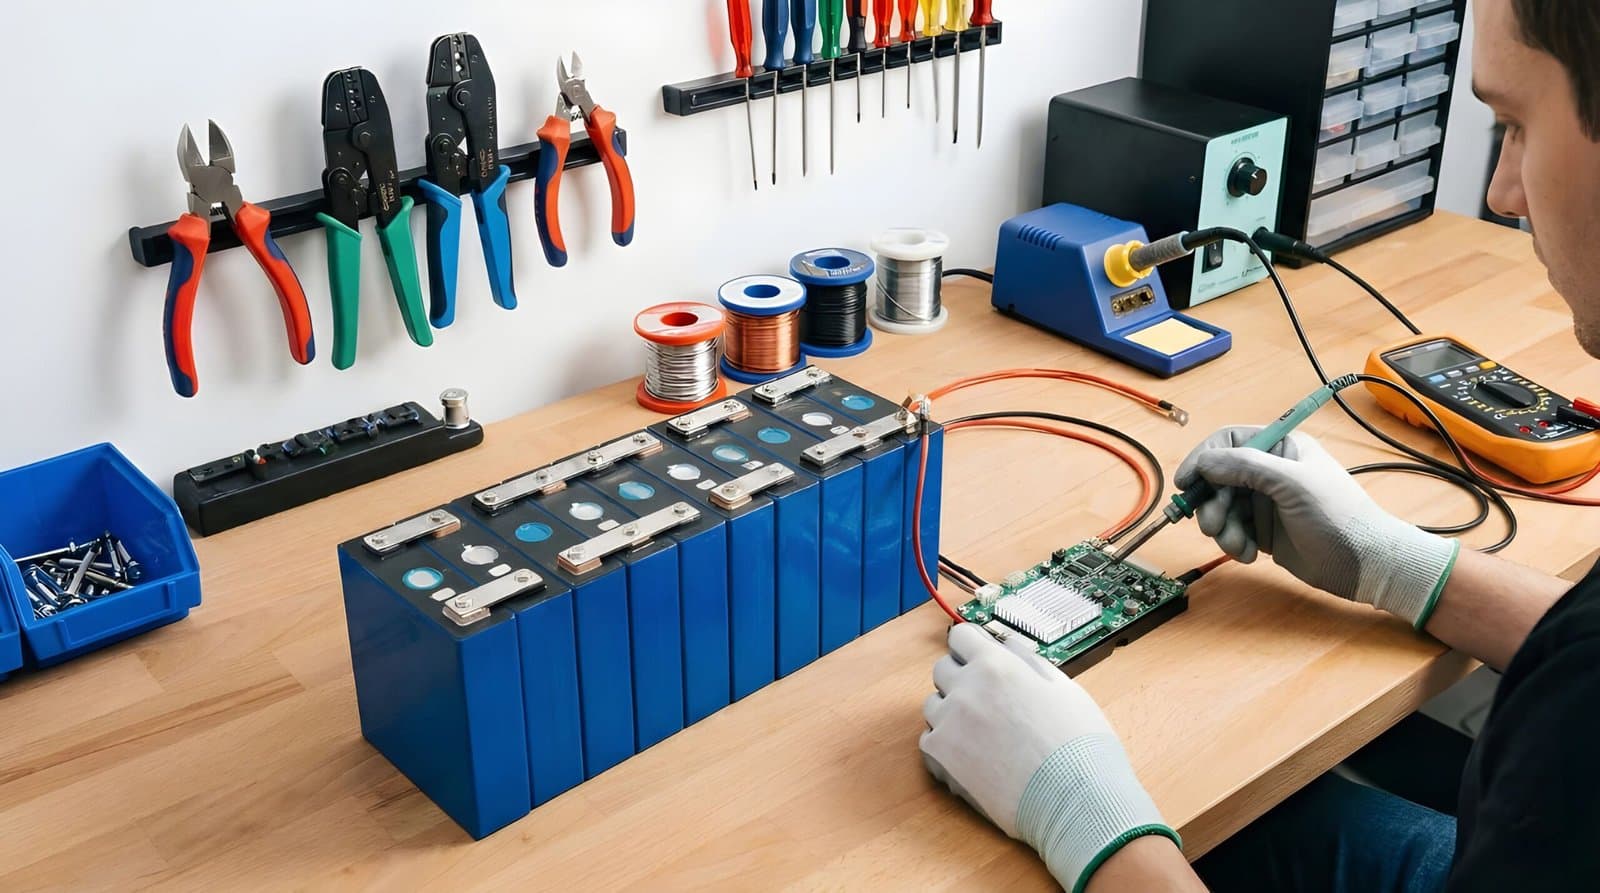
Building a DIY lithium battery pack involves connecting multiple LiFePO4 cells in series or parallel configurations, installing a battery management system (BMS), and housing the assembly in a protective enclosure. This process typically takes 4 to 8 hours for beginners and can reduce costs by 30 to 50% compared to pre-assembled systems.
LiFePO4 (Lithium Iron Phosphate) batteries are the safest lithium chemistry for DIY projects, offering 3,000 to 5,000 charge cycles and stable performance across temperatures ranging from 0°C to 45°C. These battery packs power solar energy storage systems, electric vehicles, off-grid camping setups, and backup power applications.
This guide covers essential materials (cells, BMS, battery box, inverter), step-by-step assembly procedures, safety protocols, and troubleshooting common issues. Key topics include cell testing and matching, proper BMS installation, top balancing techniques, and fire safety measures to ensure reliable long-term performance.
What Is A Lithium Battery Pack?
A lithium battery pack consists of multiple lithium cells connected together through series or parallel wiring to create a unified power unit. These battery storage systems are widely used in home solar installations, electric bikes, and off-grid camping equipment.
Why Build A DIY Lithium Battery Pack?
Several factors drive individuals toward DIY LiFePO4 battery projects:
Cost Savings: Pre-made battery packs often carry premium price tags. Building a custom pack can significantly reduce expenses.
Customization: DIY builds allow for precise sizing, whether creating a small pack for camping equipment or a large-scale system for solar backup power.
Learning Experience: Many enthusiasts enjoy understanding battery technology and developing hands-on technical skills.
Risk Considerations: Safety concerns and time investment are valid factors to consider before starting a project.

How To Build A Lithium Battery Pack (Using LiFePO4)
This section covers the detailed process of constructing a DIY LiFePO4 battery system.
Essential Materials And Tools
Selecting appropriate components is critical for project success.
Batteries
When assembling lithium batteries, several factors require attention:
Type: LiFePO4 cells (3.2V, prismatic or cylindrical) offer stability and longevity with better safety profiles than NCM chemistry for beginners.
Grade: The following table provides a reference for comparing battery grades:
Battery Parameters: Look for cells with closely matched specifications including capacity (aim for less than 5% variance, such as 95Ah to 100Ah in a 100Ah pack), internal resistance (difference less than 1mΩ), and self-discharge rate (test over 72 hours). Mismatched cells age unevenly and can cause packs to lose 20% capacity within months because one underperforming cell degrades the entire system. When salvaging used cells, verify their cycle history because pairing a 200-cycle cell with a 50-cycle cell creates instability.
Safety Certifications: UL or CE labels indicate quality standards. Certified cells avoid overheating and failure issues common with uncertified products.
BMS (Battery Management System)
Purpose: This circuit board prevents overcharging, over-discharging, and short circuits. Without proper BMS protection, cells risk damage or fire hazards.
Types: Active balancing provides greater efficiency for packs exceeding 100Ah but requires precise voltage sensing. Passive balancing may need manual intervention if cell divergence exceeds 50mV. Unbalanced packs lose efficiency when cells operate at different voltage levels (one cell at 4V, others at 3V).
Top Balance: Charge all cells to 3.65V before initial use. Solar system builders favor this method for consistency. Skipping this step can lead to underperformance.
Bottom Balance: Discharge to the same low voltage instead. This method is rare and preferred by some low-power device builders. However, it can negatively impact high-drain setups, making top balancing the recommended approach for most applications.
Battery Box (DIY LiFePO4 Battery Box)
Materials: High-temperature plastic, aluminum, or 3D-printed cases. Plastic offers lightweight portability while metal provides durability.
Design Requirements: Ventilation prevents heat buildup (overheating reduces lifespan); waterproofing prevents corrosion; shock resistance protects cells from impact damage. Poor-quality boxes can melt or crack under stress.
Inverter
Purpose: Converts DC to AC for appliances. Only required for AC loads; DC setups do not need inverters.
Necessity: Only for AC power needs. Home backup systems require inverters while EV builds typically do not. Mismatching wattage (using a 500W inverter on a 1000W load) causes equipment failure.
Selection: Match the pack’s output capacity (for example, 1000W for 12V 100Ah systems).
Tools And Accessories
Tools: Multimeter (voltage checking), soldering iron (electrical connections), screwdriver (assembly). Testing equipment is essential for troubleshooting.
Accessories: Nickel strips (for welding), heat shrink tubing (insulation), terminal connectors, wires. Use proper gauge wiring to prevent overheating issues.
Step-By-Step DIY Process
This detailed assembly process provides the framework for successful builds.
Plan Your Requirements
Calculate voltage requirements (for example, 4 cells in series equals 12.8V) and capacity needs (for example, 100Ah cells in parallel equals 100Ah). Design the setup based on intended use whether for solar applications, camping, or other applications. For more project resources, consult technical documentation. Then select matching LiFePO4 cells from a reliable supplier.
Test Cells
Connect each cell to a testing device and check:
Capacity: Charge to 3.65V, discharge to 2.5V, and record Ah rating. Perfect matches are uncommon; aim for 2 to 5% variance (for example, 98 to 102Ah for 100Ah cells, per industry standards). Wider gaps (10% or more) cause pack imbalance.
Internal Resistance: Use a meter (aim for less than 1 mΩ difference). High resistance generates heat and power loss, which can lead to pack failure.
Voltage: Resting voltage should be similar (for example, 3.2 to 3.3V). Cells with significantly different voltages fail prematurely.
Connect Batteries
Series: Stack cells (positive to negative) for higher voltage (for example, 4S equals 12.8V).
Parallel: Link all positives and negatives for increased capacity (for example, 4P equals 400Ah).
Spot weld nickel strips (soldering carries higher risk because overheating damages cells). Verify polarity with a multimeter because reversed connections cause sparks and damage.
Install BMS
Select a BMS appropriate for the configuration (for example, 4S 100A for 12V 100Ah). Wire B minus to battery negative, P minus to load, following the provided diagram. Test by charging to 14.6V to verify cutoff, then discharge to check low-voltage protection. Incorrect wiring eliminates protection and destroys the pack.
Build The Battery Box
Arrange cells securely in the DIY LiFePO4 battery box. Drill ventilation holes (heat damages cells), add padding (vibration causes cracks), and seal edges (moisture causes failure). Test the fit because loose cells can shift and create short circuits.
Fire Safety:
- Line the battery box with fire-resistant materials (for example, ceramic fiber blanket)
- Keep a Class D fire extinguisher nearby for lithium battery fires
- Never solder directly to cells; use spot welding to avoid heat damage (temperatures above 150°C degrade LiFePO4)
Add Inverter (If Needed)
Connect to BMS output (positive to positive, negative to negative). Test with a small load (for example, 60W bulb) to confirm operation. Overloading equipment (for example, 1000W on a 500W inverter) causes failure; scale up gradually.
Test The System
Measure pack voltage (for example, 12.8V for 4S configuration). Charge fully (14.6V), discharge with a load (for example, 100W), and monitor temperatures (above 50°C indicates problems). Check each cell’s voltage because significant gaps indicate faulty connections. Adjust and retest because rushing through this process causes pack failure.

Solar Permit Solutions
DIY Solar? We Handle the Permits.
You install the panels — we design the permit-ready plan set your building department requires. Fast, affordable, all 50 states.
Key Precautions For A Safe DIY Battery Pack
Safety considerations are essential for successful battery pack assembly:
Connections: Secure terminals tightly because loose connections cause sparks or power loss.
BMS Matching: Incorrect specifications (for example, 50A BMS on 100A load) fail to provide adequate protection.
Temperature: Operating range of 0 to 45°C is safe; overheating accelerates cell aging while cold reduces capacity.
Maintenance: Monthly voltage checks and clean terminals prevent issues because dusty contacts overheat.
Safety: Use fireproof storage, proper insulation, and avoid creating short-circuit conditions. For residential installations, ensure compliance with local permit requirements. Understanding Texas regulations or California requirements helps ensure proper documentation.
Pre-assembled battery packs offer alternatives for those who prefer ready-made solutions. These packs save time (no assembly required), come professionally tested (stable and safe), and include warranties (eliminates troubleshooting challenges). For professional solar system design with integrated battery storage, consulting with experts ensures proper permitting and installation standards. Need assistance? Contact specialists for guidance.
Conclusion
Lithium battery pack DIY projects, including building a DIY LiFePO4 battery box, present both challenges and rewards. Testing every step and prioritizing safety produces reliable DIY LiFePO4 battery systems. Starting small, learning progressively, and documenting results helps build expertise in battery assembly. For complex installations requiring professional oversight, Solar Permit Solutions offers comprehensive design and permitting services for residential and commercial projects.
FAQs
- Capacity variance stays under 5%
- Internal resistance variance stays under 10%
- Identical chemistry is confirmed (all LiFePO4, no LFMP variants)
- Complete top-balancing is performed before first use