
Quick Answer: Solar panel wiring (stringing) connects modules together to create an electrical circuit that powers your inverter. You can wire panels in series (voltage adds up, current stays constant) or parallel (current increases, voltage stays constant). The best configuration depends on your inverter specifications, shading conditions, and local electrical codes, with most residential systems in the U.S. capped at 600V.
Recommendation: Useseries wiring for unshaded installations where you need higher voltagefor string inverters. Use parallel wiring for shade-prone areas or whenusing PWM charge controllers. For systems with 6+ panels, consider a series-parallelhybrid configuration to balance voltage requirements with shade tolerance.
What You’ll Learn in This Guide:
- Essential electrical terms: voltage, current, and power in solar systems
- Step-by-step instructions for wiring solar panels in series vs. parallel
- Critical inverter specifications you must know before stringing
- How temperature and shading affect system voltage and performance
- Advanced optimization techniques, including inverter clipping and MPPT configuration
- Common wiring mistakes that cause underperforming systems
Why This Matters: Incorrect string configuration can cause your system to underproduce significantly, either by exceeding your inverter’s maximum voltage (limiting output and potentially shortening equipment life) or falling below the minimum start voltage (preventing the inverter from operating at all). Understanding these principles ensures you design systems that maximize energy production while meeting all safety codes and equipment specifications.
Who Should Read This: Solar installers, system designers, DIY solar enthusiasts, and anyone learning the fundamentals of photovoltaic system configuration.

Understanding Voltage
Voltage, shortened to V and expressed in volts, represents the electrical charge differential between two circuit points. This charge difference drives electrical flow. Voltage quantifies potential energy, or the possible amount of energy available for release.
Within a solar array, multiple variables influence voltage. Primary among these is the sunlight intensity (irradiance) striking the array. Predictably, increased irradiance on the modules results in elevated voltage.
Temperature plays a role in voltage as well. Rising temperatures decrease the energy a module generates (refer to our Temperature Coefficients article for comprehensive coverage of this phenomenon). During cold, bright days, a solar array’s voltage can exceed typical levels substantially, whereas extremely hot conditions may cause notable voltage reduction.
Defining Electrical Current
Electrical current (denoted as “I” in formulas) describes the flow rate of electrical charge.
In our previous analogy, water streaming through the pipe from the reservoir parallels current in an electrical system. Electrical current is quantified in amps (amperes abbreviated).
Explaining Electric Power
Power (P) represents the energy transfer rate. It equals voltage multiplied by current (V*I = P) and is quantified in Watts (W). In solar photovoltaic installations, the inverter serves a crucial role, beyond converting DC power from the solar array into AC power for household use and grid connection, by optimizing array power output through current and voltage adjustments.
Solar Permit Solutions
Need Solar Permit Plans?
Professional, permit-ready solar plan sets delivered fast. Residential and commercial projects across all 50 states.
Core Principles of Solar Panel Connections (String Configuration)
To establish a working solar photovoltaic installation, you must connect the modules together to form an electrical pathway for current transmission and also link the modules to the inverter that transforms the DC electricity generated by the modules into AC electricity suitable for household consumption and grid integration. Within the solar sector, this process is commonly called “stringing,” and each connected series of modules is termed a “string.”
This guide will concentrate on string inverters (rather than microinverters). Every string inverter functions within a specified voltage range.
Required Wiring Components for Solar Panels
When connecting solar modules, particular cable types and connectors are essential to complete the installation properly. These components include:
PV Wire or Solar Cable: These cables interconnect the solar modules in what we’ve described as stringing.
MC4 Connectors: These connectors serve as the industry standard for solar module installations.
Wire Management Clips or Zip Ties: To maintain wire security and protect against potential harm, wire management clips and zip ties are commonly employed.
Circuit Breakers or Fuses: These devices deliver overcurrent protection. The precise size and variety depend on your installation’s components and voltage requirements.
Charge Controller and Inverter Cables: These cables are essential for connecting the charge controller to the battery system.
Keep in mind that the varieties and gauges of wiring required depend significantly on your installation’s particular design. Always reference the system specifications or seek guidance from a professional solar installation expert for optimal outcomes.

Series vs. Parallel String Configurations
Multiple approaches exist for solar panel wiring. A critical distinction to grasp is connecting solar modules in series compared to connecting solar modules in parallel. These varied string configurations produce different impacts on the electrical current and voltage within the circuit.
Connecting Solar Panels in Series
Connecting solar modules in series means linking each module to the subsequent one in a line.
Similar to a standard battery you might recognize, solar modules feature positive and negative terminals. When configuring in series, the wire from one solar module’s positive terminal connects to the following module’s negative terminal and continues this pattern.
When configuring modules in series, each added module contributes to the string’s overall voltage (V) while the current (I) throughout the string stays constant.
A disadvantage to series configuration is that a shaded module can diminish the current flowing through the complete string. Since the current maintains consistency throughout the entire string, it drops to match the module with the weakest current. (Note: Practically speaking, most solar modules include bypass diodes that permit current to bypass a shaded module.)
Connecting Solar Panels in Parallel
Configuring solar modules in parallel (displayed in the diagram above) is somewhat more complex. Instead of linking one module’s positive terminal to the next module’s negative terminal, when configuring in parallel, the positive terminals of all string modules connect to a single wire, and the negative terminals all connect to a separate wire.
When configuring modules in parallel, each added module boosts the circuit’s current (amperage), yet the circuit’s voltage stays unchanged (matching each module’s voltage). Due to this characteristic, an advantage of parallel configuration is that if one module experiences heavy shading, the remaining modules can function normally and the entire string’s current won’t be diminished.
How to Wire Solar Panels in Series: Step-by-Step
1. Verify panel specifications. Check each panel’sVoc (open circuit voltage) and Isc (short circuit current) on the manufacturerlabel. All panels in a series string should have identical specifications.
2. Calculate maximum string voltage. Multiply panel Voc x number of panels. Example: 10 panels x 40V Voc = 400V. Ensure this stays below your inverter’s maximum input voltage and NEC limits (600V residential).
3. Connect positive to negative. Using MC4connectors, connect the positive (+) terminal of the first panel to the negative (-) terminal of the second panel. Continue this daisy-chain pattern through all panels.
4. Terminate the string. At the end of your string, you’ll have one free positive wire (from the last panel) and one free negative wire (from the first panel). These connect to your inverter or charge controller.
5. Verify connections with a multimeter. Measure DC voltage across the string terminals. The reading should approximately equal your calculated string voltage (may vary based on sunlight conditions).
How to Wire Solar Panels in Parallel: Step-by-Step
1. Verify panel specifications. All panels should have the same voltage rating. Mismatched voltages in parallel will cause the higher-voltage panels to push current into lower-voltage panels, reducing efficiency and potentially causing damage.
2. Calculate total current output. Multiply panelIsc x number of panels. Example: 10 panels x 10A Isc = 100A total. Ensure you wire gauge and charge controller can handle this amperage.
3. Use a combiner box or branch connectors. Connectall positive (+) terminals together using a PV combiner box or MC4 branchconnectors. Do the same for all negative (-) terminals.
4. Install fuses on each parallel string. NECrequires overcurrent protection when three or more strings are paralleled.Install appropriately rated fuses (typically 1.25 x Isc, rounded up to standardfuse size) on each string’s positive conductor.
5. Connect to charge controller or inverter. Thecombined positive and negative outputs connect to your equipment. Verifyvoltage matches panel voltage and amperage is within equipment ratings.
Wire Sizing Guide for Solar Installations
Selecting the correct wiregauge is critical for system safety, efficiency, and NEC compliance. Undersizedwiring causes voltage drop, overheating, and potential fire hazards. Oversizedwiring increases costs unnecessarily. Use this guide to select appropriate wiregauges based on your configuration and current requirements.
Solar Panel Wire Sizing Chart by Configuration
Voltage Drop Calculation
NEC recommends voltage drop notexceed 3% for branch circuits (maximum 5% total). Calculate voltage dropusing:
VoltageDrop = (2 x Length x Current x Resistance) / 1000
Where Length is one-waydistance in feet, Current in amps, and Resistance per 1000 ft (10 AWG copper =1.02 ohms, 8 AWG = 0.64 ohms, 6 AWG = 0.40 ohms). If voltage drop exceeds 3%, increasewire gauge by one size.
Important:Always use PV-rated wire (USE-2, PV Wire, or XLPE) for outdoor solarinstallations. Standard THHN wire is not rated for direct sunlight exposure andwill degrade.
Step-by-Step Process: Essential Information for Solar Panel String Configuration
Multiple critical data points regarding your inverter and solar modules must be gathered before you can establish how to configure your solar array strings.
Inverter Specifications
You’ll need to identify the following inverter characteristics (these details are available in the manufacturer’s product datasheet):
Maximum DC Input Voltage (Vinput, max): the upper voltage limit the inverter can accept
Minimum or “Start” Voltage (Vinput, min): the voltage threshold required for inverter activation
Maximum Input Current: the energy capacity the inverter can process before failure
Number of Maximum Power Point Trackers (MPPTs): How many MPPTs does the unit contain?
Understanding MPPTs
As previously mentioned, inverters function to optimize power generation as environmental conditions affecting the modules fluctuate. They accomplish this through Maximum Power Point Trackers (MPPTs), which determine the current and voltage levels where power reaches its peak.
Nevertheless, for any specific MPPT, the conditions across the modules must remain relatively uniform, or performance will decline (for example, variations in shading levels or module orientation).
It’s equally significant to recognize that when the inverter contains multiple MPPTs, module strings experiencing different conditions can be linked to a distinct MPPT.
Solar Module Specifications
Beyond the inverter data mentioned above, you’ll also require the following information on your chosen modules:
Open Circuit Voltage (Voc): the peak voltage that module can generate under no-load conditions
Short Circuit Current (Isc): the current flowing through the cell when voltage reaches zero (though we won’t explore current calculations in this guide)
A crucial aspect to comprehend about these figures is that they derive from the module’s performance under what’s termed Standard Test Conditions (STC).
STC encompasses an irradiance of 1000 W per square meter and 25 degrees Celsius (~77 degrees F). These particular laboratory conditions ensure testing consistency, but the actual environmental conditions a photovoltaic installation encounters may differ substantially.
Consequently, the real current and voltage of the modules may diverge considerably from these figures.
You’ll need to modify your calculations according to the anticipated minimum and maximum temperatures at the module installation location to confirm that your string lengths suit the conditions the photovoltaic installation will face, as we’ll explore below.
Fundamental Guidelines for Solar Panel Wiring
1. Maintain Voltage Within Inverter Operating Parameters
Prevent the strings you’re linking to the inverter from surpassing the inverter’s maximum input voltage or maximum current or from dropping below its minimum/start voltage threshold.
Confirm that the maximum voltage adheres to local code regulations in your design area.
In the United States, the National Electrical Code restricts the maximum permissible voltage to 600V for most residential installations. In Europe, elevated voltage levels are permitted.
Expert Tip: Avoid Relying Exclusively on STC Values for Voltage Range Calculation
We understand that voltage accumulates additively in series strings while current accumulates additively in parallel strings. Accordingly, you might logically presume that you can establish the voltage of your planned photovoltaic system design and whether it remains within the suggested inverter range by multiplying the module voltage by the quantity in a series string. You might also presume that you could establish the system current by summing the current of each parallel string (which would equal the module current multiplied by the quantity in the parallel string).
Nevertheless, as we explored earlier, since STC values represent the modules’ performance under highly specific conditions, the real voltage of the modules in actual operating conditions may differ substantially.
Therefore, the basic calculations derived from STC values only provide an initial approximate estimate; you must factor in how the system voltage will fluctuate based on the temperatures it may encounter in the installation location. At lower temperatures, the system voltage may be significantly elevated; at elevated temperatures, it may be considerably reduced.
To guarantee that the temperature-adjusted string voltage remains within the inverter’s input voltage window, it will necessitate a more complex formula, like those presented below:

If these formulas appear somewhat confusing, don’t be concerned; modern solar design software automatically executes these calculations and notifies you during the design process if your string lengths are excessive or insufficient given the anticipated temperatures at the location. (For additional information on stringing configurations, consult relevant help center resources.)
Advanced solar software also conducts numerous other validations to confirm that the system will follow the correct operational sequence for solar installations and not breach codes or equipment specifications; this can prevent expensive performance problems and ensure complete project approval.
Real-World Example of Underperforming Photovoltaic Systems
For a practical illustration of why accurately accounting for how environmental conditions will impact your photovoltaic system’s voltage is crucial, examine our analysis of an underperforming installation in Cathedral City, California. In that scenario, a solar designer’s failure to account for the presence of shading resulted in the system regularly falling below the inverter’s start voltage and consequently generating substantially less energy than projected.
2. Confirm Strings Have Similar Conditions or Link Strings with Different Conditions to Separate MPPT Ports
After you’ve established that your strings are appropriate lengths for the inverter specifications, another critical consideration is that the strings experience the same conditions (e.g., same azimuth/orientation, same tilt, same irradiance) if they’re linked to the same inverter MPPT.
Discrepancies in the conditions across the strings will diminish the efficiency and power generation of your solar design. For an exploration of why mismatches in shading, orientation, or azimuth cause lost power generation, consult our Guide to PV System Losses.
If you’re designing for a location where it’s essential to have modules on different roof surfaces, or certain areas of the array will receive more shade than others, you can guarantee that the modules with different conditions are divided into their own strings, and then those strings are linked to separate MPPTs of the inverter (assuming your selected inverter has more than one MPPT).
This will enable the inverter to confirm each string functions at the point where it generates the maximum power. Understanding how to make solar accessible to all communities, including bringing benefits to low-income consumers, is also essential for designers working on diverse projects.
3. Advanced Considerations to Enhance Your Design
The preceding guidelines will confirm that your stringing configuration will meet the specifications of your inverter and that the energy generation of the system won’t be adversely impacted by mismatches in the conditions across the modules.
Nevertheless, there are supplementary factors that a solar designer can evaluate to achieve the optimal design (that is, the design that maximizes energy generation while minimizing cost). These factors encompass inverter clipping, the utilization of module-level power electronics (MLPE), devices that include microinverters and DC optimizers, and design efficiency delivered by software tools.
Inverter Clipping
Sometimes it may be logical to oversize the solar array that you’re linking to the inverter, leading to a theoretical maximum voltage that is slightly elevated above the inverter max. This may enable your system to generate more energy (because there are more modules) when it is below its maximum voltage, in exchange for reduced (“clipped”) generation during the periods when the DC voltage of the array surpasses the inverter’s maximum.
If the generation gains surpass the generation lost to inverter clipping, then you can generate more power without purchasing an additional inverter or one with a higher voltage rating.
Naturally, this decision should be made with caution and a thorough understanding of how much generation will be clipped compared to how much additional generation will be gained at other periods.
In its system loss diagram, advanced solar software indicates how much energy will be lost to clipping so that you can make an informed decision about whether this is sensible. For a comprehensive explanation of inverter clipping and when a system with inverter clipping is sensible, review relevant blog articles on the subject.
Microinverters
String inverters aren’t the only inverter choice. Microinverters, which are inverters that attach to each individual module (or a couple), enable each module to function at its maximum power point regardless of the conditions on other modules. In this arrangement, one need not be concerned about confirming modules on the same string have the same conditions. Microinverters can also facilitate adding more modules in the future.
Explore Several Different Options to Identify the Best One
As you can observe, there are numerous considerations when it comes to stringing your modules and identifying the inverter and stringing configuration that is optimal for the customer.
You may not achieve the optimal design the first time around, so it can be beneficial to assess several different options. In order for this to be efficient, however, you’ll need a process where you can assess multiple designs rapidly. This is where solar design services can be particularly valuable.
Let Solar Software Handle the Stringing for You
Finally, technology like automated stringing functionality in modern solar design platforms can handle the stringing for you! It will take into consideration the factors discussed here and present you with an ideal stringing configuration.

7 Common Solar Wiring Mistakes That Kill System Performance
Avoid these costly wiringerrors that cause underperforming systems, failed inspections, and potentialsafety hazards:
1. Mixing Mismatched Panels in Series
The Problem: Connectingpanels with different wattages or current ratings in series causes the entirestring to operate at the level of the weakest panel. A single 250W panel in astring of 400W panels limits the entire string to 250W output per panel.
TheFix: Always use identical panels (same manufacturer, model, andwattage) within each series string. If you must mix panels, connect differentpanel types in separate parallel strings.
2. Exceeding Inverter Maximum Voltage
The Problem: Designingstring voltage based only on STC (Standard Test Conditions) without accountingfor cold weather voltage rise. On cold, sunny days, voltage can exceed ratedVoc by 10-20%, potentially exceeding inverter limits and causing shutdown ordamage.
The Fix: Calculate maximum voltage using the coldest expectedtemperature and your panel’s temperature coefficient. Formula: Vmax = Voc x [1+ (Temp Coefficient x (Lowest Temp – 25C))]. Leave 10% safety margin belowinverter maximum.
3. Undersized Wiring for Parallel Configurations
The Problem: Using the same wire gauge for parallel strings as series strings. Parallel wiring accumulates current. Four 10A strings combined equals 40A, which exceeds the30A rating of 10 AWG wire.
The Fix: Calculate total combined current and size main conductors accordingly. Use 8 AWG for up to 50A, 6 AWG for up to 65A. Also account for voltage drop on longer runs by upsizing one gauge.
4. Skipping Fuses on Parallel Strings
The Problem: NEC 690.9requires overcurrent protection when three or more strings are paralleled. Without fuses, a fault in one string can cause other strings to back feed current into the fault, creating fire risk.
The Fix: Install a fused combiner box with appropriately rated fuses(typically 1.25 x Isc, rounded up to standard fuse size) on each string’s positive conductor. Use touch-safe fuse holders rated for DC voltage.
5. Loose or Improperly Crimped MC4 Connections
The Problem: MC4connectors that are not fully clicked together or have poorly crimped terminals create high-resistance connections. This causes arcing, heat buildup, power loss, and potential fire. This is a leading cause of solar installation failures.
The Fix: Use proper MC4 crimping tools (not standard electrical crimpers). Ensure connectors click audibly and cannot be pulled apart by hand. Perform pull tests on all connections. Inspect annually for signs of heat damage or discoloration.
6. Ignoring Shading in Series String Design
The Problem: Designing series strings without considering seasonal shading patterns. A single shaded panel can reduce entire string output by 30-50% due to the ‘Christmas lighteffect.’ The shaded panel becomes a bottleneck limiting current through all panels.
The Fix: Conduct a shade analysis using tools like PVsyst or Aurora Solar before finalizing string design. Group panels with similar shading conditions on the same string. For partially shaded arrays, consider parallelwiring, microinverters, or DC optimizers.
7. Using PWM Controller with Series-Wired Panels
The Problem: PWM (PulseWidth Modulation) controllers reduce panel voltage to match battery voltage,wasting any excess. A series string at 120V connected to a PWM controllercharging a 48V battery loses over 60% of potential power.
The Fix: Use MPPT (Maximum Power Point Tracking) controllers withseries-wired panels. They convert excess voltage to usable current with 94-99%efficiency. Reserve PWM controllers only for small, parallel-wired systemswhere panel voltage closely matches battery voltage.
Conclusion
- You can connect solar modules in a series or parallel, which is superior depends on the specific situation. In general, when there are potential shading concerns, parallel is the superior option.
- Don’t overlook the essential information you’ll need:
- Maximum DC input voltage
- Start voltage
- Maximum input current
- Number of MPPTs
- Open circuit voltage
- Short-circuit current
- We don’t suggest using basic STCs to calculate the ideal inverter range, as it can lead to underperforming systems.
- Confirm strings with similar conditions are linked to the same MPPT ports (or maintain similar conditions for all strings).
- Consider inverter clipping and microinverters as alternative options.
Understanding the principles of solar panel connections enables you to guarantee optimal designs for your solar customers. To discover more about how solar functions, how to size a solar system, how to mitigate shading losses, and more, continue exploring available resources.
FAQs
Ready to ensure your solar project meets all electrical and permitting requirements? Whether you need residential solar design, commercial solar design, or help navigating common permit mistakes, our team at Solar Permit Solutions is here to help. Contact us today to streamline your solar permit processing and ensure your system is designed for maximum performance. For state-specific guidance, explore our Texas solar permit requirements, California solar permit guide, and comprehensive permit application steps. Learn about solar incentives available in your area and find valuable information about solar industry data and installation trends to help inform your project decisions. For comprehensive information on solar incentives by state and understanding regional solar opportunities, additional resources are available to support your planning process.
Need Solar Permit Plans?
Professional, permit-ready solar plan sets delivered fast. Residential and commercial projects across all 50 states.
Frequently Asked Questions
Solar modules require wiring that is protected for outdoor use and rated to handle the system's amperage. Most modern solar module installations use single-conductor Photovoltaic (PV) wire, between 10 and 12 gauge AWG. Wiring is required to link the solar modules to the charge controller, inverter, and battery (in an off-grid system).
In terms of power generation, it is superior to connect solar modules in a parallel circuit rather than a series. Parallel solar connections allow for more independent power generation between the modules but also increase the system's upfront costs for materials and installation. To maximize electricity generation without surpassing inverter voltage ratings, some solar energy systems utilize a combination of series and parallel wiring connections. Technology such as solar optimizers and microinverters can also help maximize system efficiency.
The quantity of solar modules you can link to your inverter is determined by its wattage rating. For example, if you have a 5,000 W inverter, you can link approximately 5,000 watts (or 5 kW) of solar modules. Using 300 W solar modules, you could then link roughly 17 solar modules (5000 W / 300 W per module). Understanding proper solar system sizing is essential for optimal performance.
Although the answer is technically yes, you should never link a solar module directly to a battery. As solar power is generated at various intensities throughout the day, charge controllers (or regulators) modify the energy so that it can be efficiently stored in the battery. Using a charge controller between the solar modules and storage bank maximizes the system's generation and protects the battery from overcharging, damage, and malfunctions.
Yes, as battery technology advances, many homeowners are considering battery storage as an addition to their solar system. But, traditionally, most grid-connected solar systems didn't have battery storage. While it is impossible to operate an off-grid photovoltaic (PV) energy system without battery storage, professionally permitted and installed solar modules and inverters safely generate solar power that is distributed throughout a home and fed into the utility electrical grid.
SPS Editorial Team
Solar Permit Solutions
Solar Permit Solutions provides professional solar permit design services for residential, commercial, and off-grid installations across all 50 states. Our team ensures permit-ready plan sets delivered fast.
Related Articles
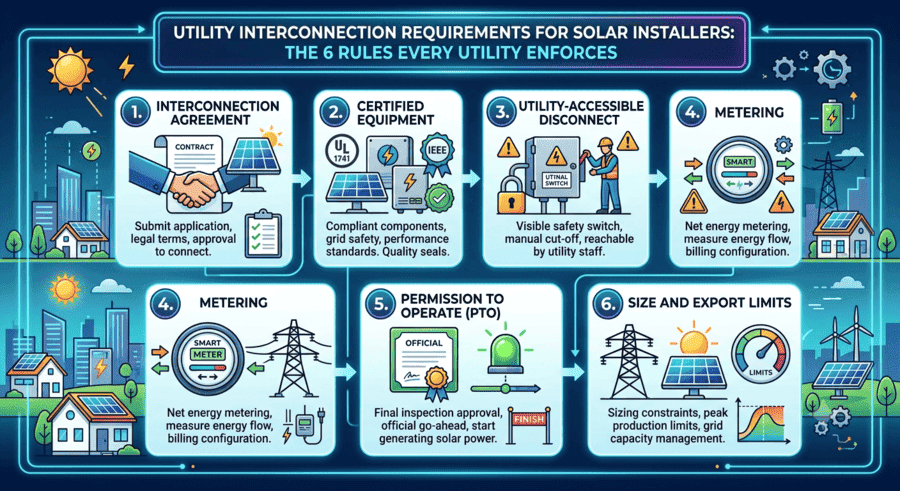
Utility Interconnection Requirements for Solar Installers: The 6 Rules Every Utility Enforces
interconnection agreement, UL 1741 and IEEE 1547 certified inverters, a utility-...
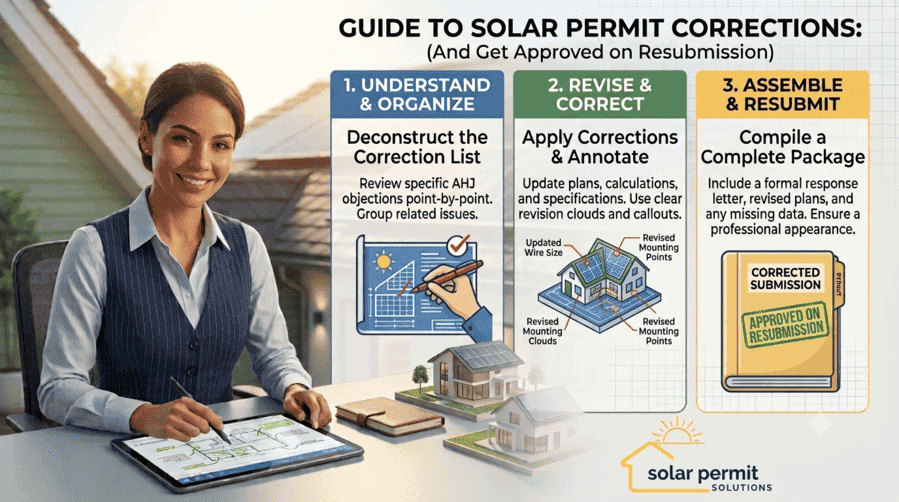
How to Respond to Solar Permit Corrections (And Get Approved on Resubmission)
To respond to a solar permit correction, read every comment from every reviewing...
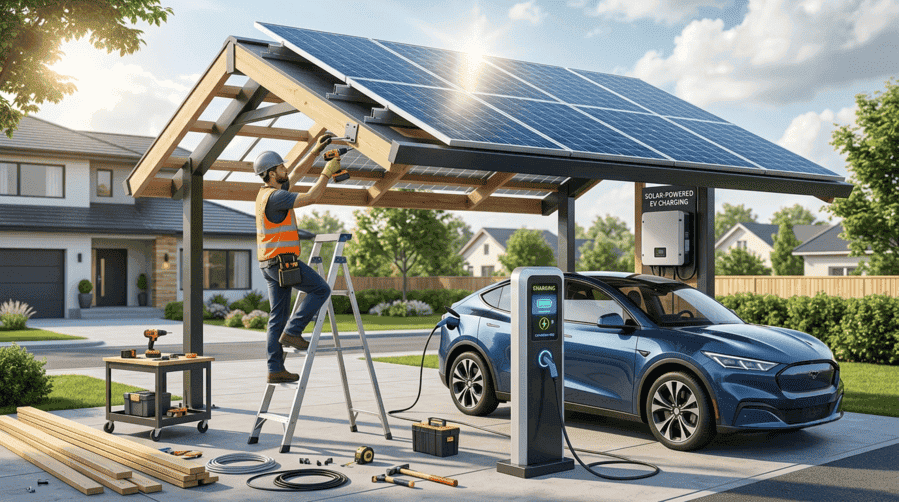
Can an EV Charging Station Be Powered by Solar? Here’s How to Build One
Yes, an EV charging station can be powered by solar. A grid-tied solar array pai...