Solar panel flashing is a waterproofing component that seals roof penetrations where solar mounting hardware is installed. This critical system prevents water infiltration that leads to structural damage, mold growth, and electrical system failures.
What does solar panel flashing cost? Installation costs range from $200-500 for a typical residential system, with aluminum flashing at $3-5 per mounting point and premium copper at $8-12 per point. Professional installation adds $5-10 per mounting point.
Why is flashing essential? Without proper flashing, water damage repairs cost between $1,000-10,000 depending on severity. Quality flashing installation protects this investment and ensures system longevity.
Key flashing materials include:
- Copper (50+ year lifespan, highest durability)
- Aluminum (20-25 years, most cost-effective)
- Stainless steel (30-40 years, ideal for coastal areas)
- Galvanized steel (high-wind resistance)
- EPDM rubber (flexible, excellent thermal expansion)
This guide covers material selection, installation techniques, maintenance requirements, and best practices for protecting solar investments through proper flashing systems.
How Solar Flashing Systems Work
Solar panel flashing works as a multi-layered waterproof barrier installed around mounting hardware that penetrates roof surfaces. The system creates a watertight seal that directs water away from penetration points while allowing the structural connection needed to secure solar panels.
Modern flashing systems integrate seamlessly with solar mounting hardware, creating a unified weatherproofing solution. The flashing typically consists of a base layer that goes under roofing materials and a top layer that covers the mounting hardware, creating what professionals call “double flashing” protection.
The key difference between solar flashing and other waterproofing methods lies in its engineered design to accommodate the specific loads and thermal expansion of solar installations. Unlike generic roof sealants, solar flashing maintains its seal integrity under the mechanical stresses of wind uplift and thermal cycling.
For retrofit installations, flashing must work around existing roofing materials, while new construction allows for integrated installation that provides superior long-term protection.
Flashing Material Options and Designs
Choosing the Right Material
Copper flashing represents the premium choice for solar installations, offering a 50+ year lifespan and superior corrosion resistance. Copper naturally forms a protective patina that enhances durability over time. Installation costs run 40-60% higher than aluminum, but the long-term value makes copper ideal for permanent installations on high-end homes.
Aluminum flashing provides the most cost-effective solution for most residential installations. Lightweight and easy to work with, aluminum flashing typically costs $3-5 per mounting point. While less durable than copper, quality aluminum flashing can last 20-25 years with proper installation and maintenance.
Stainless steel flashing offers exceptional strength and corrosion resistance, making it ideal for coastal environments or areas with extreme weather. The material requires specialized cutting tools but provides superior wind resistance and maintains its appearance over decades.
Galvanized steel flashing delivers maximum strength for high-wind areas at moderate cost. The galvanized coating provides corrosion protection, though it may require replacement sooner than stainless steel in harsh environments.
EPDM rubber and composite options represent newer technologies that combine flexibility with durability. These materials excel in thermal expansion accommodation and can be particularly effective for metal roof applications.
Flashing System Configurations
Standard flashing systems use separate base and cap pieces to create the waterproof seal. This traditional approach works well for most applications and allows for easy maintenance access.
Micro-flashing versus regular flashing represents a significant design choice. Micro-flashing uses smaller, more numerous pieces that integrate tightly with individual mounting points, while regular flashing covers larger areas with fewer pieces. Micro-flashing typically provides better long-term sealing but requires more labor to install.
Integrated flashing solutions combine mounting hardware with flashing in a single component. These systems reduce installation time and potential leak points but may limit mounting flexibility.
Tile replacement flashing specifically addresses clay and concrete tile roofs by replacing individual tiles with flashed mounting points. Available in flat, S-tile, and W-tile configurations to match existing roof profiles.
Matching Flashing to Roof Materials
Asphalt shingle installations represent the most common application, typically using compression-sealed mounts with integrated flashing. The key is ensuring proper integration with the shingle overlap pattern to maintain water shedding.
Metal roof applications require specialized flashing that accommodates thermal expansion and contraction. Standing seam metal roofs often use clamp-on systems that don’t require roof penetrations, eliminating flashing needs entirely.
Tile roof systems present unique challenges due to their three-dimensional profile. Flat tiles allow for direct flashing installation, while curved S-tiles and W-tiles require custom-shaped flashing or tile replacement systems. For complex clay tile roof installations, specialized techniques ensure both structural integrity and weatherproofing.
Shake and cedar installations need flexible flashing that can conform to the irregular surface. Lead-coated copper or EPDM rubber flashing often works best for these applications.
Low-slope and flat roof considerations require enhanced waterproofing due to reduced water shedding. These applications often benefit from membrane-style flashing systems with heat-welded seams. When roof replacement is necessary, professional roofing services can integrate solar-ready infrastructure during the installation process.

Proper Installation Techniques
New construction versus retrofit installation significantly impacts flashing strategy. New construction allows for integrated flashing installation under roofing materials, providing superior protection. Retrofit installations must work around existing materials, requiring careful sealing and integration. For homeowners considering solar, preparing homes for solar installation includes evaluating roof condition and flashing requirements.
Double flashing techniques provide maximum protection by creating redundant water barriers. The lower flashing integrates with roofing materials, while the upper flashing covers the mounting hardware. This approach virtually eliminates leak potential but increases material and labor costs.
Proper measurement and sizing ensures optimal fit and performance. Flashing should extend at least 4 inches beyond the mounting hardware in all directions on sloped roofs, with additional coverage required for low-slope applications.
Integration with mounting hardware requires careful attention to load transfer and thermal movement. The flashing must not interfere with the structural connection while maintaining complete weather sealing.
Sealant application and weatherproofing provides the final barrier against water infiltration. Use only solar-rated sealants that maintain flexibility over temperature extremes and UV exposure.
Building code standards and manufacturer guidelines vary by location and system type. Always verify local requirements and follow manufacturer specifications to maintain warranties and ensure proper performance.
Solar Permit Solutions
Need Solar Permit Plans?
Professional, permit-ready solar plan sets delivered fast. Residential and commercial projects across all 50 states.
Troubleshooting Flashing Issues
Water infiltration issues typically result from improper flashing overlap, inadequate sealant application, or thermal movement damage. Prevention requires attention to detail during installation and regular maintenance inspections.
Flashing failure modes include corrosion, thermal fatigue, and mechanical damage. Early warning signs include visible rust, cracking, or separation at seams. Address these issues immediately to prevent water damage.
Compatibility issues can arise when mixing flashing materials or mounting systems from different manufacturers. Always verify compatibility before installation and consider using complete systems from single manufacturers.
Weather-related challenges include ice dam formation, wind uplift, and thermal cycling. Design flashing systems to accommodate these stresses through proper material selection and installation techniques.
Maintenance requirements include annual inspections, sealant refresh every 5-7 years, and immediate repair of any damage. Develop a maintenance schedule to maximize flashing lifespan and prevent costly repairs.
Investment and Value Analysis
Material costs by type range from $3-5 per mounting point for aluminum flashing to $8-12 for copper systems. Stainless steel falls in the $6-9 range, while integrated systems can cost $10-15 per point.
Installation cost factors include roof complexity, accessibility, and local labor rates. Professional installation typically adds $5-10 per mounting point, but ensures proper technique and warranty coverage.
Long-term value and replacement schedules favor higher-quality materials. While copper flashing costs 60% more initially, its 50-year lifespan versus 20 years for aluminum makes it cost-effective for permanent installations.
Cost of water damage versus proper flashing investment strongly favors quality flashing. Water damage repairs average $1,000-8,000 per incident, while comprehensive flashing for a typical residential system costs $200-500.
Hiring Professionals or DIY Installation
When to hire professionals includes complex roof geometries, tile or slate roofs, and any situation where roof structural integrity is questionable. Professional installation also maintains manufacturer warranties and ensures code compliance.
DIY installation guidelines apply primarily to simple asphalt shingle roofs with straightforward mounting layouts. DIY installers must have proper safety equipment, roofing experience, and access to quality materials.
Tools and skills required include metal cutting tools, roofing experience, and understanding of water flow patterns. Improper installation can void warranties and create liability issues.
Warranty implications often require professional installation to maintain coverage. Verify warranty requirements before choosing DIY installation.
Safety considerations include fall protection, electrical safety, and proper tool use. Roof work presents significant hazards that require proper training and equipment.
Selecting Quality Flashing Products
Top-rated flashing systems include integrated solutions, versatile mounting systems, and traditional copper flashing for premium applications.
Manufacturer comparisons show various brands leading in integrated systems, excelling in versatility, and traditional suppliers providing cost-effective standard flashing.
Where to purchase includes solar supply distributors, roofing supply stores, and online retailers. Verify product authenticity and warranty coverage when purchasing.
Quality indicators include material thickness, coating quality, and manufacturer certifications. Look for products tested to relevant ASTM standards and backed by established manufacturers.

Ongoing Care and Problem Detection
Regular inspection procedures should occur annually, focusing on sealant condition, flashing integrity, and any signs of water infiltration. Use binoculars for initial assessment to avoid unnecessary roof access.
Signs of flashing problems include water stains, rust streaks, separated seams, or damaged sealant. Address any issues immediately to prevent escalation.
Repair versus replacement decisions depend on damage extent and flashing age. Minor sealant issues can be repaired, while significant corrosion or mechanical damage typically requires replacement.
Seasonal maintenance considerations include pre-winter inspections, post-storm assessments, and spring cleaning to remove debris that could trap moisture. Professional comprehensive maintenance services can ensure optimal performance and early problem detection.
Proper solar panel flashing installation represents a small fraction of total system cost but provides critical protection for the entire investment. By understanding the options, choosing appropriate materials, and ensuring proper installation, property owners can prevent costly water damage while maximizing solar system performance and longevity. Whether choosing professional installation or tackling the project independently, prioritize quality materials and proven techniques to ensure decades of reliable weather protection.
Conclusion
Protecting a solar investment starts with understanding the critical role that proper flashing plays in system longevity and performance. Quality flashing installation prevents water damage that can cost thousands to repair while ensuring decades of reliable operation. Property owners who invest in appropriate materials and professional installation techniques safeguard their systems against the elements and maximize return on investment.
Selecting the right flashing system requires careful consideration of roof type, climate conditions, and long-term property goals. Whether choosing premium copper for maximum durability or cost-effective aluminum for standard applications, the key lies in proper installation and regular maintenance. Annual inspections and timely repairs prevent minor issues from escalating into costly problems.
The solar industry continues to evolve with integrated flashing solutions that streamline installation and reduce potential failure points. These modern systems offer enhanced protection while simplifying the installation process. As solar technology advances, proper weatherproofing remains fundamental to system success, making informed flashing decisions essential for every solar project.
FAQs
Need Solar Permit Plans?
Professional, permit-ready solar plan sets delivered fast. Residential and commercial projects across all 50 states.
Frequently Asked Questions
Solar panel flashing costs range from $3-5 per mounting point for aluminum systems to $8-12 for premium copper installations. Professional installation adds $5-10 per mounting point. For a typical residential system, expect total flashing costs of $200-500, which is minimal compared to potential water damage repairs of $1,000-8,000.
Copper flashing offers the longest lifespan at 50+ years, naturally forming a protective patina that enhances durability over time. Stainless steel provides 30-40 years of service, while quality aluminum flashing typically lasts 20-25 years. The choice depends on budget, climate conditions, and long-term plans for the property.
Independent installation is possible for simple asphalt shingle roofs with straightforward layouts, but requires roofing experience, proper safety equipment, and quality materials. Complex roof geometries, tile roofs, or situations requiring structural assessment should use professional installation to maintain warranties and ensure code compliance.
Solar panel flashing should be inspected annually, with additional checks after severe weather events. Look for water stains, rust streaks, separated seams, or damaged sealant. Sealant typically needs refreshing every 5-7 years. Use binoculars for initial assessment to avoid unnecessary roof access, and address any issues immediately to prevent water damage.
Common warning signs include visible water stains on ceilings or attic spaces near mounting points, rust or corrosion on flashing surfaces, separated seams or gaps in the flashing material, cracked or deteriorating sealant, and debris accumulation around mounting hardware. Any of these indicators require immediate professional assessment to prevent extensive water damage.
Properly installed solar panel flashing should not void roof warranties when performed by qualified professionals following manufacturer guidelines. However, improper installation or unauthorized roof penetrations can compromise warranty coverage. Always consult with roofing manufacturers and solar installers before beginning work to ensure compliance with warranty terms and local building codes.
SPS Editorial Team
Solar Permit Solutions
Solar Permit Solutions provides professional solar permit design services for residential, commercial, and off-grid installations across all 50 states. Our team ensures permit-ready plan sets delivered fast.
Related Articles
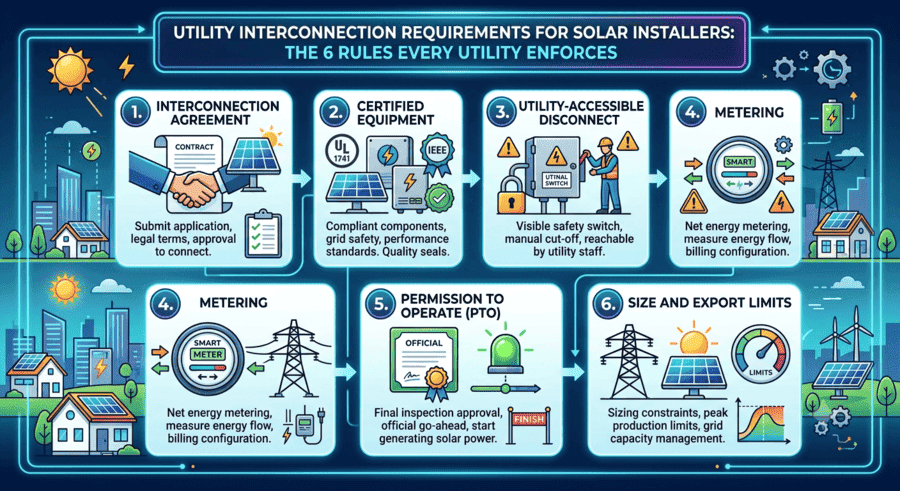
Utility Interconnection Requirements for Solar Installers: The 6 Rules Every Utility Enforces
interconnection agreement, UL 1741 and IEEE 1547 certified inverters, a utility-...
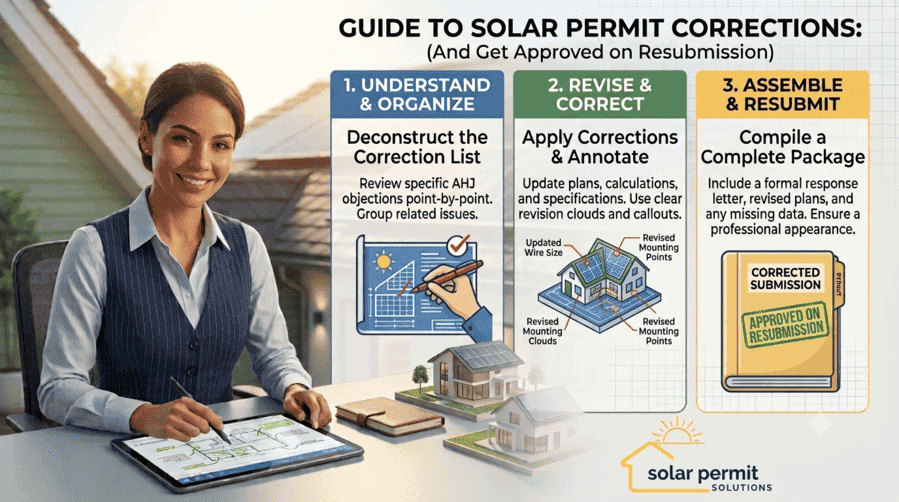
How to Respond to Solar Permit Corrections (And Get Approved on Resubmission)
To respond to a solar permit correction, read every comment from every reviewing...

Can an EV Charging Station Be Powered by Solar? Here’s How to Build One
Yes, an EV charging station can be powered by solar. A grid-tied solar array pai...