DIY solar panel installation for homes is a cost-effective alternative to professional setup, with homeowners saving 40-60% on total project costs by eliminating labor fees. A typical DIY residential solar system requires six essential components: photovoltaic panels (monocrystalline, polycrystalline, or thin-film), an inverter to convert DC to AC power, mounting hardware, electrical wiring, basic tools, and optional battery storage for off-grid capability or backup power.
To calculate your solar power needs, divide your monthly kilowatt-hour consumption by 30 for daily usage, then divide that number by your region’s average peak sun hours (3-6 hours depending on location). For example, a home using 900 kWh monthly (30 kWh daily) in an area with 5 peak sun hours needs a 6 kW system. The installation process takes 1-3 days for smaller systems and involves ten steps: selecting equipment, obtaining permits, assembling materials, mounting hardware on south-facing roof sections, positioning panels, connecting wiring, attaching the inverter, integrating battery storage (optional), establishing grid connections, and activating the system.
Key considerations include choosing quality panels from reputable manufacturers, securing proper building permits to avoid fines, selecting rigid panels for permanent rooftop installations versus portable panels for mobile applications, and sizing systems with 10-20% capacity above current needs for future growth. DIY solar systems require minimal maintenance and biannual cleaning and inspections and can generate clean energy for 25+ years with proper care.
Designing Your DIY Solar Installation
Proper planning forms the foundation of any successful DIY solar project. Rushing past this phase invites preventable errors. Confirm you’ve gathered all required materials and accurately assessed your energy requirements to ensure smooth installation. Whether planning a residential solar design or exploring off-grid solar system options, thorough preparation is essential.

Essential Equipment for Your DIY Solar Setup
Your system requires more than just panels. You’ll need power conversion equipment, hardware for mounting, electrical connections, standard tools, and energy storage if you’re seeking independence from the grid or system optimization.
- Panels: These fundamental components transform sunlight into DC power. Panel quantity and capacity dictate your generation capability. Solar collection begins when photovoltaic panels capture solar radiation. Panel efficiency varies based on manufacturing materials. Standard panel categories encompass monocrystalline, polycrystalline, and thin-film varieties. Quality matters significantly when selecting panels. Choosing an established, trusted manufacturer ensures optimal system performance. Understanding solar permit equipment specifications helps ensure your components meet local code standards.
- Inverter: This device transforms panel-generated DC power into AC current compatible with household electronics and electrical grids. Panels typically capture solar energy as DC power. Residential electrical systems operate on AC current. Inverters bridge this gap, converting solar-generated DC into household-compatible AC electricity following renewable energy best practices.
- Mounting Hardware: These fixtures anchor panels to rooftops or ground structures, maintaining stability and ideal positioning for sunlight capture.
- Electrical Connections: Cables link system components, safely transmitting power from panels through inverters and storage units (when included) and into household circuits.
- Tools: Standard equipment, including drills, screwdrivers, wire cutters, and electrical testers, is necessary for proper assembly and safe installation procedures.
- Storage Unit (Optional): Batteries retain surplus electricity for use during non-sunny periods, delivering backup capacity and enhanced independence for off-grid setups or outage protection. Off-grid installations require battery systems to store captured solar energy. Properly sized storage ensures adequate electricity availability whenever needed. A frequent misunderstanding about solar technology is its inability to function during cloudy weather or nighttime. Storage systems enable solar energy to fulfill electrical requirements regardless of time or weather conditions. Sufficient storage capacity becomes critical for off-grid living.

Determining Your Solar Power Requirements
Calculate your solar needs by identifying daily energy consumption. Review your electricity statement for monthly kilowatt-hour usage and divide by 30 for daily requirements. Monthly consumption of 900 kWh equals approximately 30 kWh daily.
Subsequently, evaluate your region’s solar production potential. Locations in sunny states like Arizona or Florida receive 5-6 peak sun hours daily, whereas Pacific Northwest regions might experience 3-4 hours. Reference solar radiation data to understand your area’s potential. Divide daily consumption by your area’s average sunlight hours to determine necessary panel output.
Consider this scenario: 30 kWh daily usage (using our previous example) with roughly 5 peak sunlight hours requires an array producing around 6 kW hourly. Select panels and storage (if desired) matching this requirement.
Expert Advice: Factor in possible future consumption growth or seasonal variations using energy efficiency guidelines.
Solar Permit Solutions
DIY Solar? We Handle the Permits.
You install the panels — we design the permit-ready plan set your building department requires. Fast, affordable, all 50 states.
Complete Installation Instructions
- Select Appropriate Solar Equipment: Account for variations by choosing systems generating moderately above daily requirements. Professional solar design services can help optimize your system sizing.
- Obtain Necessary Authorizations: Check with local authorities regarding required permits and inspection procedures. Understanding solar permitting requirements is crucial before beginning installation. State regulations vary; California solar permits differ from Texas solar permit requirements. Review this complete guide to solar permit applications to avoid delays.
- Assemble Materials: Collect all previously mentioned essential items, including panels, mounting systems, and wiring. The American Solar Energy Society provides helpful resources for DIY installers.
- Mount Panel Hardware: Safely reach your rooftop and attach mounting brackets on your home’s southern exposure.
- Position Panels: After securing mounts, install panels to complete your array.
- Install Electrical Connections: Proceed with wiring installation and panel interconnection.
- Attach Inverter: Link panel wiring to the inverter, ensuring captured energy converts to functional AC power.
- Integrate Storage and Inverter (Optional): For grid independence or reserve power during inclement weather or power failures, connect your inverter to battery storage.
- Establish Grid and Household Connections: Grid connection remains optional. Contact your power company for proper equipment integration assistance. Grid-independent systems still require household electrical system connection for appliance operation. The IEEE Power & Energy Society resources offer guidance on grid interconnection procedures.
- Initialize System Operation: Power up your installation and verify functionality. Upon successful testing, begin enjoying your clean energy source!
Frequent DIY Solar Installation Mistakes
- Incorrect Panel Selection: Rooftop installations demand rigid panels designed for permanent mounting. Conversely, mobile applications like van conversions require portable options.
- Inadequate System Capacity: Verify your array sufficiently covers energy requirements with capacity for future expansion. Commercial solar design projects typically require more sophisticated capacity planning.
- Prioritizing Low Cost: Economical panels don’t guarantee value. Higher-priced panels typically offer superior construction, greater efficiency, and extended longevity. Global energy development research emphasizes quality in renewable installations.
- Permit Negligence: Bypassing authorization processes risks penalties, project delays, or mandatory system removal. Avoid common solar permit mistakes by completing proper paperwork. Learn to streamline solar permit processing for faster approval.
- Maintenance Oversight: Twice-yearly servicing and cleaning maintains proper panel operation and maximizes system lifespan. Consult renewable energy trends to understand weather patterns affecting maintenance schedules.
Conclusion
Embarking on a DIY solar installation journey empowers you to take control of your energy future while significantly reducing electricity costs. While the process requires careful planning, attention to detail, and a commitment to following safety protocols, the rewards extend far beyond financial savings. You’ll gain valuable hands-on experience, a deep understanding of your home’s energy system, and the satisfaction of contributing to environmental sustainability through renewable energy.
Remember that successful DIY solar installation hinges on three critical factors: thorough upfront planning, selecting quality components from reputable manufacturers, and adhering to local regulations and building codes. Don’t rush through any phase of the project, and never hesitate to consult with professionals when facing complex electrical work or structural concerns. For assistance with permit requirements, Solar Permit Solutions offers expert guidance. Whether you’re aiming for complete energy independence or simply want to supplement your grid power, your DIY solar system represents a long-term investment in both your property and our planet’s future. With proper installation and regular maintenance, your system will deliver clean, renewable energy for decades to come.
For additional resources, visit our blog or contact our team with questions. Understanding permit requirements nationwide ensures regulatory compliance.
FAQs
DIY Solar? We Handle the Permits.
You install the panels — we design the permit-ready plan set your building department requires. Fast, affordable, all 50 states.
Frequently Asked Questions
Installation timeframes vary depending on system size and complexity, but most homeowners complete DIY solar installations within 1-3 days for smaller systems and up to a week for larger arrays. This timeline includes mounting hardware installation, panel positioning, electrical connections, and system testing. However, the planning phase, including permit acquisition, equipment selection, and site assessment, can take several weeks. First-time installers should allocate extra time for learning and troubleshooting. Breaking the project into manageable phases over multiple weekends is often the most practical approach for those balancing installation with other responsibilities.
Absolutely. DIY solar installation can reduce total project costs by 40-60% compared to professional installation, primarily by eliminating labor charges that typically account for 10-30% of total system costs. A professionally installed residential system might cost $15,000-$25,000, while purchasing the same equipment and installing it yourself could cost $6,000-$12,000. However, consider your skill level, available time, and comfort with electrical work. If mistakes occur due to inexperience, repair costs and potential safety hazards could offset savings. Additionally, some professional installers offer warranties and guarantees that DIY systems lack, so weigh immediate savings against long-term peace of mind.
While professional expertise isn't mandatory, successful DIY solar installation requires basic construction skills, electrical knowledge, and comfort working at heights. You should understand fundamental electrical concepts like voltage, current, and circuit safety. Familiarity with power tools, roofing work, and reading wiring diagrams is highly beneficial. If you've successfully completed home improvement projects like installing ceiling fans, running electrical circuits, or roofing repairs, you likely possess the foundational skills needed. Many manufacturers provide detailed installation manuals and video tutorials to guide you through each step. However, if you're uncomfortable with any aspect, particularly electrical connections, consult or hire a licensed electrician for those specific portions while handling mechanical installation yourself.
This depends entirely on your existing roof warranty terms and how you execute the installation. Many roof warranties contain clauses about penetrations and modifications, and improper solar panel mounting that damages roofing materials can void coverage. To protect your warranty, carefully review your roofing warranty documentation before beginning installation. Use proper flashing and sealing techniques around all roof penetrations to prevent leaks. Consider using mounting systems specifically designed to minimize roof damage. Some homeowners opt for ballasted mounting systems that don't require roof penetrations, though these work best on flat roofs. If concerned, contact your roofing manufacturer beforehand to understand their policies and obtain guidance on approved installation methods that preserve warranty coverage.
DIY solar systems are remarkably low-maintenance, typically requiring attention only twice annually plus occasional visual inspections after severe weather. Basic maintenance includes cleaning panels to remove dust, pollen, bird droppings, and debris that reduce efficiency. Simply rinse with water using a soft brush or squeegee, avoiding abrasive materials that scratch surfaces. Inspect all electrical connections for corrosion or looseness, checking that wiring remains secure and weatherproofing stays intact. Examine mounting hardware for rust or instability, and trim nearby vegetation that creates shading. Monitor your system's performance output regularly; significant drops may indicate issues requiring attention. Check inverter displays for error messages. Most importantly, inspect for physical damage like cracks or hot spots on panels. While professional servicing isn't usually necessary, scheduling an electrician's inspection every 3-5 years provides added assurance your system operates safely and efficiently.
SPS Editorial Team
Solar Permit Solutions
Solar Permit Solutions provides professional solar permit design services for residential, commercial, and off-grid installations across all 50 states. Our team ensures permit-ready plan sets delivered fast.
Related Articles
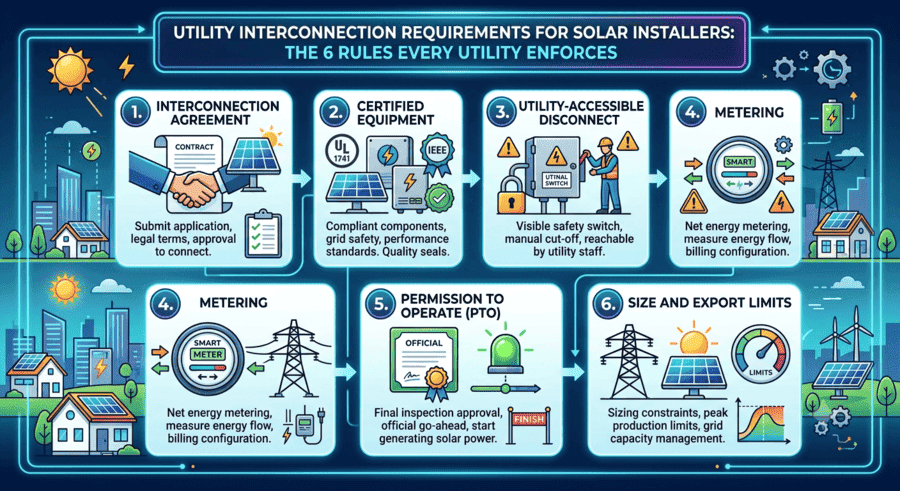
Utility Interconnection Requirements for Solar Installers: The 6 Rules Every Utility Enforces
interconnection agreement, UL 1741 and IEEE 1547 certified inverters, a utility-...
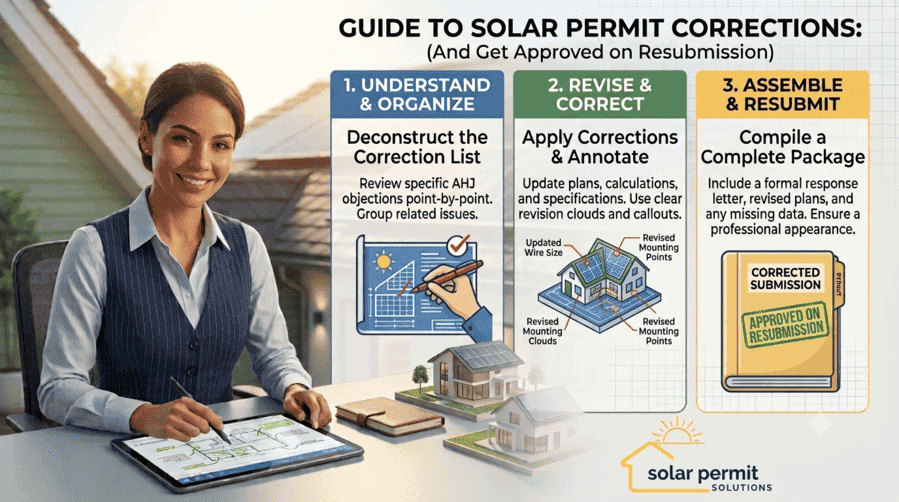
How to Respond to Solar Permit Corrections (And Get Approved on Resubmission)
To respond to a solar permit correction, read every comment from every reviewing...
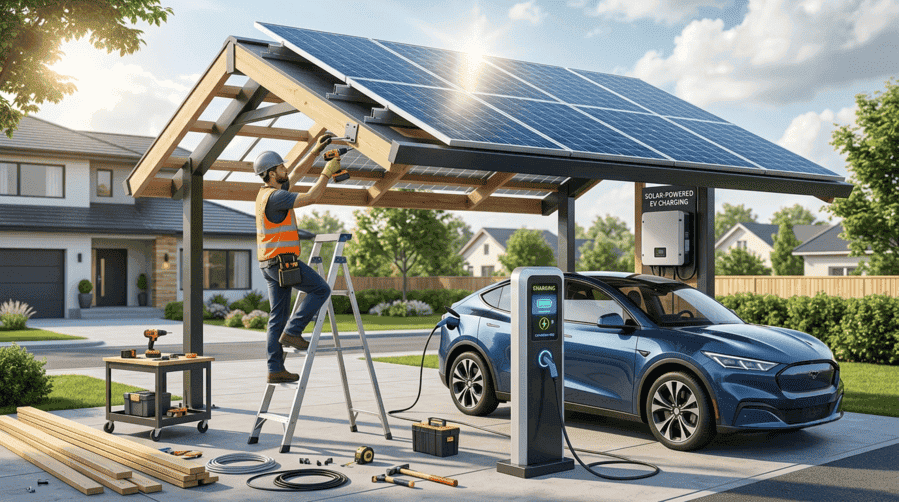
Can an EV Charging Station Be Powered by Solar? Here’s How to Build One
Yes, an EV charging station can be powered by solar. A grid-tied solar array pai...