What Is Solar Panel Testing and Why Does It Matter?
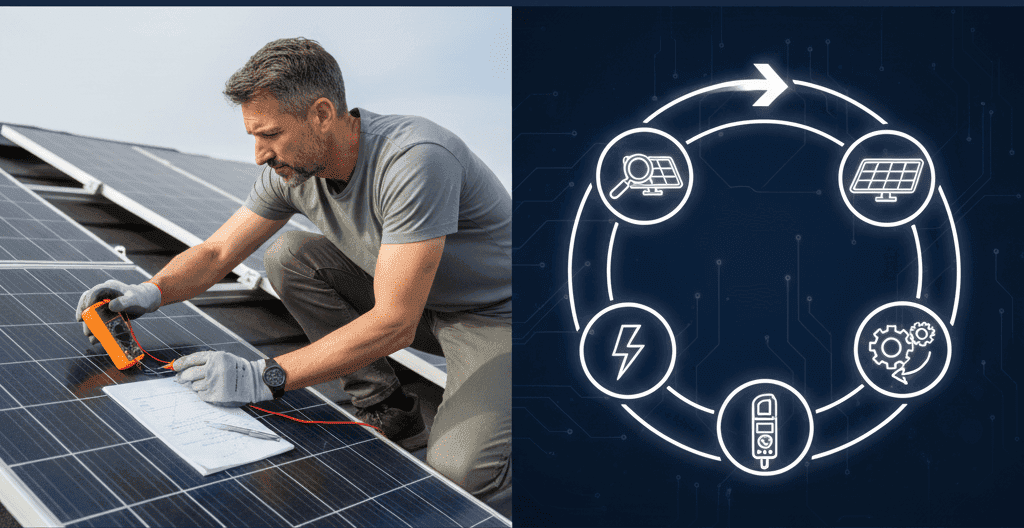
Solar panel testing measures voltage, current, and power output to verify panels function correctly and produce expected electricity. Testing requires a digital multimeter set to DC voltage mode to measure open circuit voltage (VOC) and DC amperage mode to check short circuit current (ISC). Healthy panels produce readings within 10% of manufacturer-rated specifications under direct sunlight.
Regular testing catches performance problems before they escalate into system failures. Warning signs requiring immediate testing include rising electricity bills, inverter error codes, visible panel damage, and batteries failing to reach full charge. Most residential systems benefit from quarterly visual inspections and biannual multimeter output verification.
Solar panels degrade approximately 0.5% to 1% annually under normal operating conditions, according to National Renewable Energy Laboratory degradation studies. Systems older than ten years accumulate measurable efficiency losses that baseline testing quantifies for warranty documentation and replacement planning. Testing under actual site conditions reveals true performance since laboratory Standard Test Conditions (STC) rarely match real-world variables like shade, heat, and sun angle.
This guide covers step-by-step multimeter testing procedures, safety precautions for working with energized panels, warning signs indicating testing urgency, recommended testing schedules, and criteria for choosing between DIY diagnostics and professional evaluation services.
How To Tell if Your Solar Panels Are Working Correctly?
Run a quick system assessment first. Check your charge controller to confirm power input registers on the display. Verify that batteries accept charge and connected devices receive electricity. Positive results on both fronts suggest your panels operate normally. For definitive answers, measure voltage and current output directly. This proves especially valuable for multi-panel configurations or expanded solar arrays where individual panel issues can hide within the larger system.
Understanding proper testing procedures helps homeowners and licensed solar contractors maintain peak system performance throughout the equipment lifespan. Proper system verification also ensures installations meet NEC code compliance standards mandated by local authorities having jurisdiction.

Warning Signs Your Solar Panels Need Testing
Several indicators signal when solar panels require immediate evaluation. Recognizing these symptoms early prevents minor issues from escalating into expensive repairs or complete system failure.
Electricity Bills Climbing Unexpectedly
Monthly utility costs creeping upward despite consistent energy habits often point toward declining solar production. Compare current bills against the same months from previous years. Increases exceeding 15% without usage changes warrant panel inspection and output verification.
Inverter Displays Error Codes or Warning Lights
Modern inverters communicate system health through indicator lights and diagnostic codes. Green lights typically confirm normal operation, while amber or red signals indicate detected problems. Flashing patterns or persistent error messages require immediate attention. Consult your inverter manual to decode specific alerts and determine appropriate testing responses. The Solar Energy Industries Association provides resources for understanding common inverter issues affecting residential systems.
Monitoring Data Shows Production Drops
Energy monitoring systems reveal production trends invisible to casual observation. Sudden output decreases suggest equipment failure or new shading obstructions. Gradual decline over months indicates panel degradation or accumulating surface contamination. Compare daily production figures against historical baselines and manufacturer projections.
Physical Damage Visible on Panel Surfaces
Cracks, chips, delamination bubbles, or browning discoloration compromise panel integrity and output capacity. Weather events, including hail, windblown debris, and heavy snow loads cause mechanical damage. Bird droppings, fallen leaves, and construction dust create shading hotspots that reduce generation. Inspect panels visually from ground level monthly and schedule roof access for closer examination annually.
Battery Bank Fails To Reach Full Charge
Off-grid and hybrid systems depend on consistent panel output to replenish battery storage. Batteries consistently falling short of full charge despite adequate sunlight exposure suggest panels underperform their ratings. Test panel output directly before assuming battery bank degradation. Understanding solar battery storage systems helps diagnose whether panels or batteries cause charging deficiencies.
Circuit Breakers Trip Repeatedly
Electrical faults within solar arrays trigger protective breaker responses. Occasional trips during storms or grid fluctuations fall within normal parameters. Repeated tripping under clear conditions signals wiring problems, ground faults, or panel malfunctions requiring systematic testing.
System Age Exceeds Ten Years
Solar panels degrade approximately 0.5% to 1% annually under normal conditions. Systems operating beyond a decade accumulate measurable efficiency losses even without visible damage. Baseline testing establishes current output capacity and informs replacement planning decisions. Review information about solar panel lifespan expectations to set realistic performance goals for aging systems.
Safety Precautions When Testing Solar Panels
Solar panel testing involves electrical hazards that demand respect and preparation. Following proper safety protocols protects against shock injuries, burns, and falls while ensuring accurate test results.
Understand Electrical Risks Before Starting
Solar panels generate electricity whenever light strikes their surface. Disconnecting panels from your system does not eliminate shock hazard since panels continue producing voltage independently. Even partially shaded panels carry dangerous electrical potential. Treat all panel wiring as energized until verified otherwise with proper testing equipment.
Wear Appropriate Personal Protective Equipment
Insulated gloves rated for electrical work protect hands during terminal contact. Safety glasses shield eyes from potential arc flash or debris. Rubber-soled footwear provides ground fault protection. Avoid loose clothing or jewelry that could contact terminals or moving parts. Long sleeves protect arms from sharp panel edges and hot surfaces. The Occupational Safety and Health Administration electrical safety guidelines provide comprehensive standards applicable to solar system work.
Work During Optimal Conditions
Perform testing during daylight hours with adequate visibility. Avoid wet conditions since moisture increases electrical conductivity and shock risk. High winds compromise balance during roof work and create unpredictable panel movement. Extreme temperatures affect both tester safety and measurement accuracy.
Use Properly Rated Testing Equipment
Verify multimeter ratings match or exceed your system voltage before connecting probes. Solar arrays wired in series multiply individual panel voltages to potentially lethal levels. CAT III or CAT IV rated meters provide appropriate protection for solar applications. Fluke solar panel testing resources offer detailed guidance on selecting properly rated equipment for photovoltaic systems. Inspect probe insulation for cracks or damage before each use.
Follow Correct Disconnection Sequences
Shut down inverters before disconnecting panel wiring. Open DC isolators or disconnects at the panel array first, then at the inverter. This sequence minimizes arc flash risk during cable separation. Never disconnect cables under load conditions. Cover panels with opaque material to reduce output during extended testing sessions.
Maintain Safe Roof Access Practices
Roof-mounted panel testing requires fall protection equipment for any work above two meters, according to OSHA fall protection standards. Secure ladders at top and bottom contact points. Walk only on roof structures rated for foot traffic. Avoid stepping directly on panel surfaces, which damages cells and creates slip hazards. Work with a partner who remains on the ground during elevated testing.
Know Emergency Response Procedures
Keep a charged phone accessible for emergency calls. Identify locations of main electrical shutoffs before beginning work. The Mayo Clinic electrical shock first aid guidelines explain symptoms of electrical injury and appropriate emergency responses. Never attempt to rescue a shock victim still in contact with electrical sources without first disconnecting power.
Professional solar permit services from Solar Permit Solutions include safety documentation and proper equipment specifications for system maintenance tasks.

Solar Permit Solutions
Need Solar Permit Plans?
Professional, permit-ready solar plan sets delivered fast. Residential and commercial projects across all 50 states.
How To Test Solar Panel Output With a Multimeter?
Measuring Open Circuit Voltage
Isolate the panel from your system and aim it toward direct sunlight. Configure a digital multimeter for DC voltage measurement and place probes on the positive and negative terminals. Record the open circuit voltage (VOC) reading and cross-reference it with manufacturer specifications. Results falling within 10% of the rated VOC generally confirm healthy panel operation.
Testing Short Circuit Current
Adjust your multimeter to measure DC amperage. Touch the probes directly to panel terminals while the unit faces full sunlight exposure. Record the short circuit current (ISC) and compare against rated specifications. Readings significantly below expected values often point toward cell degradation or shadows interfering with light absorption.
Verifying Performance Under Active Load
Wire the panel into a charge controller connected to a battery system or attach it directly to an electrical load. Document both voltage and amperage while the system draws power. This method reveals actual working performance rather than theoretical maximums. Quality portable panels designed for stable output across different lighting scenarios benefit most from this testing approach.
Inspecting Physical Condition and Connections
Survey the panel face for visible cracks, color changes, oxidation, or connector damage. Small physical flaws often escalate into major performance problems or create fire hazards. Confirm all wiring connections remain tight and protective insulation shows no wear or exposure. Proper solar wiring configurations ensure optimal current flow and system safety throughout the installation lifespan.
Tracking Output Trends Over Time
Record energy production data through your charge controller interface or dedicated monitoring software over several weeks. Long-term tracking exposes gradual output decline or erratic generation patterns that signal aging equipment or deteriorating wire connections. The Department of Energy Solar Energy Technologies Office publishes research on expected performance parameters for various panel technologies.
Why Regular Solar Panel Testing Protects Your Investment?
Maximizing Power Generation Efficiency
Minor surface contamination or developing faults steadily erode output capacity. Routine verification confirms panels deliver rated performance levels. This discipline becomes critical for larger residential solar systems featuring high-wattage rigid panels, where small percentage losses translate to significant energy deficits.
Avoiding Expensive System Failures
Weak panels force healthy units to compensate, accelerating wear across your entire array. Battery banks suffer when receiving inconsistent charging current. Catching degraded panels before they stress other components prevents repair bills from multiplying. Large-scale commercial solar installations especially benefit from proactive testing programs that prevent costly downtime.
Documenting Performance for Warranty Protection
Solar panel warranties typically span 10 to 25 years with guaranteed output thresholds. Maintaining test records substantiates warranty claims when panels underperform. Documentation also establishes maintenance schedules and replacement timelines.
Explore solar warranty requirements to understand manufacturer expectations for maintaining coverage eligibility.
How Often Should You Test Your Solar Panels?
Establishing a consistent testing schedule catches developing problems before they compromise system performance or trigger equipment failures. Testing frequency depends on system type, local conditions, and installation age.
Quarterly Visual Inspections
Conduct basic visual checks every three months throughout the year. Survey panel surfaces for debris accumulation, bird nesting activity, or vegetation growth creating new shade patterns. Verify all visible wiring remains secure and undamaged. Check inverter displays for error codes or status changes. These quick assessments take minimal time and catch obvious problems early.
Biannual Output Verification
Perform full multimeter testing twice yearly during spring and fall. These seasons typically offer moderate temperatures and predictable sunlight, creating consistent testing conditions. Compare readings against previous results and original manufacturer specifications. Document all measurements for warranty records and trend analysis.
Post-Storm Assessments
Schedule immediate inspections following severe weather events. Hailstorms cause surface fractures invisible from ground level. High winds shift panel mounting positions and loosen electrical connections. Lightning strikes damage surge protection components and inverter circuitry. Heavy snow loads stress mounting hardware and frame integrity. Test output within one week of significant weather to identify storm-related degradation.
Annual Professional Evaluation
Consider professional inspection annually for systems exceeding 5 kW capacity or installations older than ten years. Certified technicians access specialized diagnostic tools unavailable to homeowners. Thermal imaging reveals hotspots indicating cell failure or connection resistance. I-V curve analysis identifies degradation patterns across individual panels. Professional reports satisfy warranty documentation requirements and inform maintenance planning.
After System Modifications
Test the complete system output whenever adding panels, replacing inverters, or modifying wiring configurations. New components must integrate properly with existing equipment. Baseline measurements after modifications establish reference points for future comparison. Verify production gains match expected improvements from upgraded components. Systems requiring expansion should review solar design services to ensure proper integration with existing arrays.
Seasonal Adjustment Periods
Systems with adjustable tilt angles benefit from output testing after seasonal repositioning. Confirm mechanical adjustments translate to expected production gains. Identify any connection loosening caused by repeated angle changes. Compare output between seasons to verify tilt optimization delivers calculated improvements.
When Production Monitoring Flags Anomalies
Respond promptly when monitoring systems detect production outside normal parameters. Automated alerts indicating output drops exceeding 10% justify immediate hands on testing. Investigate anomalies before assuming software glitches or temporary weather effects. Early detection of genuine problems prevents extended production losses.
Should You Test Solar Panels Yourself or Hire a Professional?
Homeowners successfully diagnose most issues using a multimeter and careful visual examination. This hands-on approach identifies common culprits, including voltage irregularities, loose connections, and surface contamination. Complex multi-string arrays or persistent unexplained problems warrant professional evaluation. Certified technicians deploy advanced diagnostic equipment like I-V curve analyzers and thermal imaging cameras that reveal hidden defects.
The EnergySage home solar guide provides comprehensive comparisons of DIY approaches versus professional service options for residential solar owners. Researching installation fundamentals and solar panel costs before purchasing helps avoid costly mistakes during initial system setup.
What Does STC Mean for Solar Panel Ratings?
Laboratory technicians evaluate solar panels under Standard Test Conditions (STC), specifying 1000 watts per square meter irradiance, 25 degrees Celsius (77 degrees Fahrenheit) cell temperature, and zero atmospheric interference. These parameters create consistent comparison baselines across manufacturers as defined by International Electrotechnical Commission standards. Real installations rarely match laboratory conditions since shade patterns, ambient heat, and seasonal sun angles all diminish actual production. Field testing under your specific environmental conditions reveals true system capability.
Calculating whether solar delivers positive returns requires factoring lifetime output from properly maintained equipment. Panels carrying UL Solutions PV module certification meet rigorous safety and performance standards that support long-term reliability. Review solar ROI calculations to estimate value for your specific situation.
Conclusion
Safety remains paramount throughout any testing procedure. Proper protective equipment, correct disconnection sequences, and awareness of electrical hazards protect both people and equipment during diagnostic work. Following a consistent testing schedule based on system age, local weather patterns, and manufacturer recommendations ensures panels deliver expected output year after year.
Whether performing quarterly visual inspections or comprehensive biannual multimeter tests, documentation builds valuable records supporting warranty claims and maintenance planning. Systems showing persistent underperformance benefit from professional evaluation using advanced diagnostic tools that reveal problems invisible to standard testing methods.
Taking proactive responsibility for solar panel verification maximizes energy production, extends equipment lifespan, and protects your renewable energy investment. Start with basic voltage and current measurements today, establish baseline performance records, and commit to ongoing monitoring that keeps your solar system operating at peak efficiency.
For expert guidance on system design, permitting requirements, and professional maintenance support, contact Solar Permit Solutions to ensure your installation meets industry standards and performs reliably throughout its operational life.
FAQs
Need Solar Permit Plans?
Professional, permit-ready solar plan sets delivered fast. Residential and commercial projects across all 50 states.
Frequently Asked Questions
Check your inverter display first since most units show real-time power production in watts or kilowatts. Green indicator lights typically confirm normal operation, while red or amber lights signal potential problems. Review your monitoring app or utility meter to verify electricity flows into your home or back to the grid. For definitive confirmation, use a multimeter to measure voltage directly at panel terminals. Readings matching manufacturer specifications indicate panels generate electricity as designed.
A nominal 12V solar panel typically produces 18V to 22V open circuit voltage (VOC) under direct sunlight with no load connected. This higher voltage accounts for efficiency losses during charging and ensures adequate potential to charge 12V battery systems. Under load conditions, operating voltage drops to approximately 15V to 18V depending on current draw and temperature. Panels reading significantly below 15V under full sun likely suffer from cell damage, shading interference, or connection problems requiring further investigation.
Several factors reduce solar panel output below rated capacity. Shading from trees, buildings, or debris blocks sunlight and dramatically cuts production even when shadows cover small panel areas. Accumulated dirt, dust, pollen, or bird droppings create surface films that reduce light absorption. High temperatures decrease panel efficiency since cells operate less effectively as heat builds. Aging panels naturally degrade over time, losing approximately 0.5% to 1% output annually. Wiring faults, loose connections, or failing inverters also limit power reaching your electrical system despite healthy panel function. Proper utility interconnection procedures ensure grid-tied systems operate without unnecessary restrictions affecting output.
Solar panels benefit from regular maintenance despite lacking moving parts. Quarterly visual inspections catch debris accumulation, physical damage, and wiring problems before they compromise performance. Biannual multimeter testing verifies voltage and current output match expected specifications. Annual professional evaluations using thermal imaging and I-V curve analysis reveal hidden defects invisible during basic testing. Cleaning panel surfaces several times yearly removes dirt films that reduce light absorption. Systems in dusty environments, areas with heavy tree cover, or regions experiencing frequent storms require more frequent attention. Understanding state solar permitting requirements helps ensure maintenance activities comply with local regulations.
Basic solar panel testing requires a digital multimeter capable of measuring DC voltage and DC current. Auto-ranging multimeters simplify testing by automatically selecting appropriate measurement scales. A DC clamp meter allows current measurement without disconnecting wiring, speeding diagnostic work on installed systems. Additional helpful tools include insulated gloves, safety glasses, a notebook for recording measurements, and the panel specification sheet showing rated VOC and ISC values for comparison. Advanced testing benefits from solar-specific meters displaying power output directly and monitoring devices tracking production over time.
SPS Editorial Team
Solar Permit Solutions
Solar Permit Solutions provides professional solar permit design services for residential, commercial, and off-grid installations across all 50 states. Our team ensures permit-ready plan sets delivered fast.
Related Articles
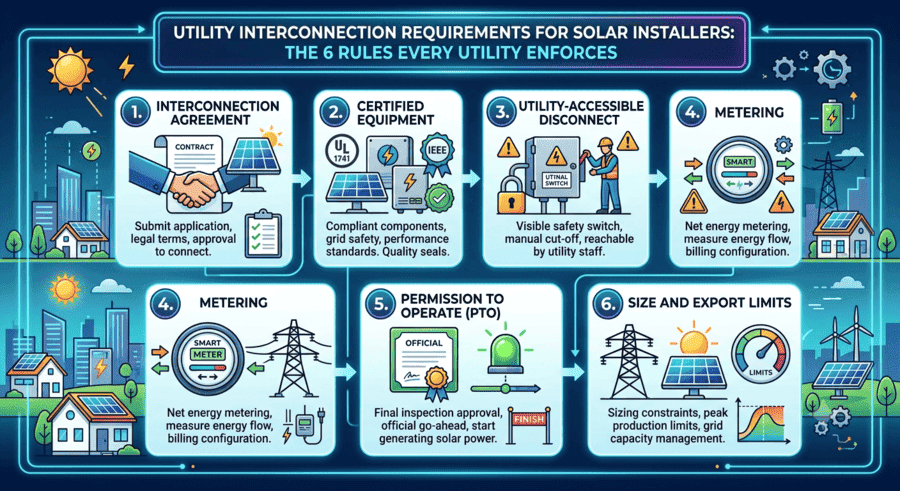
Utility Interconnection Requirements for Solar Installers: The 6 Rules Every Utility Enforces
interconnection agreement, UL 1741 and IEEE 1547 certified inverters, a utility-...
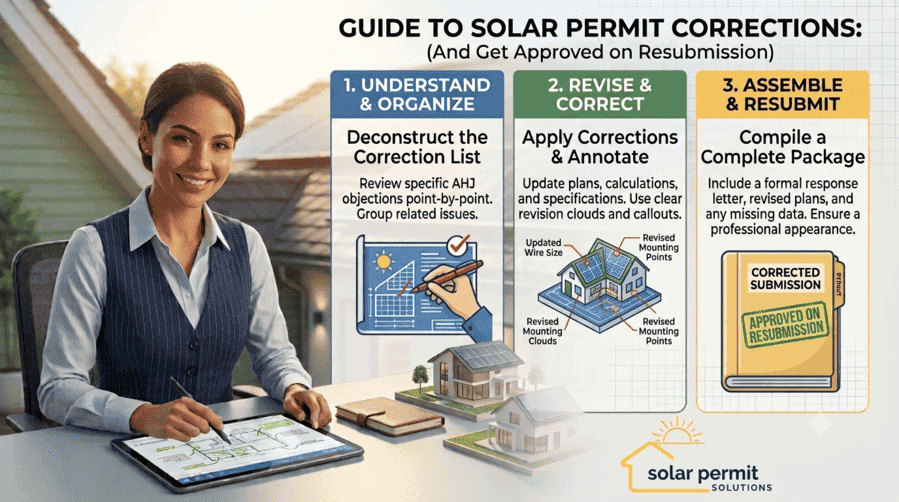
How to Respond to Solar Permit Corrections (And Get Approved on Resubmission)
To respond to a solar permit correction, read every comment from every reviewing...
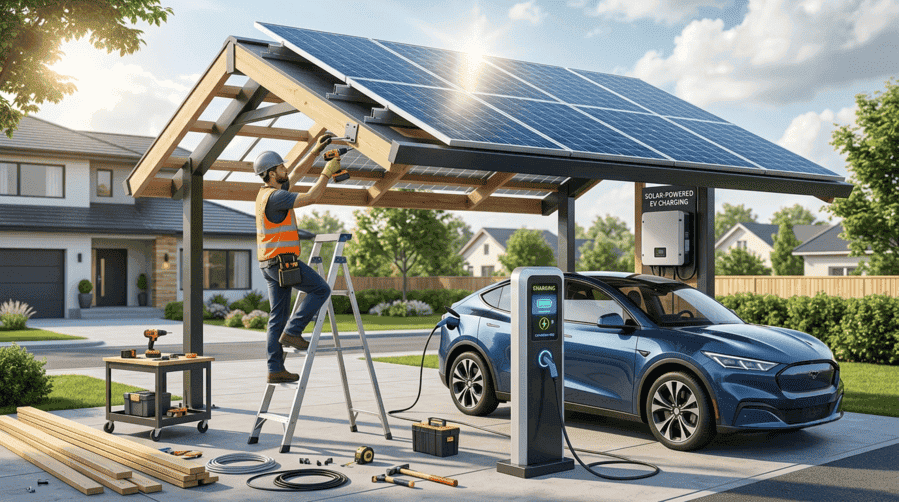
Can an EV Charging Station Be Powered by Solar? Here’s How to Build One
Yes, an EV charging station can be powered by solar. A grid-tied solar array pai...