
Rough-in inspections are formal evaluations conducted by building inspectors to verify that electrical, plumbing, mechanical, and fire safety systems meet code requirements before walls or ceilings enclose them. These inspections occur after system installation but before finishing work begins, typically conducted by the authority having jurisdiction (AHJ) or certified third-party inspectors.
Construction projects require rough-in inspections for five primary systems: electrical (wiring, boxes, panels), plumbing (pipes, joints, venting), mechanical (HVAC ductwork and controls), framing (studs, fasteners, load paths), and fire safety (insulation, fire blocking, emergency systems). Passing these inspections allows contractors to close work permits, receive payment, and proceed to the next construction phase.
The inspection process identifies installation errors early when corrections remain cost-effective, preventing expensive repairs and safety hazards like electrical fires, water leaks, or structural failures. Proper preparation includes conducting pre-inspection checks, scheduling with adequate advance notice (typically several days to one week), organizing trade partner sequencing, and documenting all work through photographs and videos for future reference.
This guide covers rough-in inspection fundamentals, preparation strategies, process expectations, proven success practices, and technology solutions for streamlined management.
Understanding Rough-In Inspection Fundamentals
Rough-in inspections, commonly called rough-ins, verify that critical system components meet code requirements and safety standards while often serving as significant project milestones. Rough-ins frequently fulfill work permit closure requirements, and passing these inspections sometimes triggers contractor payment releases. The authority having jurisdiction (AHJ) or a third-party inspector typically conducts rough-ins.
In standard practice, a municipality performs a rough-in after completing room or area framing, installing important systems, and conducting multiple routine quality checks. Some locations provide detailed lists of required rough-in inspections with specific timing guidelines for each.
Rough-ins aim to identify problems before walls or ceilings enclose them, making corrections more difficult and expensive. Confirming proper system installation also prevents potentially serious issues, including electrical fires, water leaks, or structural failures.
Rough-ins follow similar procedures across most projects, regardless of construction type. Certain projects feature specialized systems requiring specific rough-ins, such as medical gas connections at healthcare facilities or hazardous chemical piping at power plants. For solar installations, AHJ requirements can vary significantly by jurisdiction.
Solar Installation Rough-In Requirements
Solar photovoltaic systems require specialized rough-in inspections that address unique electrical and structural components. These inspections verify proper installation of conduit pathways, roof penetrations, mounting attachments, and electrical disconnects before final system activation.
Solar-Specific Inspection Elements:
DC and AC Electrical Pathways – Inspectors verify that conduit runs from the solar array to inverters and service panels meet code requirements for sizing, support, and protection. Proper labeling of DC circuits and compliance with rapid shutdown requirements under NEC 690.12 are critical checkpoints.
Roof Attachments and Waterproofing – For roof-mounted systems, rough-in inspections examine mounting rail attachments, flashing installation, and penetration sealing before panels are installed. Inspectors confirm that roof structure can support additional loads and that all penetrations are properly weatherproofed to prevent leaks.
Grounding and Bonding Systems – Proper grounding electrode installation, bonding jumpers, and equipment grounding conductors require verification during rough-in. Inspectors check that all metallic components are bonded correctly and that grounding systems meet local requirements.
Disconnect and Combiner Boxes – AC and DC disconnect locations, proper sizing, and accessibility get evaluated during rough-in. Combiner box installations, wire management, and compliance with working clearance requirements are verified before covering or enclosing.
Solar rough-in inspections often occur in phases, with separate inspections for structural/mounting, electrical rough-in, and final system verification. Coordinating these phased inspections with your AHJ timeline prevents delays and ensures compliance throughout the installation process. Professional solar design services streamline this coordination by providing inspection-ready plans that anticipate common AHJ requirements.
Effective Preparation Strategies For Rough-In Inspections
Thorough preparation for rough-ins proves essential, as inspection failures require rescheduling with the AHJ and generate additional costs and delays. Understanding code compliance requirements helps ensure first-time approval.
Thoroughly Inspect Before The Rough-In
Subcontractors and general contractors (GC) should perform routine work checks and conduct formal evaluations and tests after installation and before the municipality’s scheduled arrival. Most trade partners formally assess their work upon completion, followed by another comprehensive check from the GC. By the actual rough-in date, most issues should be identified and resolved, with the AHJ primarily confirming compliance rather than discovering new problems. Some inspectors prefer to witness system tests, such as activating electricity or running water to check for leaks. Running these tests before the rough-in helps avoid surprises and catch any issues. For residential solar projects, thorough pre-inspection checks are particularly important.
Include Rough-Ins In Project Planning
Planning a rough-in can present complications, as it often requires coordinating multiple trades, must complete before starting dependent tasks, and involves scheduling with an AHJ. Incorporating rough-ins into the planning process as early as possible helps prevent delays or, when delays occur, clarifies their impact on the project’s critical path. Many planning methods, including pull planning or work breakdown structure (WBS), utilize rough-ins as milestones to guide planning and phase completion.
Segment Work
Most projects require multiple subcontractors working on different tasks simultaneously to meet completion deadlines. Projects can be segmented with numerous rough-ins scheduled so construction continues on remaining project areas. For instance, a hotel might divide into floors or rooms with rough-ins completed in each area. This approach allows drywall work to begin in one area while systems install in another. Effective segmentation and sequencing become possible through planning techniques like WBS and input from trade partners. Commercial solar design projects often benefit from this phased approach.
Get Organized
Many systems require installation and inspection in each area, often within similar timeframes. Many GCs gather all trade partners to develop a plan for sequencing tasks in an area and establish clear procedures for marking completed system installations. This process ensures nothing gets missed and reduces miscommunication. Proper system sizing and layout planning prevent installation conflicts.
Many procedures begin with sequencing. For example, a team might determine that installation order follows low voltage cabling, then plumbing, electrical, and HVAC controls. The GC might assign each trade a color and have them paint a stud their respective color upon completing work in an area. This signals to the next trade that their work can begin.
For example, the subcontractor handling low-voltage cabling might paint a stud pink when finished. This cues the plumbing team to begin. Once plumbing completes, they might paint the stud green. This signals the HVAC team to start, and so on.

Solar Permit Solutions
Skip the Permit Headaches
We design plan sets that pass inspection the first time. Code-compliant, PE-stamped, accepted by AHJs nationwide.
Rough-In Inspection Process: Key Elements And Expectations
Understanding what gets inspected at the rough-in proves important. This knowledge helps with preparation, improves work quality, and speeds up the inspection process. Some locations feature inspection checklists on their websites detailing everything requiring inspection.
Inspectors typically evaluate whether elements meet code requirements and comply with local regulations, focusing on verifying correct sizing, proper functioning, and safe connections to the rest of the system. They usually do not assess specific building plan details, such as measuring element placement. For example, they might check that correct wires exist in the wall with safe installation, but not measure outlet placement.
Commonly, rough-in inspections cover the following elements:
Electrical, including wiring, boxes, routing, mounts, service panels, and meters
Plumbing, including pipes, joints, routing, fasteners, venting, and insulation
Mechanical, including ductwork, HVAC equipment, and HVAC controls
Framing, including studs, fasteners, material quality, load paths, headers, and egress. Proper roof structure assessment is essential before installation.
Fire safety, including insulation, component placement, fire blocking, and emergency system testing
Despite thorough preparation, inspectors still occasionally find issues requiring attention. When possible, minor issues get addressed immediately for verification while the inspector remains onsite. For major issues, the inspector will fail that room, area, or building, requiring another rough-in to be scheduled. Review municipal inspection requirements to understand common failure points.
Proven Practices For Successful Rough-In Inspections
Several strategies can make rough-in inspections more efficient and maximize their utility.
Collaborate
Rough-ins often represent important project milestones requiring regular communication and collaboration between builders, contractors, and owners. GCs should work to ensure everyone maintains a shared understanding of timelines, project requirements, safety measures, and processes. Professional design services facilitate this coordination effectively.
Trade partners possess exceptional expertise that provides valuable insight into task duration, potential challenges, and codes and regulations. Holding kickoff and OAC (owner, architect, and contractor) meetings helps open communication lines, keeps projects on schedule, and resolves issues as they arise. Understanding local inspection processes improves coordination.
Document Everything
The rough-in often represents the last opportunity to access some components before walls or ceilings enclose them. GCs should thoroughly document all elements through photographs and videos. Documentation gets referenced during the final walk-through with the owner, the final inspection for the certificate of occupancy, and gets included in closeout documents. Photographs provide quick ways to show work completed effectively and safely without removing wall or ceiling sections, which creates delays and additional costs. Owners also frequently reference documentation for locating important systems during maintenance or renovations. Accurate panel layout documentation proves invaluable for future work.
Have Trade Partners On Hand For The Inspection
Some GCs have trade partners attend the rough-in to address minor issues on the spot. Minor issues can often be resolved while the inspector remains onsite, helping avoid inspection failures and additional scheduling.
Manage Relationships With Inspectors
In many locations, a few inspectors handle hundreds of requests, making it important to respect their time. Not every inspector seeks friendly relationships, but nothing beneficial comes from negative, contentious, or distrustful relationships. Positive relationships help navigate uncertain issues that arise. Familiarize yourself with inspection protocols in your jurisdiction.
Leveraging Technology For Streamlined Rough-In Management
Rough-ins require extensive planning, coordination, and documentation. Many GCs use software to store and organize documents and photos, including those collected during and leading up to rough-ins. They also use project management tools to track inspections and to build and share plans, drawings, and schedules. Finding tools to streamline these processes and create effective workflows makes rough-ins smoother while also serving other project aspects such as invoicing and closeout. For off-grid installations, specialized documentation requirements may apply.
Conclusion
Rough-in inspections represent critical checkpoints in the construction process that directly impact project timelines, budgets, and overall quality. Success in these inspections requires more than just meeting code requirements; it demands thorough preparation, strategic planning, and effective collaboration among all stakeholders. By conducting comprehensive pre-inspections, organizing work sequences clearly, and maintaining open communication with trade partners and inspectors, construction teams can navigate rough-ins efficiently and avoid costly delays. Solar Permit Solutions provides expert support throughout the permitting process.
The investment in proper documentation, relationship management, and technology adoption pays dividends not only during the rough-in phase but throughout the entire project lifecycle. These practices ensure that critical systems remain accessible for future reference and that projects move forward without unnecessary setbacks. With the right approach and attention to detail, rough-in inspections transform from potential obstacles into valuable milestones that confirm quality work and keep construction projects on track toward successful completion. Visit our blog for more construction and permitting insights.
FAQs
Skip the Permit Headaches
We design plan sets that pass inspection the first time. Code-compliant, PE-stamped, accepted by AHJs nationwide.
Frequently Asked Questions
Rough-in inspections verify that critical building systems like electrical, plumbing, mechanical, and fire safety components meet code requirements and safety standards before walls or ceilings enclose them. These inspections catch installation errors early when corrections remain relatively simple and cost-effective, preventing expensive repairs and potential safety hazards later in the construction process.
The duration of a rough-in inspection varies based on project size, complexity, and the number of systems being evaluated. A single-room inspection might take 30 minutes to an hour, while larger commercial spaces or entire floors can require several hours. Proper preparation and having all systems ready for inspection helps expedite the process and demonstrates professionalism to the inspector.
When a rough-in inspection fails, the inspector documents the specific deficiencies that need correction. The construction team must address these issues, which may involve reworking installations, replacing materials, or adjusting system components. Once corrections are complete, another inspection must be scheduled with the AHJ, potentially causing project delays and additional costs. This makes thorough pre-inspection checks essential.
Rough-in inspections are typically conducted by the authority having jurisdiction (AHJ), which is usually a municipal building department inspector, or by a certified third-party inspector approved by the local jurisdiction. These inspectors hold specialized knowledge of building codes and safety regulations and have the authority to approve or fail inspections based on compliance with established standards.
Yes, construction can continue in other project areas while waiting for a rough-in inspection, which is why many projects segment work into different zones or phases. This approach allows crews to install systems in one area while another undergoes inspection, maintaining project momentum. However, work cannot proceed in the specific area awaiting inspection approval, as passing the rough-in is typically required before enclosing walls or moving to finishing stages.
Essential documentation for rough-in inspections includes building plans, permit information, approved drawings, material specifications, and any required test results or certifications. Many inspectors also appreciate having installation photos, material cut sheets, and manufacturer specifications readily available. Organized documentation demonstrates professionalism and helps address any questions that arise during the inspection process.
Rough-in inspections should be scheduled as soon as the work area is ready and all systems have been installed and pre-checked. Most jurisdictions require several days to a week of advance notice, though this varies by location and inspector availability. Building inspection scheduling into the project timeline early and maintaining flexibility helps accommodate inspector schedules and prevents unnecessary delays in the construction sequence.
SPS Editorial Team
Solar Permit Solutions
Solar Permit Solutions provides professional solar permit design services for residential, commercial, and off-grid installations across all 50 states. Our team ensures permit-ready plan sets delivered fast.
Related Articles
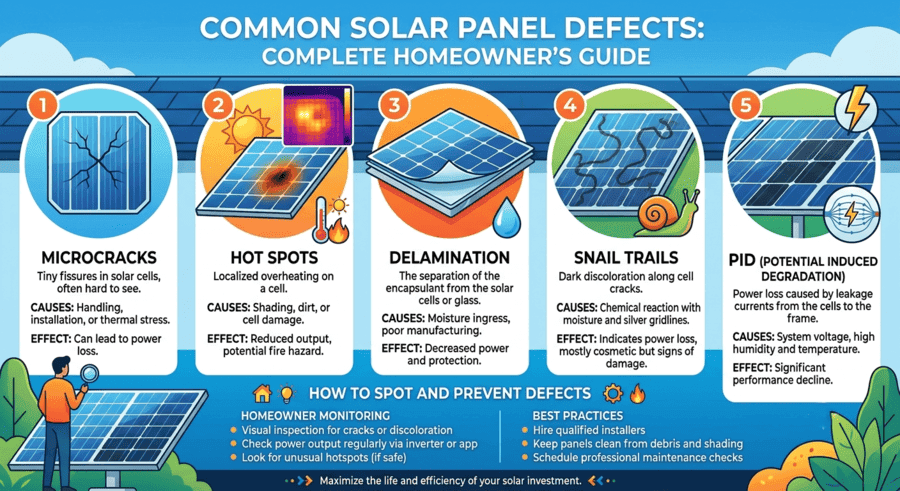
Common Solar Panel Defects: Complete Homeowner’s Guide
Updated 2026 | By Solar Permit Solutions Editorial Team Solar panels typically l...

Can You Replace Your Roof and Add Solar Together? 2026 Guide
Yes, you can replace your roof and add solar together, and in most cases it is t...
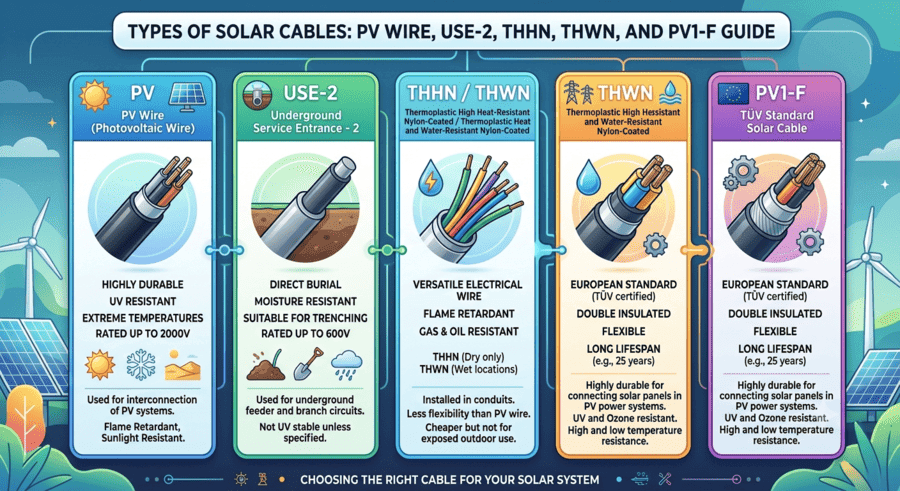
Types of Solar Cables: PV Wire, USE-2, THHN, THWN, and PV1-F Guide
Expert guide to solar cables: PV wire, USE-2, and THHN/THWN types explained. Lea...