
Homeowners turn to solar energy for various motivations. Clean, renewable power attracts some. Energy independence draws others. Yet one factor consistently tops the list: substantial cost savings.
Working with full-service solar providers offers undeniable convenience, they handle every detail from planning to execution. However, if you possess the necessary skills, available time, and hands-on enthusiasm, self-installation becomes a viable path forward.
Understand that this involves far more than mounting panels on your rooftop. Depending on your installation scale, complexity escalates quickly. Many jurisdictions enforce engineering standards, permit requirements, and certification mandates for incentive qualification.
Let’s examine the key benefits and drawbacks of self-installed solar systems, then break down the design and installation workflow into six actionable steps.

Budget Breakdown: Building Your Own Solar System
When pursuing DIY solar, choose between purchasing a complete kit or sourcing components independently.
Solar kit pricing varies significantly; expect to invest $7,000 to $18,000 for a 6kW system before applying the 30% federal tax incentive. Note that permitting expenses and installation labor aren’t included, costs typically covered by professional installers.
Current market data from January 2025 shows professional 6kW solar installations averaging $18,000 pre-incentive, dropping to $12,600 after tax credits. While this represents a higher investment, you’re securing a system backed by warranties for its 25-year operational lifespan.
Building from scratch involves variable costs for materials and permits. While you’ll likely spend less than professional installation, equipment failures leave you without warranty protection or manufacturer assistance, repair costs fall entirely on you.

Weighing DIY Solar: Benefits vs. Drawbacks
Despite lower costs compared to professional installation, DIY solar represents a significant financial and time commitment. Determine whether self-installation aligns with your situation before investing heavily in the process.
Review these pros and cons to make an informed decision:
Benefits:
- Reduced upfront costs
- Personal accomplishment from project completion
Drawbacks:
- Substantial time investment and physical effort
- Potential roof structural damage and water infiltration
- Safety hazards during installation
- Limited or no access to certain incentive programs
- Zero manufacturer support for defects or warranty issues
Why Choose DIY Solar Installation
Self-installation delivers cost reductions while providing satisfaction from completing a challenging project.
Financial Advantages
DIY installation cuts thousands from upfront expenses.
Professional solar companies charge approximately $2.95 per watt on average. For a standard 5 kW (5,000 watt) system, total costs reach $14,750.
Conversely, DIY solar kits for 5 kW systems cost between $1.00–$1.50 per watt. Completing all tasks yourself brings total project costs to $5,000–$7,500.
This creates potential savings of $7,250–$9,759 by selecting DIY over professional services.
These figures represent averages. Multiple variables affect your actual costs, including system capacity and solar tax credit eligibility (valued at 30% of total system expenses).
Project Fulfillment
If tackling ambitious DIY challenges appeals to you, solar installation offers the perfect opportunity.
You’ll engage multiple skill sets: navigating municipal regulations, financial planning, power tool operation, electrical system work, and tax documentation.
Solar installation encompasses numerous phases: research, planning, equipment procurement, permit applications, physical installation, electrical connections, and performance monitoring.
This extended project demands sustained commitment, and successful completion delivers genuine accomplishment.
Solar Permit Solutions
DIY Solar? We Handle the Permits.
You install the panels — we design the permit-ready plan set your building department requires. Fast, affordable, all 50 states.
Potential Drawbacks of Self-Installation
Cost savings appear attractive, yet DIY solar disadvantages frequently exceed the benefits.
Significant Time and Effort Requirements
Self-installation rewards those actively seeking substantial DIY challenges.
If your DIY experience consists mainly of furniture assembly, reconsider taking on solar installation. Beyond demanding extensive planning and organizational capabilities, this project consumes considerable time: from initial concept through final commissioning, DIY solar typically requires one to four months.
Roof Damage and Leak Risks
This represents the most significant financial risk in DIY solar projects.
Non-flat roofs require drilling numerous penetrations. Drilling in incorrect locations causes structural compromise, while improper sealing and flashing lead to water infiltration and potential mold growth.
Additionally, DIY installation likely voids your existing roof warranty, making you financially responsible for all subsequent repairs.
Safety Concerns
Working at heights and handling high-voltage electricity create major hazards during solar installation.
Physical risks extend beyond installation day. When issues arise during the panels’ 25-year lifespan, you’ll need to return to the roof for troubleshooting.
Most critically, improper wiring can cause your rooftop system to ignite.
Limited Support for Equipment Issues
Equipment malfunctions leave you handling problems independently.
Direct manufacturer contact remains possible, but proving warranty claims becomes challenging. Furthermore, improper installation can void warranty coverage entirely.
Restricted Incentive Access
State and local programs provide incentives and rebates that dramatically reduce solar costs.
However, certain incentives require certified solar company installation. Research available incentives and rebates in your area before proceeding.
Six-Step DIY Solar Installation Process
Now let’s explore the six essential steps for completing your DIY solar project from conception to activation.
Step 1: Create Your Plan and System Design
This critical phase challenges those without energy system experience. Address all considerations below before starting your DIY solar journey.
A. Define Your Objectives
What outcomes do you seek? Lower energy bills? Emergency backup power? Complete grid independence?
Your objectives determine optimal system type, installation complexity, and total project investment.
B. Select Your Solar System Type
Match your system type to your stated goals.
All configurations share common components: solar panels, inverters, mounting hardware, and wiring.
Crucial differences exist that impact cost and complexity. Here’s each type summarized:
Grid-Connected System: This configuration uses the utility grid for energy storage through net metering. Grid-connected systems require minimal equipment, offering the lowest initial investment. The limitation: no backup power capability.
Hybrid System: Hybrid configurations incorporate battery storage while maintaining grid connectivity. Higher costs than grid-connected systems, but additional features include backup power during outages and time-of-use energy arbitrage.
Off-Grid System: Off-grid systems operate completely independent from utility infrastructure. Without grid backup, these systems need extensive panel arrays and large battery banks to supply power continuously, even during winter months and extended cloudy periods. This represents the highest-cost configuration.
C. Research Solar Regulations
Solar installation regulations vary extensively across states and local jurisdictions.
Some states prohibit grid connection for solar systems unless certified contractors perform installation. If this applies to your location, DIY grid-connected or hybrid systems become impossible.
Where DIY is permitted, building permits and utility permits typically precede installation. This usually involves onsite inspections by structural engineers or licensed electricians.
After completing installation, additional inspection rounds are mandatory before system activation and grid connection.
D. Engineer Your System
This ranks among the most complex aspects of DIY solar installation. Design your system considering all these elements:
- Household energy consumption
- Local climate and monthly sun exposure hours
- Panel orientation
- Panel tilt angle
- Natural efficiency degradation
- Energy conversion losses
- Shade patterns
- Future expansion potential
- Battery capacity and charging (for hybrid and off-grid configurations)
Our residential solar design services process all these variables to display monthly system output throughout the year. We recommend appropriate system sizing for your specific property and identify optimal roof sections for maximum sunlight exposure.
E. Calculate Financial Projections
With your system design complete, calculate projected costs and savings across the panels’ 25-year lifespan.
Determine costs through online solar equipment research. The simplest approach: locate pricing for complete DIY solar kits matching your desired capacity.
Next, calculate utility bill reductions. Start by determining annual system output (find location-specific data through renewable energy resources). Multiply this by your local electricity rates to estimate avoided utility expenses.
With cost and savings data, calculate your DIY solar project return.
Apply this straightforward formula: Avoided utility expenses (electric bill savings) – Solar equipment costs = Total financial benefit.
This calculation reveals whether DIY solar makes financial sense for your situation.
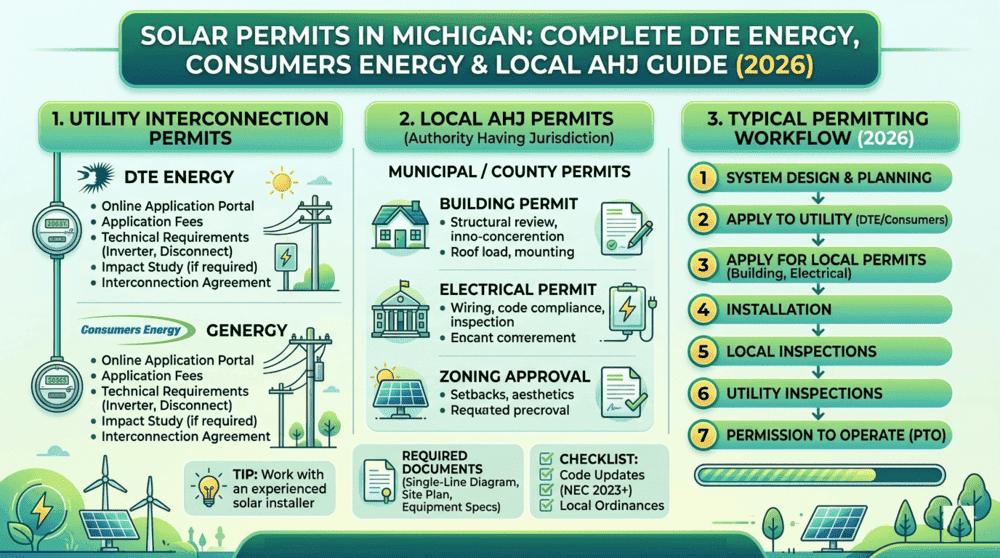
Step 2: Navigate the Permitting Process
You’re eager to install solar panels! However, those regulations mentioned in Step 1 require attention first.
List all permits required by your state, utility company, and local authority having jurisdiction (AHJ). Building and utility permit applications typically precede any physical work. This often involves inspections by electricians, structural engineers, or both.
Follow all requirements strictly to ensure code compliance and legal installation. Understanding common mistakes when applying for solar permits can help you avoid delays.
Step 3: Source and Purchase Equipment
Here’s the complete equipment list for your solar installation:
- Solar panels
- Solar inverter
- Mounting and racking systems
- Wiring and electrical supplies
- Battery system (for hybrid and off-grid configurations)
- Charge controller (required for certain battery systems)
The easiest approach: purchase a complete DIY solar kit containing all necessary equipment. Otherwise, you face the challenging task of selecting individual components and verifying compatibility. Check essential solar permit equipment requirements to ensure your components meet code standards.
When comparing kits, check product reviews to ensure purchases from reputable manufacturers.
Regarding suppliers, prioritize those offering extensive warranties and excellent post-sale support. In fact, place these factors above pricing considerations, you’ll interact frequently with suppliers for technical assistance and potentially warranty support.
Step 4: Execute Physical Installation
At this stage, all necessary permits and approvals should be secured, and solar equipment delivered. Installation time has arrived.
Specific installation procedures depend on your chosen system type and equipment.
The process described below covers grid-connected systems using microinverters for DC to AC power conversion. Solar installation presents complexity, these steps minimize potential complications.
Step 1: Mount Solar Panel Racking
Use a chalk line for precise measurement and marking of racking system locations on your roof.
Locate solid roof sections for lag bolt installation. Consider using stud finders with AC current detection to avoid drilling through electrical wiring.
Apply caulk to holes and install flashing to create waterproof seals before securing lag bolts. With lag bolts positioned, install L-feet and secure rails onto them.
This method applies to roof-mounted systems. If your roof proves unsuitable, evaluate ground-mounted alternatives.
Step 2: Wire Microinverters
Address the microinverters next. These compact units regulate individual panel output. Attach them to rails using supplied bolts. Each unit features positive and negative wire terminals, which you’ll connect in series for each array.
Step 3: Establish Grounding
Connect appropriately-gauged copper wire across rails for grounding. This critical safety measure helps dissipate anomalies from lightning strikes or system faults.
Step 4: Mount Roof Junction Box
Drill a roof penetration for junction box installation. For multiple solar arrays, run trunk cables from each into the junction box. This channels solar panel power into your home. Proper wire management and conduit practices are essential for code compliance.
Step 5: Position Solar Panels
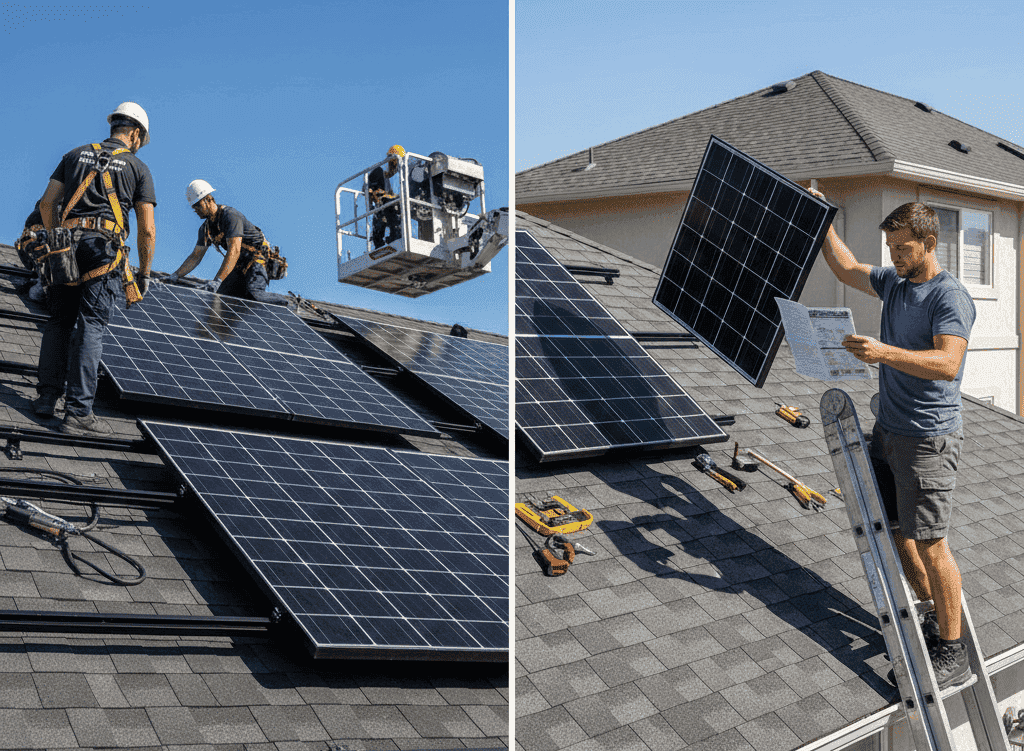
Transport panels onto the roof. Each module measures approximately 65 inches by 39 inches, an awkward dimension for solo handling. Request assistance for this phase, particularly on steep roofs. Use safety harnesses throughout.
Attach solar panels to mounting rails. Before laying panels flat, organize wiring. Each panel includes negative and positive DC wires; secure them to the panel preventing roof contact. After neatly arranging wires, connect them to microinverters.
Insert provided mid-clamps into railing on both sides of each solar panel for secure positioning. Apply end-clamps to panels at rail ends; these secure panels while remaining less visible from ground level.
Step 6: Complete Home Connection
With panels installed, connect them to your house. This requires installing:
- Conduit
- External junction box
- Emergency disconnect box
Conduit carries wiring from roof junction box to external junction box. The junction box connects to an emergency disconnect, a safety feature enabling rapid solar system shutdown, required in many jurisdictions. Understanding solar rapid shutdown requirements ensures your system meets current code.
Install external junction boxes and emergency disconnects in weatherproof, easily accessible locations allowing simple connection to your home’s main electrical panel.
From the emergency disconnect, route wires to the main electrical panel. For specific connection methods, review guidance on solar supply-side connections.
Your solar system is physically complete, but additional steps precede activation. That’s where the next phase begins.
Step 5: Complete Inspections and Grid Interconnection
After finishing installation, schedule inspection with your local AHJ. Inspectors verify local ordinance compliance and confirm design matches submitted plans.
Electrical inspection ensures code compliance. Proper three-line diagrams help inspectors understand your system configuration quickly.
Upon passing inspection, apply for grid interconnection. The utility either installs a second meter or replaces your existing meter with a bi-directional (net) meter. Bi-directional meters record power exports to the grid, enabling bill credits.
Step 6: Activate Your System
Once your system meets all state, local, and utility requirements, proceed with commissioning. Verify system functionality through your solar monitoring application, most modern inverters include one.
Does the application show expected performance? If yes, congratulations! The hard work paid off, you’re finished.
Solar Power Delivers Value Regardless of Installation Method
If you’ve read this comprehensive guide completely, well done. It demonstrates serious commitment to solar energy, a journey offering substantial rewards. Solar panels slash electric bills, reduce carbon footprints, and enhance energy independence.
With sufficient time and appropriate skills, DIY installation becomes achievable.
However, if DIY solar exceeds your capabilities, don’t worry: numerous highly-rated solar installers can handle the work. While professional installation costs more, installer expertise and practical experience eliminate frustration and risk. Our services include comprehensive design and permitting support for both residential and commercial projects.
Whether DIY or professional, contact our team to discuss how we can help streamline your solar permitting process and ensure your system meets all local requirements.
Conclusion
DIY solar panel installation represents a significant undertaking that can deliver substantial financial savings and personal satisfaction. By handling the installation yourself, you can potentially save between $7,000 and $10,000 compared to professional installation costs. However, these savings come with important trade-offs that deserve careful consideration.
The decision to pursue DIY solar installation hinges on your technical skills, available time, and risk tolerance. Successfully completing a solar project requires expertise across multiple domains: electrical systems, roofing, local regulations, and system engineering. The process typically spans one to four months from initial planning to final activation, demanding sustained commitment and attention to detail.
Safety considerations cannot be overstated. Working at heights while handling high-voltage electrical systems creates inherent risks that extend well beyond installation day. Additionally, improper installation can void warranties, compromise your roof’s integrity, and disqualify you from valuable incentive programs that could significantly offset system costs.
For homeowners with strong DIY backgrounds, adequate time, and willingness to navigate complex permitting requirements, self-installation offers a rewarding path to solar energy adoption. The sense of accomplishment from successfully powering your home with a system you built yourself is genuinely meaningful.
However, if any aspect of this process feels overwhelming, professional installation remains the wiser choice. Certified solar installers bring expertise, warranty protection, and accountability that protect your investment throughout the system’s 25-year lifespan. The additional upfront cost often proves worthwhile when considering the reduced risk and guaranteed performance.
Regardless of which path you choose, transitioning to solar energy delivers lasting benefits: lower electricity bills, reduced environmental impact, and greater energy independence. Whether you install the panels yourself or work with professionals, you’re making a sound investment in sustainable energy and your financial future.
DIY Solar? We Handle the Permits.
You install the panels — we design the permit-ready plan set your building department requires. Fast, affordable, all 50 states.
Frequently Asked Questions
DIY solar installation usually requires one to four months from initial planning to system activation. The actual physical installation might only take several days to a week, but the majority of time involves researching regulations, designing your system, obtaining permits, scheduling inspections, and coordinating with your utility company for grid interconnection. If you're working on weekends only while maintaining regular employment, expect the project to trend toward the longer end of this timeline. More complex systems like hybrid or off-grid configurations require additional time for battery integration and system testing.
Yes, DIY solar installation typically voids your existing roof warranty. Roof manufacturers generally specify that only certified professionals should penetrate roofing materials, and self-installation violates these terms. This means you assume full financial responsibility for any leaks, water damage, or structural issues that arise from your installation. Professional solar installers often carry insurance and warranties that cover roof penetrations and water intrusion, protecting you from these costly risks. If your roof is relatively new or still under warranty, carefully weigh whether potential solar savings justify losing this protection.
Yes, DIY solar installations qualify for the 30% federal solar Investment Tax Credit (ITC), which remains available through 2032. You can claim this credit for equipment costs including solar panels, inverters, mounting hardware, wiring, and battery storage systems. However, you cannot claim the credit for the value of your own labor. Keep detailed receipts for all equipment purchases and consult with a tax professional to ensure proper documentation. Note that while the federal credit applies to DIY installations, some state and local incentive programs require certified installer involvement, so research your area's specific requirements before proceeding.
When DIY-installed systems malfunction, you bear sole responsibility for diagnosis and repairs. While you can contact manufacturers directly for warranty claims, proving the defect wasn't caused by improper installation becomes your burden. Many manufacturers require photographic evidence, detailed installation documentation, and sometimes third-party verification before honoring warranties. Some companies may deny warranty claims entirely for self-installed systems. Additionally, you'll need to safely access your roof to troubleshoot problems throughout the system's lifespan. Professional installations typically include workmanship warranties and dedicated support teams that handle these issues without additional cost to you.
No, DIY solar installation legality varies significantly by state and local jurisdiction. Some states prohibit homeowners from connecting self-installed solar systems to the electrical grid, effectively banning DIY grid-tied installations. Other areas allow DIY installation but require licensed electrician involvement for final connections or mandate inspections by structural engineers. Certain jurisdictions impose strict certification requirements that make DIY installation impractical. Before purchasing any equipment, research your state's solar regulations and contact your local Authority Having Jurisdiction (AHJ) and utility company to understand specific requirements. Proceeding without proper permits and approvals can result in fines, forced system removal, or denial of grid interconnection.
DIY solar installation requires both specialized tools and diverse technical skills. Essential tools include a quality drill with various bits, socket wrench sets, wire strippers and crimpers, multimeters for electrical testing, chalk lines for layout, stud finders, safety harnesses, and appropriate personal protective equipment. You'll need skills in several areas: reading and understanding electrical diagrams, working safely at heights, basic carpentry for mounting systems, roof penetration and waterproofing techniques, and ability to navigate building codes and permit applications. Previous experience with electrical work and roofing projects significantly increases your likelihood of success. If you lack confidence in any of these areas, consider consulting with professionals for those specific aspects or opting for full professional installation instead.
Proper system sizing requires analyzing multiple factors simultaneously. Start by reviewing 12 months of utility bills to calculate your annual electricity consumption in kilowatt-hours (kWh). Account for your local climate and average daily sun hours, which vary significantly by region and season. Consider your roof's orientation and tilt angle, as south-facing roofs with optimal tilt angles produce more energy than east or west-facing installations. Factor in efficiency losses from shading, panel degradation over time, and energy conversion from DC to AC power. Online solar calculators can process these variables and recommend appropriate system sizes for your location. Most homeowners target systems that offset 100% of their annual electricity usage, though your specific goals and budget may warrant different sizing decisions.
SPS Editorial Team
Solar Permit Solutions
Solar Permit Solutions provides professional solar permit design services for residential, commercial, and off-grid installations across all 50 states. Our team ensures permit-ready plan sets delivered fast.
Related Articles

Solar Permits in Minnesota: Xcel Energy, Great River Energy & Local AHJ Guide 2026
Minnesota solar permits require a building permit and an electrical permit from ...
Solar Permits in Michigan: Complete DTE Energy, Consumers Energy & Local AHJ Guide (2026)
Michigan is adding solar faster than most people expect. With residential electr...
Professional vs. DIY Solar Installation: Can You Pull Your Own Permit and Save Money?
Professional solar installation costs 10-30% more but delivers better ROI throug...