Mounting solar panels correctly requires specific components, proper materials, and adherence to local building codes. This comprehensive guide covers everything from selecting mounting hardware and materials to choosing optimal placement locations and executing a step-by-step installation process for rigid rooftop solar panels.
Solar panel mounting systems typically include fixing brackets, adjustable brackets, mounting rails, roof attachments, and module clamps. The installation process involves securing these components to create a stable structure that can withstand wind loads of 100 to 180 mph and last 25 years or more. Most residential installations take 1 to 3 days to complete, depending on system size and roof complexity.
Key requirements for successful solar panel mounting include maintaining a minimum 10-degree tilt angle to prevent dust accumulation, ensuring at least 20mm gaps between adjacent panels, and obtaining necessary building and electrical permits before installation. Material choices range from aluminum (lightweight and corrosion-resistant) to stainless steel (most durable but expensive) and affect both installation difficulty and long-term performance. For additional solar installation resources, comprehensive guides cover various aspects of residential and commercial solar projects.
Whether mounting panels on residential roofs, ground systems, walls, or alternative surfaces, proper installation protects the roof structure, maximizes energy generation, and ensures warranty coverage. DIY installations can reduce costs significantly, though professional installation guarantees optimal positioning, electrical safety compliance, and expert knowledge of local regulations.
Essential Components And Hardware For Panel Mounting
The required components for mounting rigid solar panels depend largely on the manufacturer specifications.
However, basic principles apply universally to any rooftop solar installation.
This guide uses panels with industry-leading 23% efficiency ratings and IP68 waterproof ratings as examples. These rank among the highest-performing and most durable options for residential photovoltaic arrays.
Quality mounting systems typically include Tilt Mount Brackets for easy rooftop installation. Standard components include four fixing brackets, two adjustable brackets, and necessary screws. These components provide everything needed to mount panels on roofs or any flat surface receiving direct sunlight.
For more permanent rooftop installations, additional components include roof attachments, mounting rails, and module clamps.
In this mounting system configuration, installers drill attachments onto mounting rails to secure the structure firmly to the roof. A support bracket installation kit works well for this setup.
Other installation types include bolt installation and pressing block installation.
Solar panel mounting kits containing all necessary mounts and screws are available from reliable third-party manufacturers.
Beyond the installation kit, required tools include:
- Wrench
- Angle ruler / Triangle ruler
- Tarp/Canvas

Selecting The Right Mounting Materials For Your Installation
Various mounting materials are available depending on where the solar panel array will be mounted. Several options are detailed below:
Aluminum: Strong, lightweight, and corrosion-resistant. Working with aluminum angles is straightforward, and standard home drills suffice for creating necessary holes. The material proves compatible with most solar panel frames. However, aluminum is not advisable when welding the mount to a structure is required.
Angle Iron: This material corrodes quickly but remains easy to use. Galvanizing the material slows corrosion, though mounting brackets and bolts remain susceptible to rusting, particularly in damp climates. Angle iron is readily available, and brackets are easy to weld.
Stainless Steel: Difficult to work with and represents a costly option. However, it offers exceptional durability, lasting decades. When opting for a stainless steel mounting system, working with professional installers is advisable.
Wood: Readily available, easy to work with, and inexpensive. The primary drawback involves faster degradation compared to other options, even when treated. Clips or battens are necessary to attach solar modules to wooden frames.
Different materials present distinct benefits and drawbacks. The right choice depends greatly on budget, environmental conditions, and intended mounting location.
Optimal Placement Options For Solar Panel Arrays
Multiple options exist for mounting solar panels. The optimal choice typically involves the flat surface on a property that receives maximum sunlight exposure.
For irregular surfaces, rigid solar panel arrays can be augmented with flexible solar panels. While flexible solar panels don’t produce sufficient rated power to serve as the sole choice for residential PV arrays, they help maximize electricity generation potential. Expert design services provide comprehensive solutions for all mounting configurations.
Common mounting location options include:
Residential Roof
Rooftop installation often represents the best option for mounting solar panels on homes. Depending on location specifics, rooftop panels are less likely to be affected by shade or other external factors that diminish electricity generation compared to other areas.
Solar panels can be installed on various roof types, including residential homes, tiny homes, sheds, and off-grid structures.
However, rooftop installation can present challenges. Limitations may arise due to roof direction and incline.
Roof age requires consideration. Depending on materials used, average residential rooftops last between 25 to 50 years before requiring replacement. If a roof nears the end of its useful life, solar panel installation should occur after roof replacement.
Properly installed solar panel systems should not damage roofs. They may actually shield roofs from sunlight, inclement weather, and other natural damage, potentially extending roof lifespan.
Motorhome/Van Roof
Solar panels are rapidly becoming standard for electricity generation in motorhomes and campers. PV arrays can be mounted to motorhome or van roofs to capture solar energy while traveling.
Flexible solar panels may be worth incorporating for this surface type. They mount easily to curved or irregular surfaces to maximize electricity generation potential.
A Pole In The Ground
Mounting solar panels on poles allows easy adjustment of panel angles to match the sun’s seasonal position on the horizon. However, this setup typically limits installations to single panels and suits situations requiring minimal electricity output.
Ground Mounting
Ground panel mounting serves as a viable option when roof space is unavailable or roofs are shaded or north-facing. Portable solar panels merit consideration in these cases. They’re easily repositioned to maximize sunlight capture throughout the day and can be transported and set up quickly.
Permanent ground mounting is more common for large-scale commercial systems. Ground mounts typically require extensive land areas.
Window Mount
Window mounting offers a cost-effective solution when only small amounts of electricity are needed to supplement on-grid power or provide backup for essential devices during blackouts.
For apartment residents, window mounting might be the most viable option. However, obvious drawbacks exist, such as blocking windows. In apartments where natural light is limited, this sacrifice may be too significant.
A Wall
Wall-mounted solar panels may represent the best option, especially when opting for smaller panels like 100W rigid solar panels.
When walls receive significant direct sunlight during the day, wall mounting becomes a viable option and can augment rooftop PV arrays.

Solar Permit Solutions
DIY Solar? We Handle the Permits.
You install the panels — we design the permit-ready plan set your building department requires. Fast, affordable, all 50 states.
Complete DIY Installation Process Step By Step
Professional installation costs can be avoided by following proper DIY procedures.
This step-by-step DIY guide provides comprehensive mounting instructions.
The solar panel mounting process may differ slightly based on various factors. This guide uses Tilt Mount Brackets for rigid solar panels as examples.
Equipment manuals should be consulted before proceeding with panel installation.
1. Plan And Prepare
Begin by gathering necessary tools for DIY installation.
Additional planning and preparation stage tasks include obtaining required permits and checking local requirements for offsetting structures from existing buildings and property lines.
Depending on mounting location, compliance with additional safety requirements may be necessary. For ground-mount solar systems, this might include installing fencing or maintaining a certain perimeter around the solar system free of vegetation.
Awareness of water wash areas, flood zones, or other factors leading to property restrictions is important. Municipal regulations might prohibit building near those areas. Additionally, installing ground-mounted systems in flood-prone areas or regions with frequent severe weather events could create problems.
2. Attach The Fixing Bracket To The Solar Panel
After gathering all tools and addressing permits and safety requirements, mounting system setup begins.
The first step involves attaching the fixing bracket to the solar panel. Place the solar panel face-down on tarp or canvas to protect the photovoltaic surface.
Ensure mounting holes on the panel back align with holes in the fixing bracket. Avoid modifying the module frame, as doing so may void manufacturer warranties.
3. Attach The Fixing Bracket To The Solar Panel’s Mounting Hole
With proper alignment confirmed, attach the fixing bracket to the solar panel’s mounting hole.
Repeat this process on the panel’s opposite side. Ensure bolt alignments are symmetrical and fix mounting holes at the same level.
4. Attach The Other Leg Of The Fixing Bracket
Connect the fixing bracket’s other leg to the first leg, joining them at one end. Hand-tightening the screw is recommended to allow fixing bracket adjustment to the proper tilt angle (detailed in the next step).
Repeat the same process on the opposite side so all four fixing bracket legs are attached.
5. Attach The Adjustable Bracket To The Fixing Bracket
Attach the adjustable bracket to the fixing bracket on both sides.
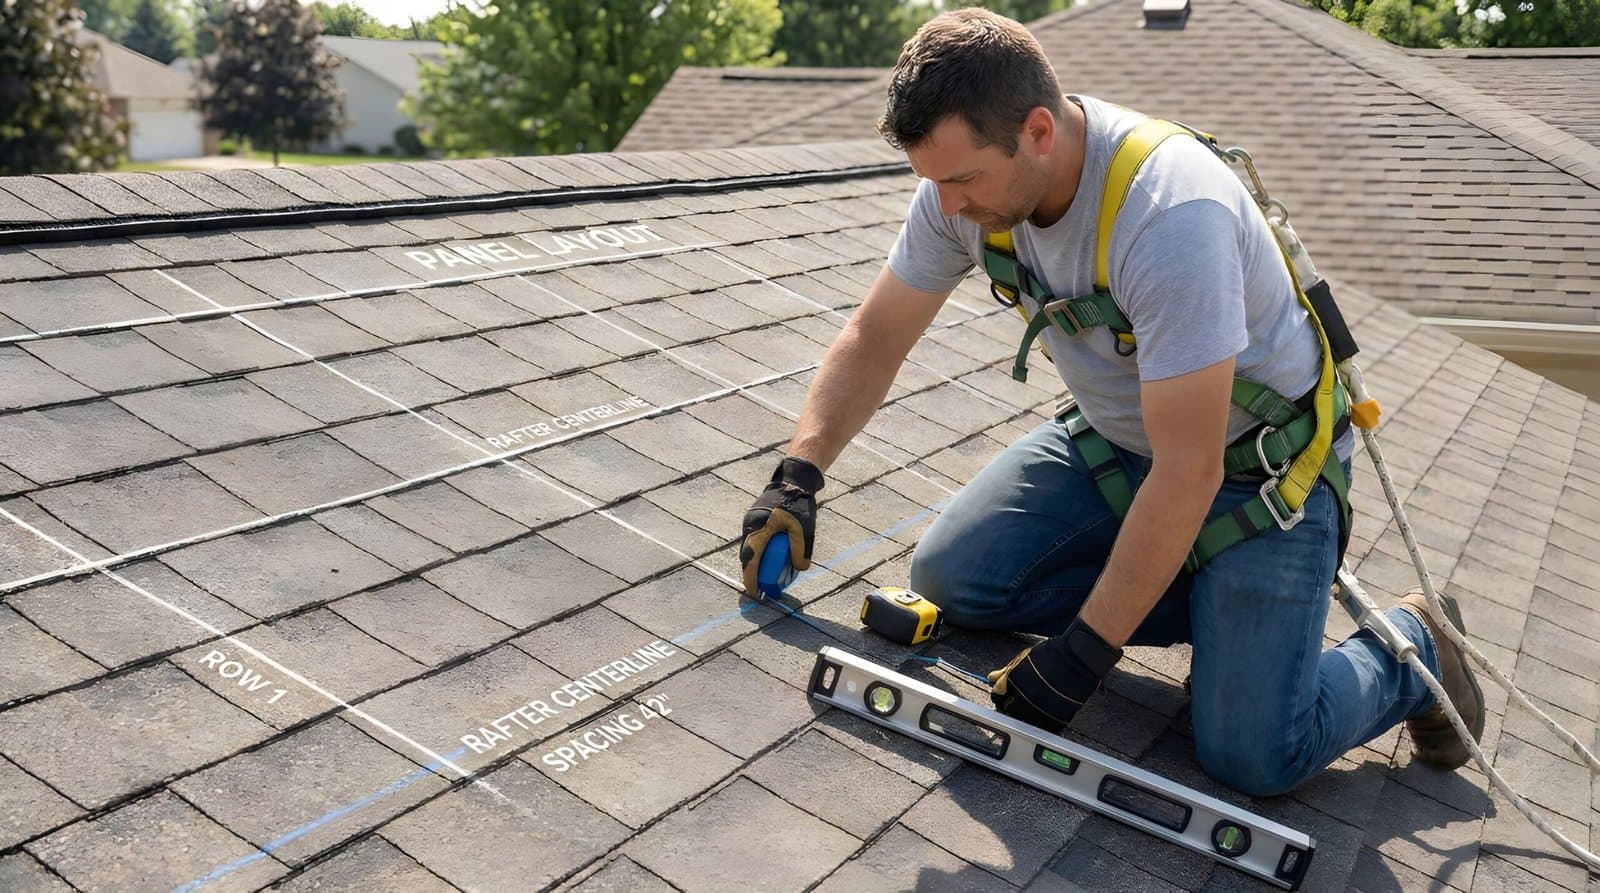
When attaching the adjustable bracket, ensure the installation tilt angle measures at least 10 degrees. Angles less than 10 degrees likely result in dust accumulation and decreased performance. If the tilt angle falls below 10 degrees, more frequent solar panel cleaning is necessary.
Careful consideration of solar panel tilt is essential to maximize investment value and generate maximum energy output. Several factors determine the optimal angle for panels to capture maximum sunlight.
Research should be conducted to identify the optimal tilt angle for solar panels based on mounting location. Factors impacting ideal panel angles include latitude, roof tilt (for roof mounting), and even seasonal variations.
Solar trackers continuously pinpoint ideal angles to the sun and adjust panels accordingly. Solar trackers prove particularly useful in areas with low average peak sun hours.
After deciding on the angle and adjusting mounting hardware, PV panel installation is ready to proceed.
6. Connect Multiple Panels (Optional)
Multiple solar panels can be connected either in series or parallel configurations. However, a minimum 20mm (3/4 inch) gap must exist between two adjacent solar panels. The distance between a singular solar panel frame and the installation plane should measure at least 40mm (1.5 inches).
Conclusion
The steps required to mount solar panels vary based on method, location, and PV panel manufacturer. However, regardless of the PV panel model chosen, considerable common ground exists between manufacturers.
This guide provides valuable information for those seeking to reduce grid reliance and fossil fuel dependency for electricity. When DIY installation feels uncomfortable, increasing demand for residential solar power has created a competitive environment for professional installers.
Regardless of the chosen solar power system, the initial investment (even when spread over time with financing) represents a substantial commitment. Cutting corners on installation doesn’t make sense when it results in reduced electricity generation.
Achieving solar payback quickly and realizing return on investment occurs through utility bill savings. For professional assistance with permitting and design, expert support ensures compliance and optimal system performance.
Ready to start your solar panel installation project? Use this guide to plan your DIY installation, or contact Solar Permit Solutions for expert permitting services and design assistance across all 50 states.
FAQs
DIY Solar? We Handle the Permits.
You install the panels — we design the permit-ready plan set your building department requires. Fast, affordable, all 50 states.
Frequently Asked Questions
The minimum recommended tilt angle for solar panel installation is 10 degrees. Angles less than 10 degrees can lead to dust accumulation and decreased system performance. When panels are installed at angles below this threshold, more frequent cleaning schedules become necessary to maintain optimal electricity generation. The tilt angle should be determined based on geographical latitude, roof inclination, and seasonal sun positioning to maximize energy capture throughout the year.
Solar panels can be installed on various roof types, including residential homes, tiny homes, sheds, and off-grid structures. However, several factors must be considered before installation. Roof age is critical, as residential rooftops typically last 25 to 50 years depending on materials used. If a roof nears the end of its useful life, replacement should occur before solar panel installation. Additionally, roof direction, incline, and shading conditions significantly impact system performance and may present installation limitations.
When connecting multiple solar panels, a minimum gap of 20mm (3/4 inch) must be maintained between two adjacent panels. Additionally, the distance between a singular solar panel frame and the installation plane should measure at least 40mm (1.5 inches). These spacing requirements ensure proper airflow, prevent overheating, facilitate maintenance access, and reduce the risk of damage from thermal expansion or contraction.
Stainless steel provides the highest durability for solar panel mounting systems, lasting decades with minimal degradation. However, this material is expensive and difficult to work with, typically requiring professional installation expertise. Aluminum offers an excellent balance of strength, lightweight properties, and corrosion resistance at a more affordable price point. The optimal material choice depends on budget constraints, local climate conditions, welding requirements, and intended installation location.
Properly installed solar panel systems should not damage roofs when installation follows manufacturer guidelines and local building codes. In fact, solar panels may protect roofs from direct sunlight exposure, inclement weather, and natural environmental damage, potentially extending roof lifespan. However, improper installation techniques, such as incorrect drilling or inadequate sealing, can compromise roof integrity. Professional installation or careful adherence to equipment manuals during DIY installation helps prevent roof damage and maintains manufacturer warranty coverage.
Professional installation is not strictly necessary for mounting solar panels, though it offers significant advantages. DIY installation can reduce costs for individuals comfortable with construction work and familiar with local permitting requirements. However, professional installers bring expertise in optimal panel positioning, electrical connections, safety compliance, and warranty preservation. The decision depends on technical skill level, comfort with heights and construction work, local code complexity, and the value placed on warranty protection versus installation cost savings. For commercial projects, professional installation is typically recommended.
Permit requirements for residential solar panel installation vary significantly based on local jurisdiction and installation type. Most municipalities require building permits for rooftop installations to ensure structural safety and code compliance. Electrical permits are typically necessary for grid-connected systems to verify safe electrical connections. Ground-mounted systems may require additional land-use permits and compliance with setback requirements from property lines. Consulting local building departments before beginning installation ensures all necessary permits are obtained and installation meets regulatory standards. Solar Permit Solutions can assist with navigating permit requirements nationwide.
SPS Editorial Team
Solar Permit Solutions
Solar Permit Solutions provides professional solar permit design services for residential, commercial, and off-grid installations across all 50 states. Our team ensures permit-ready plan sets delivered fast.
Related Articles
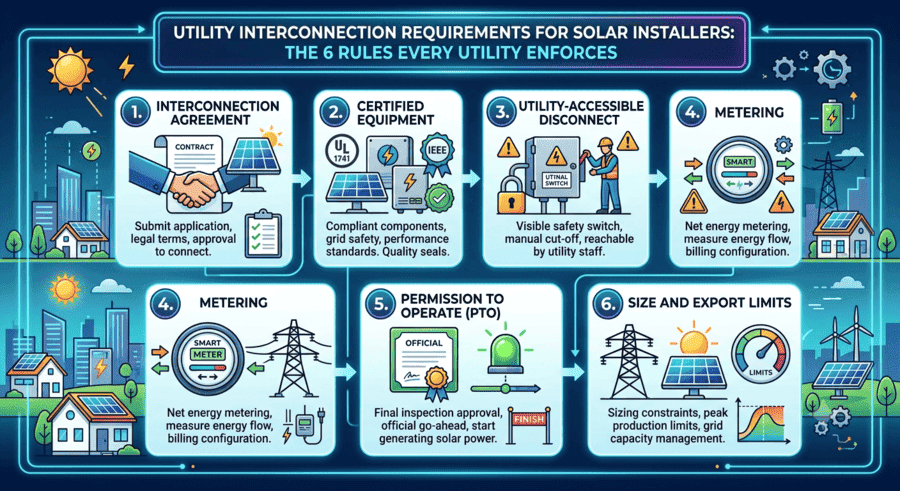
Utility Interconnection Requirements for Solar Installers: The 6 Rules Every Utility Enforces
interconnection agreement, UL 1741 and IEEE 1547 certified inverters, a utility-...
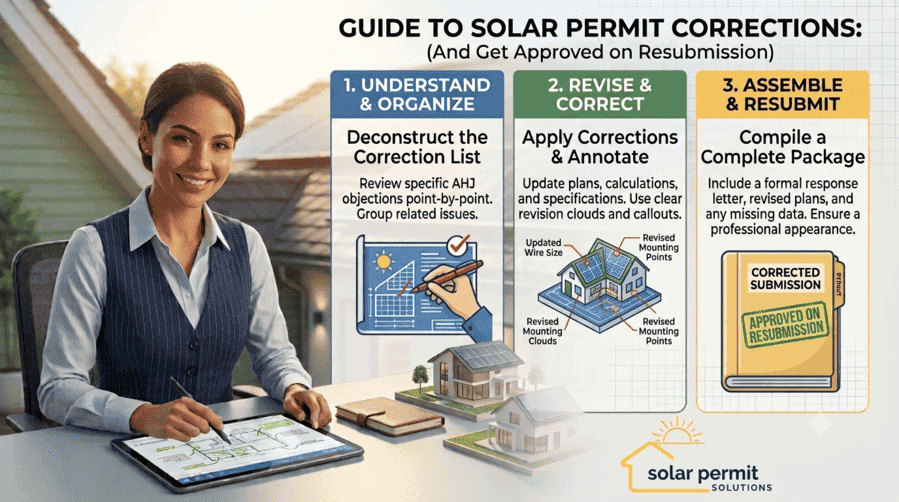
How to Respond to Solar Permit Corrections (And Get Approved on Resubmission)
To respond to a solar permit correction, read every comment from every reviewing...
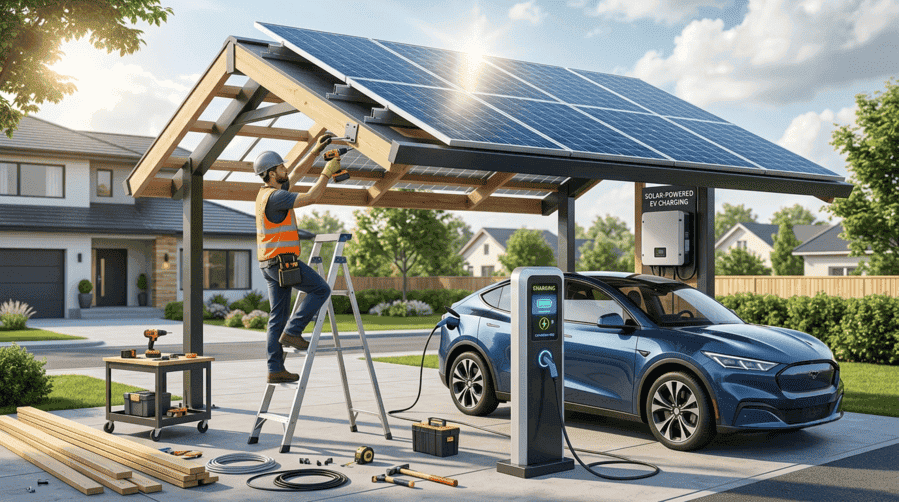
Can an EV Charging Station Be Powered by Solar? Here’s How to Build One
Yes, an EV charging station can be powered by solar. A grid-tied solar array pai...