Wiring solar panels to a breaker box requires connecting the solar inverter’s AC output to your electrical panel through either a load-side connection (after the main breaker) or a supply-side connection (before the main breaker). Load-side connections must follow the NEC 120% rule: (Main Breaker + Solar Breaker) ≤ (Busbar Rating × 1.20), while supply-side connections bypass this limitation but require additional approvals and junction boxes.
Most residential solar installations use load-side connections with a dedicated solar breaker rated at 125% of the inverter’s continuous output current. For a 32-amp inverter, you need a minimum 40-amp breaker (32A × 1.25 = 40A) and appropriately sized conductors, typically 8 AWG for AC wiring. Licensed electrician involvement is legally required in most jurisdictions for breaker box connections, even if other installation aspects are DIY-friendly.
Critical Safety Requirements:
- NEC Article 690.12 mandates rapid shutdown devices reducing DC voltage to safe levels within 30 seconds
- Arc-fault circuit interrupters (AFCI) are required for rooftop installations
- All work requires permits from your Authority Having Jurisdiction (AHJ)
- Personal protective equipment includes insulated gloves, safety glasses, and voltage testers
Connection Method Decision:
- Load-side (most common): Use when solar breaker + main breaker ≤ 120% of busbar rating
- Supply-side: Required when system exceeds 120% rule, installed before main breaker in junction box
- Example: A 200A panel with 200A main breaker allows maximum 40A solar breaker via load-side connection
Wire Sizing Fundamentals:
- DC wiring: Calculate based on string current, distance, and 3% voltage drop limit
- AC wiring: Size for 125% of inverter continuous output (derating for continuous solar generation)
- Common residential sizes: 12 AWG or 10 AWG for AC connections, varies by system capacity
System Types:
- Grid-tie: Simplest configuration with direct inverter-to-panel connection
- Off-grid: Requires charge controller, battery bank, and load management
- Hybrid: Most complex, includes automatic transfer switches and critical load panels

Critical Safety Measures & Regulatory Obligations
Safety represents your paramount concern when mastering solar panel to breaker box wiring systems. Solar projects involve numerous electrical dangers, from DC voltage at panel locations to AC connections at your distribution panel.
NEC Article 690.12 Regulatory Standards
The National Electrical Code Article 690.12 controls solar photovoltaic system rapid shutdown specifications for buildings. Essential specifications include:
- Rapid Shutdown Standards: Systems must incorporate rapid shutdown mechanisms that decrease DC voltage to safe thresholds within 30 seconds
- Arc-Fault Circuit Interrupters (AFCI): Mandated for most rooftop projects to eliminate electrical fire risks
- Grounding and Bonding: All metal components require proper grounding per NEC guidelines
- Disconnection Equipment: Easily accessible disconnect mechanisms required for both DC and AC system sides
- Overcurrent Safety: Correct fusing and breaker selection for system safeguarding
Professional Electrician vs DIY Installation
While certain solar installation elements accommodate DIY approaches, distribution panel connections usually demand professional knowledge:
Always engage a certified electrician for:
- Main distribution panel alterations or improvements
- Supply-side (line-side) installations
- Service entrance modifications
- Any tasks requiring utility involvement
- Advanced electrical calculations and load evaluations
Potential DIY elements (with appropriate permits):
- Solar panel attachment and DC conductor installation
- Conduit placement and cable organization
- Equipment grounding and bonding procedures
- System monitoring configuration
Personal Protection Equipment Requirements
Critical safety gear consists of:
- Insulated electrical gloves appropriate for operating voltage
- Safety eyewear with lateral protection
- Non-conductive footwear
- Voltage measurement devices and multimeters
- Insulated equipment with suitable ratings
- Arc flash protection garments for high-energy installations
Power Disconnect Protocols
Prior to commencing any electrical tasks:
- Deactivate the main breaker at your distribution panel
- Shield solar panels or disconnect DC power sources
- Verify all circuits using a voltage measurement device
- Implement lockout and tagout procedures for all power sources
- Confirm zero energy condition before continuing
Comprehending Your Solar System Elements
Successfully connecting solar panels to breaker box systems demands understanding how individual components operate and communicate within the complete system design.
Solar Panels and DC Generation Properties
Solar panels produce direct current (DC) electricity with voltage and current attributes that fluctuate based on sunlight strength and temperature conditions. A standard residential solar panel generates:
- Open Circuit Voltage (Voc): 21.7-43.2 volts per unit
- Maximum Power Point Voltage (Vmp): 18-36 volts per unit
- Short Circuit Current (Isc): 8-12 amps per unit
- Maximum Power Point Current (Imp): 7-11 amps per unit
When panels connect in series, voltages combine while current stays consistent. Parallel arrangements combine current while voltage remains identical. Grasping these interactions proves crucial for appropriate system planning and conductor selection.
Inverters: String vs Micro vs Power Optimizers
String Inverters: Single substantial inverter managing multiple panels linked in series. Most economical for projects without shading complications. Standard residential string inverters span 3kW to 10kW capacity.
Microinverters: Individual inverters mounted to each panel, transforming DC to AC at the panel location. Deliver panel-level tracking and optimization but require higher initial investment. Perfect for projects with shading or intricate roof configurations.
Power Optimizers: DC-to-DC transformers that enhance each panel’s generation before transmitting power to a central string inverter. Deliver certain microinverter advantages at reduced expense.
Charge Controllers for Battery Applications
Off-grid and hybrid installations demand charge controllers to control power delivery to batteries:
PWM Controllers: Pulse Width Modulation controllers cost less but operate less efficiently, typically achieving 75-80% efficiency. Optimal for smaller installations where budget represents the primary consideration.
MPPT Controllers: Maximum Power Point Tracking controllers reach 95-98% efficiency by enhancing the power conversion from panels to batteries. Critical for larger installations and cold weather regions.
Battery Arrays and Energy Storage
Battery choice significantly influences system planning and conductor specifications:
- Lithium Iron Phosphate (LiFePO4): Maximum efficiency, extended operational life, yet higher initial expense
- Lead Acid: Reduced upfront investment but abbreviated lifespan and reduced efficiency
- Lithium Ion: Effective compromise of performance and expense for residential uses
Battery array voltage impacts conductor sizing and system compatibility. Standard arrangements include 12V, 24V, and 48V systems, with elevated voltages permitting reduced wire sizes for equivalent power levels.
Monitoring Systems and Disconnects
Contemporary solar projects require multiple disconnect mechanisms and monitoring features:
- DC Disconnect: Separates solar panels from remaining system components
- AC Disconnect: Isolates inverter generation from distribution panel
- Production Meters: Monitor energy production for net metering
- System Monitoring: Remote tracking of system operation and fault identification
Distribution Panel Connection Categories
When linking solar panels to breaker box systems, you possess two primary connection approaches, each with particular uses, benefits, and code specifications.
Load-Side Installations (Most Prevalent)
Load-side installations occur after the main breaker, representing the most prevalent approach for residential solar projects. This technique involves adding a dedicated solar breaker in your current distribution panel.
120% Rule Formulas and Demonstrations
The NEC 120% rule restricts the capacity of solar systems connectable through load-side installations. The regulation states that combined main breaker and solar breaker ratings must not surpass 120% of the panel’s busbar capacity.
Formula Structure: (Main Breaker Rating + Solar Breaker Rating) ≤ (Busbar Rating × 1.20)
Demonstration 1: Standard 200A Panel
- Busbar Rating: 200A
- Main Breaker: 200A
- Maximum Solar Breaker: (200A × 1.20) – 200A = 40A
Demonstration 2: Reduced Main Breaker
- Busbar Rating: 200A
- Main Breaker: 175A (reduced)
- Maximum Solar Breaker: (200A × 1.20) – 175A = 65A
Breaker Selection Standards (125% Rule)
Solar breakers must accommodate 125% of the inverter’s continuous generation current rating. This specification addresses the continuous nature of solar production during maximum sun exposure.
Formula Demonstration:
- Inverter Generation: 32A continuous
- Necessary Breaker Size: 32A × 1.25 = 40A minimum
Panel Capacity Restrictions
Older distribution panels may not support large solar systems due to busbar constraints:
- 100A Panels: Maximum 20A solar breaker (100A × 1.20 – 100A = 20A)
- 125A Panels: Maximum 25A solar breaker (125A × 1.20 – 125A = 25A)
- 150A Panels: Maximum 30A solar breaker (150A × 1.20 – 150A = 30A)
Supply-Side (Line-Side) Installations
Supply-side installations occur before the main breaker, typically within a junction enclosure between the utility meter and main distribution panel. This approach circumvents the 120% rule constraints but demands additional permissions and factors.
When to Implement Supply-Side Installations
Supply-side installations become necessary when:
- The planned solar system surpasses 120% rule constraints
- The distribution panel lacks capacity for additional breakers
- Adding whole-home battery backup installations
- Main panel improvement proves impractical or economically unfavorable
Junction Enclosure Specifications
Supply-side installations require appropriately rated junction enclosures with:
- Sufficient ampacity for combined utility and solar currents
- Appropriate environmental classifications for exterior placement
- Reachable position for maintenance and examination
- Suitable grounding and bonding arrangements
Authority Having Jurisdiction (AHJ) Permission
Many regions maintain particular specifications for supply-side installations:
- Specialized permit submissions may be necessary
- Utility involvement and permission often mandatory
- Extra safety equipment may be required
- Improved labeling and documentation standards

Solar Permit Solutions
Skip the Permit Headaches
We design plan sets that pass inspection the first time. Code-compliant, PE-stamped, accepted by AHJs nationwide.
Grid-Connected Solar to Breaker Box Wiring
Grid-connected solar systems constitute the most prevalent residential project category, enabling you to produce solar power while preserving connection to the utility grid for backup electricity and net metering advantages.
Sequential Grid-Connected Installation Method
Step 1: System Planning and Permitting Finish electrical calculations, secure permits, and arrange with your utility provider for interconnection permission. This phase typically requires 2-6 weeks based on local specifications.
Step 2: Mount Solar Panels and DC Conductors Attach panels following manufacturer guidelines and link DC conductors in suitable series/parallel arrangements. Utilize MC4 connectors for weatherproof links and appropriately sized DC conductors.
Step 3: Mount Inverter and AC Disconnect Position the inverter in a shaded, properly ventilated area within 25 feet of the distribution panel. Place the AC disconnect mechanism in an easily reachable location between the inverter and distribution panel.
Step 4: Route AC Conductors to Distribution Panel Place appropriately sized AC conductors from the inverter to the distribution panel using proper conduit and adhering to local electrical regulations. Standard residential projects utilize 12 AWG or 10 AWG conductors based on system capacity.
Step 5: Mount Solar Breaker in Distribution Panel Position the solar breaker in the distribution panel, typically in the location most distant from the main breaker. Attach the solar AC conductors to the breaker adhering to correct polarity and torque guidelines.
AC Disconnect Standards and Location
NEC specifications require easily reachable AC disconnect mechanisms for solar projects:
- Location: Within visual range of the inverter and distribution panel
- Labeling: Distinctly identified “Solar Disconnect” or “PV System Disconnect”
- Rating: Must accommodate the complete inverter generation current
- Type: Non-fused disconnect mechanisms typically prove adequate
Rapid Shutdown System Integration
Contemporary solar projects must incorporate rapid shutdown functionality to decrease DC voltage to safe thresholds within 30 seconds of triggering:
- Module-Level Shutdown: Microinverters and power optimizers deliver inherent rapid shutdown
- String-Level Shutdown: String inverters demand additional rapid shutdown mechanisms
- Activation Approaches: Manual mechanisms, utility disconnect, or emergency stop controls
Production Meter Placement
Net metering arrangements typically necessitate production meters to monitor solar energy production:
- Utility-Supplied Meters: Bidirectional meters that monitor both usage and production
- Customer-Owned Meters: Independent production meters for tracking and billing
- Smart Meter Integration: Advanced metering framework for real-time tracking
Conductor Sizing Formulas and Demonstrations
Appropriate conductor sizing guarantees safety and reduces voltage loss:
DC Conductor Sizing Demonstration:
- String Current: 10A
- Conductor Run: 100 feet
- Voltage Drop Threshold: 3%
- Necessary Conductor Size: 12 AWG minimum
AC Conductor Sizing Demonstration:
- Inverter Generation: 32A continuous
- Derated Current: 32A × 1.25 = 40A
- Necessary Conductor Size: 8 AWG minimum
Off-Grid Solar to Breaker Box Wiring
Off-grid solar systems function independently from the utility grid, demanding battery storage and distinct wiring strategies compared to grid-connected projects.
Battery-Based System Wiring Distinctions
Off-grid systems demand additional elements and conductor factors:
- Charge Controller Integration: Controls power delivery from panels to batteries
- Battery Array Wiring: Series/parallel links for desired voltage and storage
- DC Load Centers: Independent panels for 12V/24V/48V DC loads
- Inverter Sizing: Must accommodate peak loads without grid assistance
Charge Controller to Battery Links
Appropriate charge controller wiring proves critical for battery longevity and system safety:
Link Sequence:
- Link batteries to charge controller initially
- Link solar panels to charge controller subsequently
- Place appropriate fusing on both positive conductors
- Utilize appropriately sized conductors for anticipated current levels
Conductor Sizing for Battery Links:
- Battery Array: 48V, 200Ah
- Maximum Charge Current: 50A
- Necessary Conductor Size: 6 AWG minimum for 10-foot run
Battery Array to Inverter Wiring
High-current DC links between batteries and inverters demand careful consideration to conductor sizing and linking approaches:
- Large Conductors: Typically 4/0 AWG or larger for high-power inverters
- Short Runs: Maintain DC runs as brief as possible to reduce voltage loss
- Appropriate Terminations: Utilize lugs and terminal blocks rated for the current
- Fusing: Place appropriate DC fuses or breakers near the battery array
Sub-Panel vs Main Panel Factors
Off-grid systems frequently utilize sub-panels to isolate critical loads from non-essential circuits:
Critical Load Sub-Panel:
- Refrigeration and freezer circuits
- Lighting and communication systems
- Water pumps and heating systems
- Medical equipment and security systems
Non-Critical Load Management:
- Electric vehicle charging
- Pool pumps and hot tubs
- Electric heating and air conditioning
- Workshop and garage equipment
Generator Integration for Backup Charging
Most off-grid systems incorporate backup generators for prolonged cloudy intervals:
- Automatic Transfer Switches: Smoothly transition between solar and generator power
- Battery Chargers: Dedicated chargers for rapid battery charging during generator function
- Load Management: Prioritize battery charging over other loads during generator function
Hybrid Systems: Grid-Connected with Battery Backup
Hybrid solar systems merge the advantages of grid-connected and off-grid systems, delivering both net metering functions and backup power during blackouts. These systems frequently incorporate advanced solar energy storage systems that automatically regulate power distribution between solar panels, batteries, and the electrical grid.
Hybrid Inverter Wiring Arrangements
Hybrid inverters regulate multiple power sources and loads simultaneously:
- AC Coupling: Independent solar and battery inverters linked on the AC side
- DC Coupling: Single hybrid inverter managing both solar and battery links
- Multi-Mode Function: Automatic transition between grid-connected and backup modes
Critical Load Panel Configuration
Hybrid systems typically incorporate independent critical load panels for backup power:
- Essential Circuits: Refrigeration, lighting, communications, and medical equipment
- Load Formula: Size battery array and inverter for critical loads exclusively
- Transfer Duration: Smooth transition during power blackouts (typically under 20 milliseconds)
Automatic Transfer Switch Integration
Transfer switches enable automatic transition between grid and backup power:
- Utility Interactive: Tracks grid voltage and frequency
- Load Shedding: Automatically disconnects non-essential loads during backup function
- Generator Integration: Synchronizes with backup generators for prolonged blackouts
Conductor Sizing, Conduit, and Hardware Specifications
Appropriate conductor sizing and hardware choice guarantee safe, code-compliant projects that operate reliably for decades.
DC and AC Conductor Gauge Formulas
Conductor sizing must address both safety and voltage drop factors:
DC Conductor Sizing Formula: Conductor Size = (2 × Distance × Current × Resistance) / (Voltage Drop Threshold × System Voltage)
AC Conductor Sizing Demonstration:
- Inverter Generation: 7,200W at 240V = 30A
- Continuous Current: 30A × 1.25 = 37.5A
- Necessary Conductor Size: 8 AWG (40A rating)
Conduit Categories and Sizing Standards
Electrical conduit safeguards wiring and guarantees code adherence:
- PVC Conduit: Most prevalent for underground and interior runs
- EMT Conduit: Electrical metallic tubing for exposed projects
- Liquid-Tight Conduit: Flexible conduit for equipment links
- Fill Formulas: Maximum 40% conduit fill for three or more conductors
Breaker Guidelines and Compatibility
Solar breakers must satisfy particular specifications for safe function:
- Backfeed Rating: Breakers must accommodate reverse current flow
- Manufacturer Compatibility: Utilize only breakers approved for your panel brand
- Interrupting Capacity: Must accommodate available fault current
- Temperature Rating: Factor ambient temperature circumstances
Understanding circuit breaker compatibility in solar systems helps ensure proper equipment selection. Popular options include Eaton’s backfeed-rated breakers, Siemens circuit breakers, and Schneider Electric’s interlock systems.
Labeling Standards and Best Practices
Appropriate labeling guarantees safety and code adherence:
- Solar Breaker Labeling: “Solar PV System” or similar designation
- Rapid Shutdown Labels: Mandatory at disconnect positions
- System Details: DC voltage, AC voltage, and maximum current ratings
- Emergency Contact: Installer and system owner contact details
Typical Installation Obstacles and Solutions
Solar projects frequently encounter particular obstacles that demand creative solutions and thorough planning.
Panel Capacity Restrictions and Improvements
Older distribution panels may not support desired solar system capacities:
Panel Improvement Factors:
- Cost Evaluation: Compare panel improvement expenses to supply-side connection expenses
- Service Capacity: Guarantee sufficient utility service for larger panels
- Future Growth: Account for electric vehicle charging and other loads
- Permit Standards: Panel improvements typically demand electrical permits
Wet Breaker Box Scenarios and Correction
Moisture in distribution panels creates serious safety dangers:
Immediate Steps:
- Avoid touching the panel or activating any mechanisms
- Deactivate power at the utility meter if safely reachable
- Contact a certified electrician immediately
- Record the circumstances with photographs for insurance documentation
Typical Moisture Sources:
- Roof leaks above distribution panels
- Condensation from temperature variations
- Plumbing leaks near electrical equipment
- Insufficient panel sealing in exterior projects
Breaker Tripping Problems and Troubleshooting
Solar breakers may trip due to various system problems:
Typical Causes and Solutions:
- Inverter Malfunctions: Review inverter error codes and manufacturer documentation
- Ground Faults: Examine DC conductors for damage or moisture penetration
- Arc Faults: Inspect DC links for loose or corroded terminals
- Overload Circumstances: Confirm appropriate breaker sizing and system planning
Voltage Drop Formulas and Reduction
Excessive voltage loss diminishes system efficiency and may trigger equipment complications:
Voltage Drop Formula: Voltage Drop = (2 × Distance × Current × Resistance) / 1000
Reduction Approaches:
- Larger Conductors: Utilize conductor sizes exceeding minimum standards
- Shorter Runs: Reduce distance between elements
- Higher Voltages: Implement higher DC voltages to decrease current
- Parallel Conductors: Install multiple conductors in parallel for high-current uses
Understanding proper DC connector installation and photovoltaic wire specifications helps prevent common wiring issues. Different solar panel wiring techniques can also impact voltage drop and overall system performance.

Testing, Commissioning, and Maintenance
Appropriate testing and continuous maintenance guarantee optimal system operation and safety throughout the system’s 25+ year operational life.
System Testing Methods and Equipment
Comprehensive testing confirms appropriate installation and operation:
Critical Testing Equipment:
- Digital Multimeter: Voltage, current, and resistance measurements
- Insulation Tester: Confirms appropriate insulation resistance
- Ground Fault Tester: Verifies grounding system integrity
- Irradiance Meter: Measures solar radiation for operation confirmation
Testing Sequence:
- Confirm all links are secure and appropriately torqued
- Measure DC voltage and current at various system locations
- Confirm AC generation voltage and frequency
- Verify all disconnect mechanisms and safety systems
- Validate appropriate grounding and bonding
Operation Monitoring Configuration
Contemporary solar systems incorporate comprehensive monitoring functions:
- Production Monitoring: Monitor daily, monthly, and annual energy production
- Consumption Monitoring: Track household energy usage patterns
- Fault Detection: Automatic notifications for system complications
- Weather Correlation: Compare operation to local weather circumstances
Regular Maintenance Schedules
Consistent maintenance maximizes system operation and longevity:
Monthly Tasks:
- Examine system operation data
- Visual examination of reachable elements
- Verify for loose links or damage
- Clean panels when necessary
Annual Tasks:
- Professional electrical examination
- Torque verification on all electrical links
- Insulation resistance testing
- Inverter maintenance and firmware improvements

Cost Evaluation and ROI Factors
Comprehending the financial elements of solar installation aids informed decisions about system capacity, elements, and installation approaches. For homeowners exploring residential solar panel projects, assessing various solar financing alternatives can significantly influence the overall return on investment.
DIY vs Professional Installation Expenses
Installation expenses fluctuate significantly based on system complexity and local labor rates:
DIY Installation Savings:
- Labor expenses: $1.00-$2.00 per watt savings
- Permit and examination: $500-$2,000
- Equipment markup: 10-20% savings potential
- Total potential savings: 20-40% of total system expense
Professional Installation Advantages:
- Warranty coverage for labor and installation
- Code adherence and examination coordination
- Insurance and liability safeguarding
- Faster installation and system commissioning
Learn more about professional solar panel installation vs DIY to make an informed decision for your project.
Element Cost Distributions
Standard cost allocation for residential solar systems:
- Solar Panels: 12% of total system expense
- Inverters: 10-15% of total system expense
- Mounting and Hardware: 10-15% of total system expense
- Electrical Elements: 5-10% of total system expense
- Installation Labor: 25-35% of total system expense
Extended Maintenance Expenses
Plan for continuous maintenance and eventual element replacement:
- Annual Maintenance: $150-$300 per year
- Inverter Replacement: $2,000-$4,000 after 10-15 years
- Panel Cleaning: $100-$300 per cleaning
- Monitoring System: $50-$200 per year
Comprehending how to connect solar panels to breaker box systems safely and effectively demands careful planning, appropriate element choice, and adherence to electrical regulations. Whether you select a DIY strategy or professional installation, emphasizing safety and code adherence guarantees your solar system will deliver clean, dependable energy for decades ahead.
Remember that electrical tasks carry inherent dangers, and many regions mandate certified electrician participation for breaker box links. When uncertain, consult with qualified professionals to guarantee your solar project satisfies all safety and operation standards.
Conclusion
Connecting solar panels to your breaker box represents a significant undertaking that combines technical expertise, safety awareness, and regulatory compliance. Throughout this guide, we’ve explored the critical components of successful solar integration, from understanding the fundamental differences between supply-side and load-side connections to mastering the complexities of wire sizing calculations and safety protocols.
The journey to solar energy independence begins with education and careful planning. Whether you’re pursuing a straightforward grid-connected system through our residential solar design services, a commercial solar installation, or a completely off-grid solar system, the principles remain consistent: prioritize safety, adhere to electrical codes, and never compromise on component quality or installation standards.
Remember that the 120% rule, NEC Article 690.12 compliance, and proper wire sizing aren’t merely bureaucratic requirements, they’re fundamental safety measures designed to protect your home, your family, and the electrical professionals who may service your system in the future. Understanding the differences between NEC Article 690 and 705 helps ensure comprehensive code compliance. Taking shortcuts or ignoring these standards can result in system failures, fire hazards, voided warranties, and potentially tragic consequences.
While DIY solar installation can offer substantial cost savings, recognize the boundaries of your expertise. Certain tasks, particularly those involving main panel modifications, supply-side connections, and final electrical hookups, fall squarely within the professional electrician’s domain. The modest investment in professional services for these critical components provides invaluable peace of mind and ensures your system operates safely for its entire 25+ year lifespan.
As solar technology continues advancing and becoming more accessible, homeowners have unprecedented opportunities to reduce energy costs, minimize environmental impact, and achieve greater energy independence. Solar radiation varies significantly across the United States, as shown by nationwide solar radiation maps, making proper system design essential for optimal performance. By following the guidelines presented in this comprehensive manual, consulting with qualified professionals when necessary, and maintaining your system properly, you’ll maximize your solar investment while contributing to a cleaner, more sustainable energy future supported by the Department of Energy’s Solar Energy Technologies Office.
The transition to solar power marks more than an equipment upgrade, it represents a commitment to responsible energy stewardship and long-term financial planning according to the EPA’s green power market initiatives. Take your time, ask questions, secure proper permits, and build your system correctly from the foundation up. Your diligence today ensures decades of reliable, clean energy production tomorrow.
For professional assistance with solar permit design and documentation, our team specializes in creating comprehensive electrical plans that meet all local code requirements. Understanding electrical fundamentals for solar projects, implementing proper grounding and bonding practices, and creating accurate three-line diagrams are essential components of any successful solar installation. Whether you need guidance on inverter selection or have questions about your specific project, contact our experienced team for expert support.
FAQs
Skip the Permit Headaches
We design plan sets that pass inspection the first time. Code-compliant, PE-stamped, accepted by AHJs nationwide.
Frequently Asked Questions
While certain elements of solar installation accommodate DIY approaches (like panel attachment and DC conductor installation), distribution panel links typically demand a certified electrician. Most regions require professional participation for main panel alterations, supply-side installations, and any tasks requiring utility involvement. Always verify local regulations and secure appropriate permits before initiating any electrical tasks.
Load-side installations occur after the main breaker and face restrictions under the 120% rule (main breaker + solar breaker ≤ 120% of busbar capacity). Supply-side installations occur before the main breaker, circumventing the 120% rule yet demanding additional permissions, junction enclosures, and frequently utility involvement. Supply-side proves necessary when the planned solar system surpasses the 120% rule constraints.
Conductor sizing relies on current, distance, and voltage loss thresholds. For DC conductors, apply the formula: Conductor Size = (2 × Distance × Current × Resistance) / (Voltage Drop Threshold × System Voltage). For AC conductors, size conductors for 125% of the inverter's continuous generation current. For demonstration, a 32A continuous inverter generation demands a minimum 40A-rated conductor (32A × 1.25 = 40A).
Critical safety equipment encompasses insulated electrical gloves, safety eyewear, non-conductive footwear, voltage measurement devices, and insulated equipment. Before initiating tasks, deactivate the main breaker, shield solar panels, verify all circuits with a voltage measurement device, and implement lockout/tagout procedures for all power sources. Contemporary projects also mandate rapid shutdown mechanisms that decrease DC voltage to safe thresholds within 30 seconds and AFCI protection to eliminate electrical fire risks.
Solar panel installations require comprehensive permitting through your local Authority Having Jurisdiction (AHJ), which typically includes electrical permits, building permits for structural modifications, and utility interconnection agreements. Most jurisdictions mandate multiple inspections throughout the installation process: a rough inspection after conduit and mounting installation, an electrical inspection before final connection, and a final inspection before utility authorization. Additionally, grid-connected systems require utility approval and net metering agreements before activation. The permit application process generally takes 2-6 weeks and requires detailed system plans, equipment specifications, and load calculations. Failure to obtain proper permits can result in fines, forced system removal, denied insurance claims, and complications when selling your property.
SPS Editorial Team
Solar Permit Solutions
Solar Permit Solutions provides professional solar permit design services for residential, commercial, and off-grid installations across all 50 states. Our team ensures permit-ready plan sets delivered fast.
Related Articles
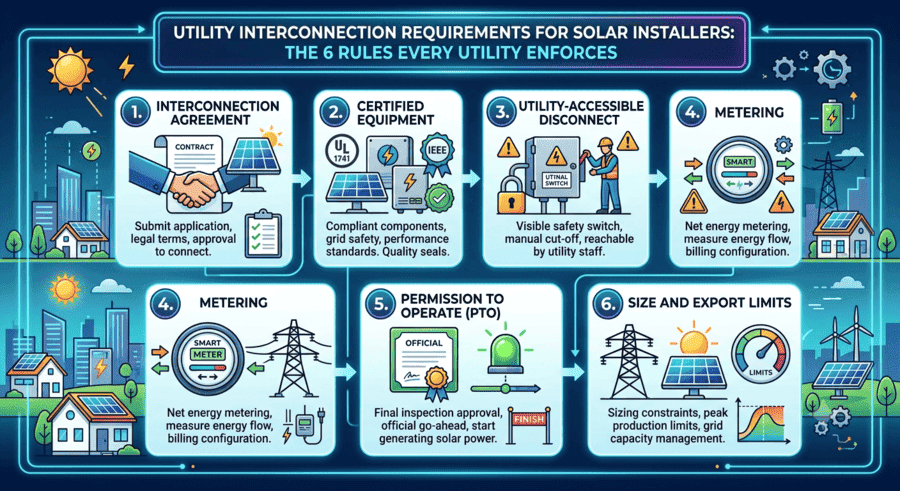
Utility Interconnection Requirements for Solar Installers: The 6 Rules Every Utility Enforces
interconnection agreement, UL 1741 and IEEE 1547 certified inverters, a utility-...
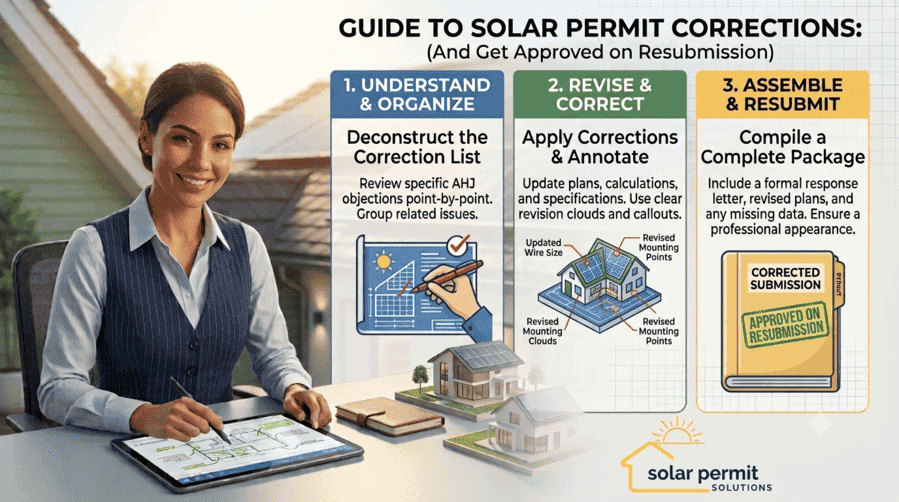
How to Respond to Solar Permit Corrections (And Get Approved on Resubmission)
To respond to a solar permit correction, read every comment from every reviewing...

Can an EV Charging Station Be Powered by Solar? Here’s How to Build One
Yes, an EV charging station can be powered by solar. A grid-tied solar array pai...