Testing solar panels after installation involves three primary methods: using a multimeter to measure voltage, current, and resistance; employing clamp meters for non-invasive current tracking; and utilizing solar charge controllers for real-time wattage monitoring. Regular testing ensures optimal system performance and catches issues before they become costly repairs.
Key testing methods include:
- Multimeter testing: Measures DC voltage (should be within 10% of Voc rating), resistance (low values indicate proper flow), and current output (compare to Isc rating)
- Clamp meter testing: Tracks current without disconnecting wires, identifying poor connections and corrosion
- I-V curve tracers: Professional-grade equipment that generates performance curves for detailed analysis
- Charge controller monitoring: Displays real-time wattage output (volts × amps) for continuous system tracking
Solar panels can lose output over time due to weather exposure, wiring complications, or component failures. Testing frequency should be monthly for new installations during the first year, then quarterly to semi-annually for established systems. Property owners who establish regular testing schedules can identify performance drops early, preventing expensive repairs and maintaining maximum return on investment.
Testing requires proper safety equipment including insulated gloves and properly rated multimeters. Always test during clear weather between 10 AM and 2 PM when panels are clean, under full sunlight, and properly angled toward the sun for accurate readings.
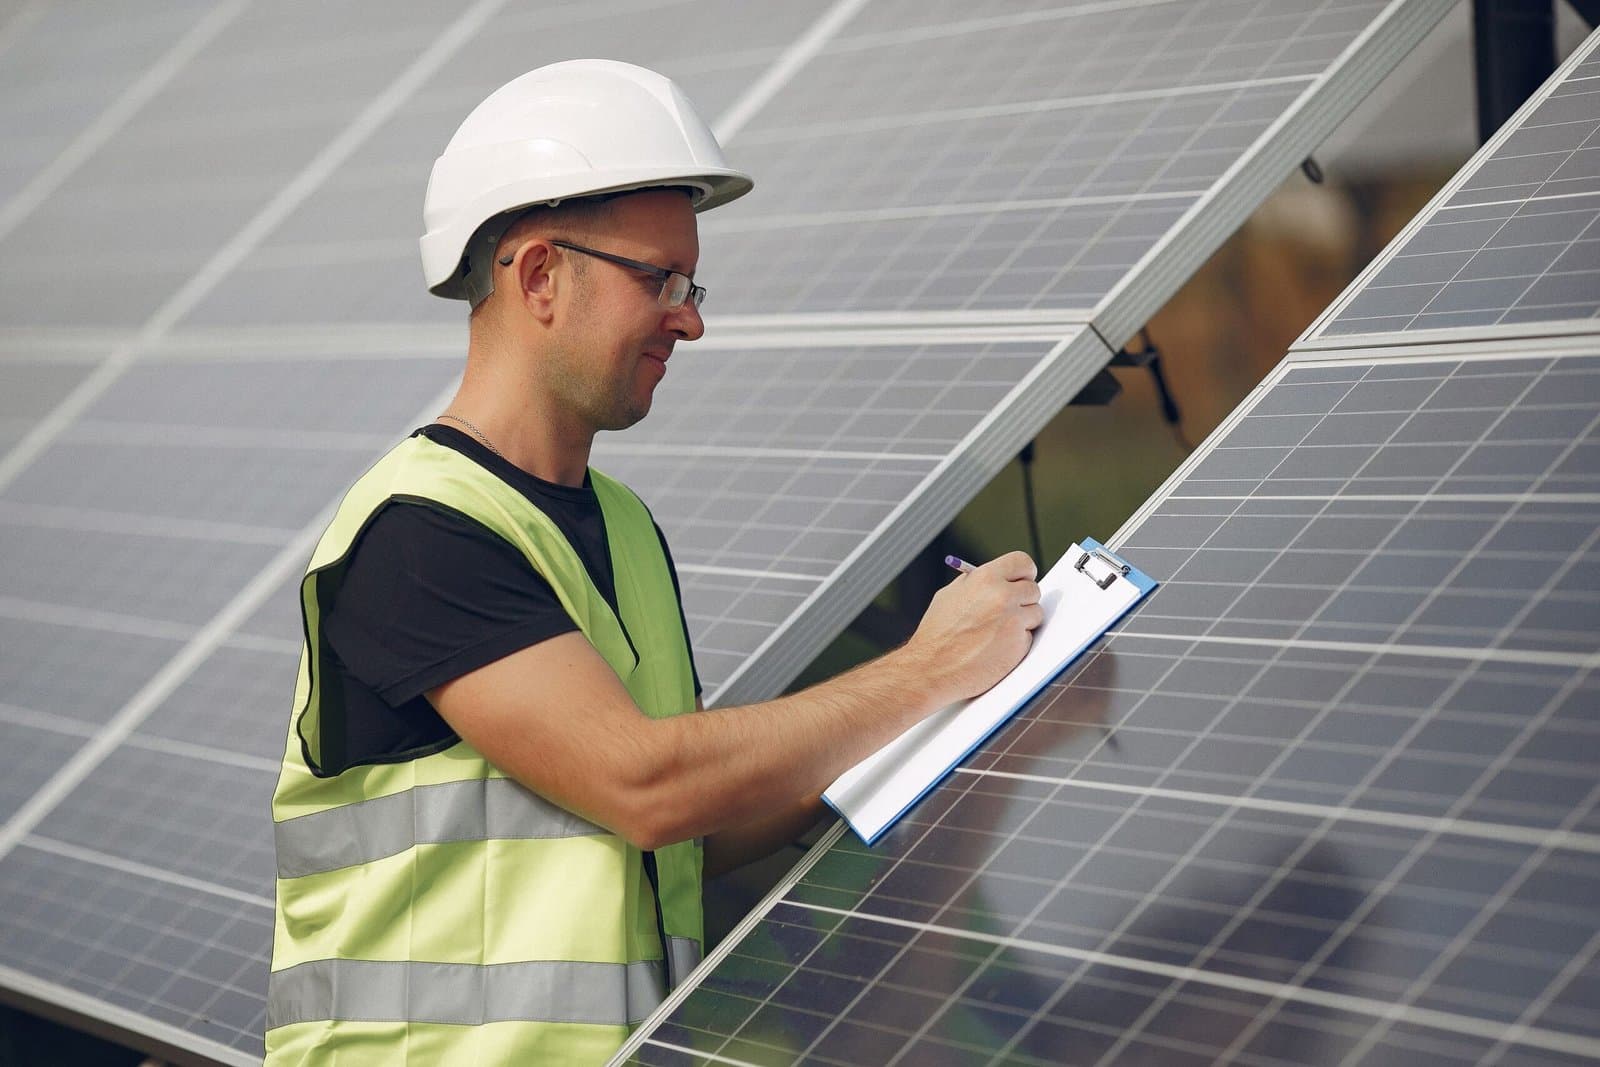
Why Testing Solar Panels Is Essential
Every solar system includes manufacturer specifications for voltage, current, and wattage. However, actual performance may vary based on environmental factors. Roof angle, seasonal weather patterns, shading obstacles, and accumulated debris can all diminish output. Without systematic testing, determining whether a system meets expected production levels becomes challenging.
Solar panel testing delivers clear insight into system health. Voltage measurements reveal whether individual modules function correctly. Current tests identify parasitic loads or short circuits.
Wattage calculations confirm whether the array delivers anticipated power output. When performance declines, testing helps isolate the underlying cause. Potential issues include damaged panels, malfunctioning inverters, or deteriorated connectors.
Testing also serves as preventive maintenance. Like all equipment, solar systems require regular monitoring. Identifying performance degradation early allows for timely corrective measures and prevents more extensive repairs.

Testing With A Multimeter
The most accessible and widely used testing method involves a multimeter. A digital multimeter measures voltage, resistance, and current.
Begin with voltage testing. Configure the meter for DC voltage, attach the probes to panel terminals, and position the panel in direct sunlight. The reading should fall within approximately ten percent of the open-circuit voltage rating (Voc) indicated on the panel’s rear label. Significantly lower readings suggest the panel requires cleaning, suffers from shade interference, or has sustained damage.
Resistance testing follows. Switch the meter to ohms setting, connect the probes, and record the value. Low resistance indicates proper electrical flow. High readings point toward broken wiring or damaged cells.
Complete the process with current testing. Set the meter to measure amps, attach the probes, and expose the panel to sunlight. Compare the reading against the short-circuit current rating (Isc) on the specification label. A properly functioning panel produces readings close to this value. Substantially lower readings indicate potential internal faults or wiring complications.
Advanced Testing With I-V Curve Tracers
Professional technicians utilize I-V curve tracers for comprehensive analysis. These instruments record current and voltage output across various operating conditions and generate graphical curves. A healthy panel produces a smooth curve matching expected performance benchmarks. Any irregularities reveal specific problems, from shade effects to cell deterioration.
I-V curve testing requires specialized equipment, including irradiance and temperature sensors. While this method typically exceeds homeowner capabilities, it provides valuable data for technicians. The test demonstrates panel performance under optimal conditions and evaluates response to partial shade or elevated temperatures. This detailed analysis identifies underperforming panels that may pass basic voltage or current checks.

Solar Permit Solutions
Need Solar Permit Plans?
Professional, permit-ready solar plan sets delivered fast. Residential and commercial projects across all 50 states.
Tracking Current With Clamp Meters
Clamp meters offer another effective testing option. Unlike standard multimeters, clamp meters measure current without disconnecting wires. The clamp encircles a conductor and delivers real-time readings. This streamlines identification of poor wiring connections, loose terminals, or corrosion between modules, inverters, and batteries.
Even minor wiring issues can generate substantial system output losses. Clamp meter testing quickly highlights these weak points for prompt repair.
Measuring Power Output With Solar Charge Controllers
Systems equipped with solar charge controllers enable direct wattage monitoring. Watts equal volts multiplied by amps, and many controllers display real-time panel output. Controllers also safeguard batteries through regulated current flow, providing comprehensive system performance data. Some models feature smartphone connectivity, enabling output tracking without specialized equipment.
When wattage readings fall below expectations, this typically signals a need for cleaning, rewiring, or maintenance.
Warning Signs Requiring Immediate Testing
Regular testing maintains system health, but certain problems demand immediate attention. Warning indicators include sudden output reductions, unexpectedly high electricity bills, inverter error messages, or visible wiring damage. Physical issues like bent frames, cracked glass, or worn connectors also warrant immediate testing.
Panels withstand harsh conditions but face constant exposure to temperature extremes and weather fluctuations. Quick testing confirms proper system operation or identifies the need for professional maintenance.
Best Practices For Accurate Testing
Reliable test results depend on optimal conditions. Always test panels when clean, under full sunlight, and properly angled toward the sun. If readings appear low, repeat testing under improved conditions before concluding a fault exists. Testing at consistent times of year under similar sunlight conditions facilitates meaningful comparison over time.
Safety remains paramount. Testing involves live electrical equipment. Use insulated gloves, inspect tools before each use, and keep all equipment dry. Never allow probe tips to contact each other, as this creates dangerous shorts. When encountering severe damage or suspected serious faults, contact qualified professionals rather than attempting personal repairs.

Maintaining Optimal Solar System Performance
Understanding how to test solar panels after installation ensures systems deliver consistent daily performance. From basic multimeter checks to sophisticated I-V curve analysis, testing reveals weak panels, wiring faults, or inverter problems before they impact energy costs.
Evaluating resistance, current, and wattage provides complete system health assessment. Including inverters, connectors, and batteries in routine inspections establishes a foundation for sustained long-term performance.
Solar Permit Solutions specializes in this comprehensive approach. Professional solar electric installations and complete service offerings help maintain peak panel performance. Property owners can maximize the financial benefits and energy independence that solar power provides. Contact Solar Permit Solutions today to protect and optimize your solar investment with expert professional services.
Conclusion
Testing solar panels after installation represents a critical component of responsible system ownership. Regular testing catches performance issues early, prevents expensive repairs, and ensures maximum energy production. Whether using basic multimeter checks or advanced diagnostic equipment, consistent monitoring delivers peace of mind and protects the substantial investment in solar technology.
The testing process need not be complicated. Simple voltage, current, and resistance measurements provide valuable insight into system health. Property owners who establish regular testing schedules position themselves to identify and address problems before they escalate. This proactive approach extends equipment lifespan, maintains optimal energy output, and preserves the financial benefits that motivated the original solar installation.
Professional support remains available when testing reveals issues beyond basic maintenance. Qualified technicians bring specialized equipment and expertise to diagnose complex problems. Combining DIY testing with professional service when needed creates the ideal balance for long-term solar system success.
FAQs
Need Solar Permit Plans?
Professional, permit-ready solar plan sets delivered fast. Residential and commercial projects across all 50 states.
Frequently Asked Questions
Testing frequency depends on system age and local conditions. New installations benefit from monthly testing during the first year to establish baseline performance. Mature systems typically require testing every three to six months. Properties experiencing harsh weather, heavy shading, or visible panel damage should increase testing frequency. Annual professional inspections complement regular DIY testing for comprehensive system monitoring.
Testing on cloudy days produces unreliable results. Solar panels require direct sunlight to generate accurate voltage and current readings. Cloud cover significantly reduces irradiance levels, causing readings that appear abnormally low even when panels function correctly. Always conduct tests during clear weather conditions with full sun exposure. Testing between 10 AM and 2 PM provides the most consistent results when the sun reaches optimal position and intensity.
A healthy panel should produce readings within ten percent of its rated open-circuit voltage (Voc). Readings falling more than ten percent below specification suggest potential problems. For example, a panel rated at 40V Voc should measure between 36V and 44V under proper test conditions. Consistently low readings after cleaning and retesting indicate damaged cells, broken connections, or internal component failure requiring professional evaluation.
Basic testing with proper safety equipment presents minimal risk when following established protocols. Always wear insulated gloves, use properly rated multimeters, and avoid testing during wet conditions. Never touch probe tips together or contact bare wiring. Testing individual panels disconnected from the system reduces electrical hazards. However, testing complete arrays with active inverters and high voltage DC requires professional expertise. Contact qualified technicians for complex diagnostics or when encountering unexpected results.
Solar charge controllers provide valuable real-time monitoring but do not replace comprehensive manual testing. Controllers display overall system output but may not detect individual panel problems or identify specific failure points. Manual testing with multimeters and clamp meters reveals issues that controllers cannot diagnose, including single panel degradation, wiring resistance, and cell-level faults. Use charge controller data as one monitoring tool within a broader testing strategy.
Sudden voltage drops typically result from specific identifiable causes. Accumulated dirt, leaves, or debris blocking sunlight represents the most common culprit and resolves with cleaning. Shading from new tree growth or structures also reduces voltage output. Physical damage from weather events, including cracked glass or bent frames, causes immediate performance loss. Internal failures like broken solder connections or degraded bypass diodes create voltage drops requiring professional repair. Testing helps isolate the specific cause for targeted corrective action.
SPS Editorial Team
Solar Permit Solutions
Solar Permit Solutions provides professional solar permit design services for residential, commercial, and off-grid installations across all 50 states. Our team ensures permit-ready plan sets delivered fast.
Related Articles
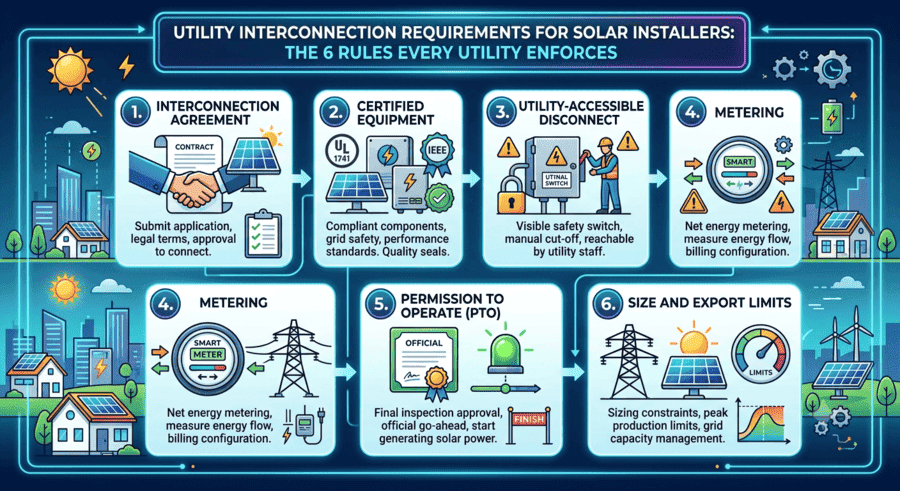
Utility Interconnection Requirements for Solar Installers: The 6 Rules Every Utility Enforces
interconnection agreement, UL 1741 and IEEE 1547 certified inverters, a utility-...
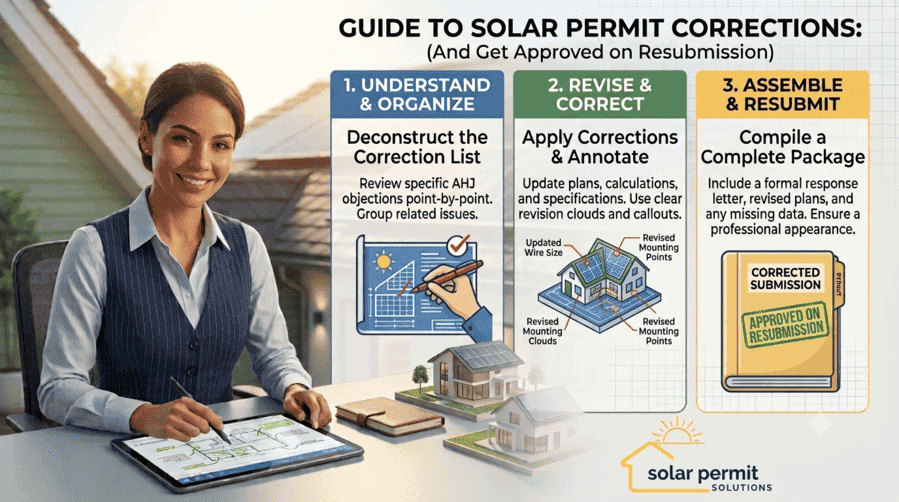
How to Respond to Solar Permit Corrections (And Get Approved on Resubmission)
To respond to a solar permit correction, read every comment from every reviewing...
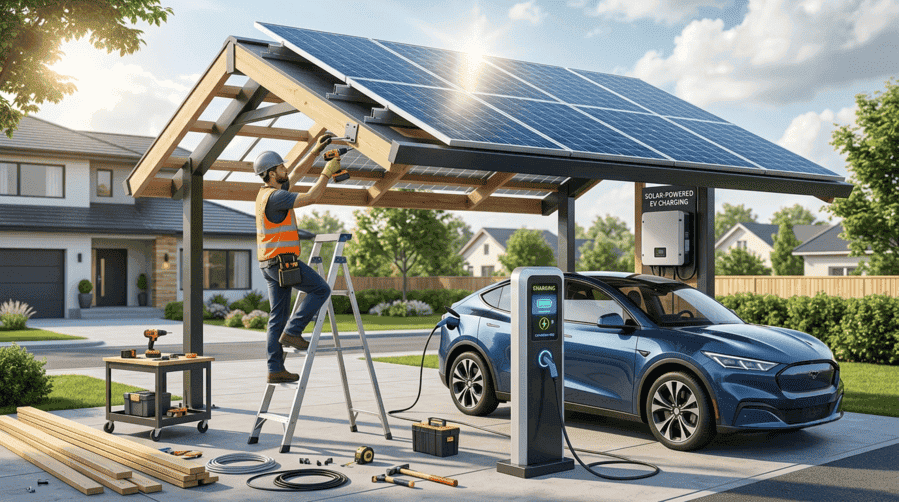
Can an EV Charging Station Be Powered by Solar? Here’s How to Build One
Yes, an EV charging station can be powered by solar. A grid-tied solar array pai...