Ground mount solar systems are photovoltaic arrays installed on ground-level foundations rather than rooftops, delivering 5-15% higher energy production through optimal tilt angle positioning and superior cooling efficiency. These systems cost 10-20% more than rooftop installations ($15,000-$18,000 vs $12,000-$15,000 for a typical 10kW system) but generate an additional 1,200-1,800 kWh annually, worth $4,500-$6,750 over 25 years. Ground mounted solar panels solve three critical problems: shading issues from trees or structures blocking sunlight, structural inadequacy of older roofs lacking load-bearing capacity, and fixed angle constraints preventing optimal panel orientation. Installation requires four foundation types – helical piles ($150-$300 each) for unstable soil, concrete piers ($200-$400) for maximum stability, driven piers ($100-$200) for cost-effectiveness, or ballasted systems ($300-$600) for no-penetration sites. Properties with 400+ square feet of available land, roof shading problems, or structural concerns benefit most from ground mount configurations, which include fixed-tilt arrays, pole-mounted tracking systems (15-25% additional yield), and dual-purpose carports. Professional Engineer (PE) certification, geotechnical soil analysis ($500-$1,500), and NEC-compliant permitting (8-16 weeks) are mandatory requirements for code-compliant installation.
Solar Permit Solutions specializes in engineering ground mount systems that maximize efficiency while ensuring code compliance.
Ground Mount Solar: The Superior Alternative to Rooftop Constraints
Ground solar panels do more than fill empty yard space; they unlock maximum energy efficiency. Deploy this approach to eliminate these critical rooftop installation challenges:
Shadow Interference: Trees or buildings blocking your roof during peak production hours? Install your ground mount system in an unobstructed area to guarantee continuous sunlight access throughout the day.
Structural Limitations: Older roofs often lack the load-bearing capacity for heavy solar arrays, and roof penetrations can void manufacturer warranties. Ground-mounted solar eliminates rooftop dependency entirely, protecting your existing structure.
Fixed Angle Constraints: Rooftop panels trap you into your roof’s existing pitch. Ground-mount solar design puts you in control – select the precise tilt angle and azimuth (compass direction) for your geographic location. Expect 5-15% higher energy generation compared to compromised rooftop angles.
Next-Generation Equipment Integration: Ground mounts seamlessly support bifacial solar panels (capturing light reflection from below) and automated solar tracking systems. Both technologies dramatically amplify your energy yield, with renewable energy advancements driving continuous performance improvements.
3 Ground-Mount Solar Array Designs: Choose Your Configuration
Ground-mount solar systems offer multiple configurations; match your design to site conditions and energy goals. Whether you need residential solar design or commercial solar design services, selecting the right configuration is critical.
1. Fixed-Tilt Arrays: Deploy the Industry’s Most Efficient Ground Solar Solution
Metal framing anchored directly to the ground defines this dominant ground-mounted solar design. Set your panels at a calculated angle and compass direction – this positioning remains permanent throughout the system’s operational life.
Master the “fixed” angle engineering; this determines whether your system excels or underperforms. Discard the oversimplified “match your latitude” rule. Real-world optimization requires precision engineering aligned with your specific objectives:
Azimuth (Compass Direction) Strategy: Forget defaulting to true South (180° Azimuth); reserve this orientation exclusively for maximum annual generation goals. Operating under Time-of-Use (TOU) utility rates? Late afternoon electricity costs surge dramatically. Rotate your array slightly southwest (up to 222° in certain regions) to capture peak generation when rates hit their highest points.
Tilt Angle Calculation: Balance summer versus winter sun angles to hit your target performance. Pursuing energy independence? Off-grid solar system design demands winter production as mission-critical. Apply a steeper, more vertical tilt (latitude + 15° to 22°) to enhance snow shedding and maximize low-angle sun capture. Grid-tied systems prioritizing total annual yield? Implement a shallower angle for optimized year-round performance.
Inter-Row Spacing Precision: Calculate the exact distance between parallel rows; this frequently neglected specification makes or breaks system performance. Prevent front-row shadow projection onto rear panels during the year’s lowest sun angle (typically winter solstice). Miscalculate this shadow length and watch annual performance plummet.
Mandatory Compliance Standards: Engineer all fixed-tilt designs to satisfy the National Electrical Code (NEC) governing wiring and grounding protocols, plus UL 2703 structural racking certification. These standards guarantee your system survives local snow and wind load specifications.
2. Pole-Mounted Systems: Capture Maximum Power Through Solar Tracking
Elevate your array 8 to 15 feet high on one or more central poles; this pole-mounted ground mount solar design excels on uneven terrain. Pair these systems with solar tracking technology to follow the sun’s movement and maximize energy harvest, as documented by NREL research on advanced tracking systems.
Solar Tracking Types: Select Your Movement Strategy
Single-Axis Trackers: Rotate your system along a north-south axis, tracking the sun’s east-to-west path throughout daylight hours. Boost your production by 15-20% compared to fixed installations.
Dual-Axis Trackers: Enable rotation on both north-south AND east-west axes, allowing panels to track the sun’s elevation angle continuously. Achieve the highest yield increase (up to 25%), but recognize that complexity and maintenance demands limit residential applications.
Structural Design & Wind Load: Engineer for Elevated Forces
Pole-mounted arrays face dramatically higher wind uplift and shear forces due to their elevated position. Drive your foundational pole deeper or anchor it with a larger concrete pier than standard fixed mounts require. Secure PE (Professional Engineer) certification for structural load calculations; this engineering stamp is mandatory, not optional.
Electrical Design: Route Power Up the Pole
Trench your electrical connection up the central pole to the inverter; mount the inverter on the pole itself for simplified service access. Understanding solar supply-side connections and proper wiring management prevents chafing or strain that could trigger system failures or safety hazards.
3. Dual-Purpose Solar Carports and Pergolas: Maximize Space with Multi-Function Structures
Operating with limited yard space or facing aesthetic restrictions? Integrate ground-mounted solar into existing or new structures; these dual-purpose designs deliver energy generation and functional space simultaneously, aligning with green building practices that maximize property value.
Structural and Aesthetic Engineering: Design solar carports and pergolas to handle solar load PLUS satisfy local building codes for habitable structures. Specify custom steel or aluminum beams to span wide, column-free areas, essential for parking circulation (carports) or open patio zones (pergolas). Set minimum height at 7 to 8 feet to meet legal clearance requirements.
Integrated Water Management: Engineer this critical design element into every covered structure. Install custom flashing or continuous metal troughs between solar panels to capture rainwater and direct flow to an integrated gutter system. Ensure water diverts cleanly, never allowing dripping through panel gaps, keeping the space beneath fully functional during rainfall.
Foundation & Trenching Strategy: Position deep concrete pier foundations strategically to avoid blocking access points or vehicle turning paths. Route electrical conduit trenching carefully to eliminate trip hazards and prevent conflicts with existing drainage infrastructure.
Solar Carports: Shelter vehicles while generating electricity simultaneously. Deploy in urban and suburban environments where land optimization drives project success.
Solar Trellises/Pergolas: Provide shade for patios and outdoor living areas while mounting PV modules overhead for dual functionality.
Ground Mount Solar: Pros and Cons Analysis
Quick Decision Guide:
Choose Ground Mount If:
- Available land space exceeds 400+ sq ft
- The roof has shading, structural issues, or poor orientation
- Maximum energy production is a priority.
- The budget accommodates 10-20% higher upfront investment
Choose Rooftop Solar If:
- Limited yard space or urban/suburban lot
- Lower initial costs are critical
- The roof is south-facing, unshaded, and structurally sound
- Faster installation timeline needed

Solar Permit Solutions
Affordable Solar Permit Plans
Don't let permit costs slow your project. Professional plan sets at competitive prices — all 50 states, fast turnaround.
Ground-Mounted Solar Panel Installation: Master Site Prep, Permitting, and Foundations
Structural and electrical engineering form the core complexity of ground-mounted solar installation – solar installers must navigate these technical challenges to deliver code-compliant systems. Our services include comprehensive engineering support for complex ground-mount projects.
Foundation Types: Select the Optimal Base for Your Ground Mount Design
Your foundation selection ranks as the most critical engineering decision; base this choice entirely on soil testing results, wind load calculations, and frost depth requirements for your specific location.
Helical Piles: Deploy on sites with loose, unstable, or rocky soil conditions. These steel, screw-shaped piles drill deep into the earth, delivering strong, dependable support while minimizing surface disruption. Installs quickly compared to concrete alternatives.
Concrete Piers: Choose this highly durable, industry-standard option for maximum stability. Recognize the labor-intensive trade-off; excavation, formwork construction, and concrete curing extend installation timelines significantly.
Driven Piers: Specify for stable soil environments. Drive these vertical metal posts directly into the ground for a cost-effective, rapid deployment method that reduces installation time.
Ballasted Systems: Apply to sites prohibiting ground penetration (capped landfills, contaminated zones, protected areas). Anchor racking structures using weighted concrete blocks; this approach eliminates excavation requirements entirely.
Soil and Geotechnical Analysis: Engineer for Structural Integrity
Your solar ground mount foundation represents the single most critical structural element, whether deploying driven piers, helical piles, or concrete installations. Base this design entirely on geotechnical data, a factor most general solar resources dangerously overlook. The IEEE Power & Energy Society provides technical standards for renewable energy installations that emphasize proper foundation engineering.
Soil Resistivity: Measure your soil’s electrical resistivity before finalizing electrical design. High resistivity conditions (dry, sandy soil) create grounding challenges that compromise safety standards. Install deeper ground rods or implement specialized grounding techniques to achieve code-compliant electrical protection.
Bearing Capacity: Structural engineers calculate pier depth and diameter based on soil bearing capacity; the maximum pressure your soil supports without failure. Ignore low bearing capacity indicators (loose sand, saturated clay), and watch your entire array settle or shift over time, destroying alignment and voiding warranties.
Corrosion Mitigation: Test for high acidity or moisture content in soil; these conditions accelerate corrosion of steel and aluminum racking and foundation components. Specify appropriate protective coatings (galvanization) or deploy corrosion-resistant materials to preserve your 25-year structural warranty integrity.
Site-Specific Environmental and Compliance Factors: Build Resilient, Code-Compliant Arrays
Environmental design extends far beyond shade avoidance; engineer your array as a resilient, long-term installation that withstands local environmental challenges. Energy efficiency standards and environmental regulations shape ground mount design requirements.
Fire Setbacks: Operating in fire-prone regions (California, arid zones)? Maintain minimum clearance buffers around your array as fire codes mandate. Position equipment to prevent ground vegetation fires from reaching electrical components while ensuring fire department vehicle access for emergency response.
Snow and Ice Loading: Calculate local maximum ground snow load before specifying racking strength and foundation depth. Engineer your array to support maximum anticipated snow and ice accumulation without structural buckling. Adjust the tilt angle for self-shedding properties; steeper angles (above 35°) enable snow to slide off naturally, reducing load stress and maintenance demands.
Trenching and Conduit Requirements: Plan electrical conduit routing from array to main service with precision. Trench to NEC-compliant depths (18 or 24 inches for rigid metal conduit); never cut corners on burial depth. Understanding solar three-line diagrams helps plan proper conduit routing and prevents water pooling along trench paths that could compromise conduit integrity or create safety hazards.
PE Stamps and Structural Approval: Secure Licensed Engineering Certification
Ground-mount arrays function as separate structures; Professional Engineer (PE) stamps become mandatory under local building codes, particularly for pole-mounted configurations or high wind load zones. Solar permitting requirements vary by jurisdiction but consistently demand PE certification for ground-mount installations.
A PE stamp validates your ground-mounted solar panels meet all structural and safety standards. Contractors: Partner with firms offering access to licensed professional engineers across all 50 states to accelerate permitting timelines and navigate complex ground-mount solar installation requirements efficiently. Need assistance? Contact our team for PE-stamped engineering drawings.
Conclusion
Ground-mount solar systems deliver 5-15% higher energy production than rooftop installations, but only when engineered with precision from foundation to final connection. Your success hinges on three non-negotiable pillars: comprehensive geotechnical analysis, strategic design configuration selection, and code-compliant permitting documentation. Organizations like the American Solar Energy Society provide industry standards that guide proper ground mount implementation.
Match your system design to site-specific conditions: deploy fixed-tilt arrays for cost-effective maximum yield, integrate pole-mounted trackers for 15-25% production boosts, or engineer dual-purpose carports and pergolas where space optimization drives project requirements. Your foundation choice – helical piles, concrete piers, driven posts, or ballasted systems; determines structural integrity for the next 25+ years.
Navigate the complexity advantage: While ground mount installations demand 10-20% higher upfront investment and extended permitting timelines, the long-term ROI accelerates through superior cooling efficiency, scalable capacity expansion, and roof-independent operation. Properties exceeding 400 square feet of available land with shading, structural, or orientation challenges unlock maximum value from ground-mounted solar. Federal incentives, including solar tax credits, help offset initial investment costs.
Secure professional engineer certification, conduct thorough soil testing, and engineer for local wind, snow, and fire code requirements; these investments prevent catastrophic structural failures and ensure your system performs at peak efficiency throughout its operational lifetime. Execute ground-mount solar correctly, and deliver systems that consistently outperform rooftop alternatives while expanding your customer base to properties previously considered unsuitable for solar. Explore our blog for additional resources on solar engineering and permitting strategies.
FAQs
Foundation construction: Helical piles, concrete piers, or driven posts require specialized equipment, materials, and labor that rooftop mounting brackets don’t need. Foundation costs range from $1,500 to $5,000 depending on soil conditions and system size.
Trenching and electrical conduit: Running underground conduit from your array to the main electrical service adds $500-$2,000 in excavation, conduit materials, and backfill labor – rooftop systems route wiring directly down through the attic. Understanding solar interconnection options helps optimize electrical design costs.
Extended permitting process: Ground mount systems require PE-stamped structural drawings, separate building permits, and often zoning variance approvals. Expect $800-$2,500 in additional engineering and permit fees. Permit expediting services can help reduce timeline delays.
Installation timeline: Ground mount projects require 2-3 days versus 1 day for rooftop installations, increasing labor costs by 50-100%.
However, the ROI equation shifts favorably: 5-15% higher energy production, a 25+ year equipment lifespan (cooler operating temperatures), and zero roof replacement complications often recover the premium investment within 3-5 years through increased electricity generation. Green power initiatives and utility incentives further improve financial returns.
Step 1: Conduct Professional Soil Testing
Invest $500-$1,500 in geotechnical analysis to determine:
- Soil bearing capacity (pressure soil supports without settling)
- Soil composition (clay, sand, rock percentages)
- Moisture content and drainage characteristics
- Frost depth requirements for your climate zone
Step 2: Match Foundation to Soil Conditions
Choose helical piles if:
- Soil testing reveals loose, unstable, or rocky conditions
- You need fast installation (1-2 days)
- The site has difficult access for concrete trucks
- Minimal ground disturbance is required
- Cost: $150-$300 per pile
Choose Concrete Piers if:
- Maximum structural stability is non-negotiable
- Soil bearing capacity is adequate
- Heavy snow loads (40+ lbs per sq ft) apply
- High wind zones require deep anchoring
- Cost: $200-$400 per pier (includes excavation, rebar, concrete)
Choose Driven Piers if:
- Soil is stable clay or firm ground
- Budget constraints prioritize cost-effectiveness
- A fast installation timeline is critical
- Moderate wind and snow loads apply
- Cost: $100-$200 per pier
Choose Ballasted Systems if:
- Ground penetration is prohibited (landfills, environmental zones)
- Temporary or relocatable installation needed
- Flat terrain with minimal wind exposure
- Cost: $300-$600 for weighted block systems
Step 3: Verify with PE Structural Calculations.
Professional engineers calculate exact foundation requirements based on your specific wind zone, snow load, and soil data – never proceed without PE-stamped drawings. DIY solar builders must still obtain professional engineering certification for ground-mount foundations.
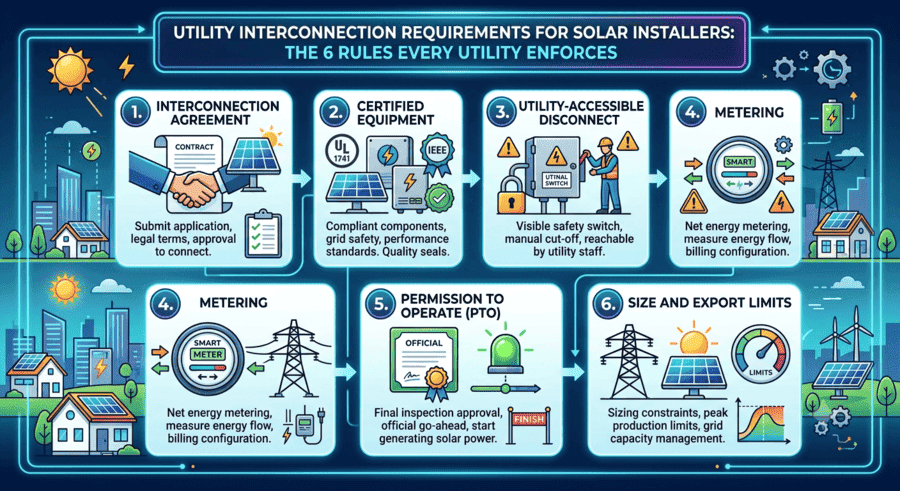
Required Permits and Approvals:
1. Building Permit (4-8 weeks)
- PE-stamped structural drawings showing foundation design
- Wind and snow load calculations
- Electrical one-line diagrams
- Site plan with setback measurements
- Expedite by hiring experienced solar contractors with jurisdiction-specific template drawings
2. Electrical Permit (2-4 weeks)
- NEC-compliant wiring diagrams, including rapid shutdown labels
- Trenching and conduit routing plans
- Grounding electrode system design
- Interconnection method documentation
- Expedite by: Submitting simultaneously with building permit
3. Zoning/Setback Approval (3-6 weeks)
- Property survey showing setback distances
- Height verification (typically 15-foot maximum)
- Aesthetic impact assessment (some jurisdictions)
- Neighbor notification (certain municipalities)
- Expedite by: Pre-application consultation with planning department
4. Utility Interconnection Agreement (4-8 weeks)
- System specifications and electrical design
- Anti-islanding protection documentation
- Net metering application
- Insurance certificates
- Expedite by: Early coordination with utility before construction begins
5. HOA Approval (2-8 weeks, if applicable)
- Visual renderings showing array placement
- Property value impact studies
- Aesthetic mitigation plans
- Expedite by: Presenting energy cost savings data and green building benefits
Total realistic timeline: 8-16 weeks in solar-friendly jurisdictions with efficient permit departments. Restrictive areas or incomplete applications extend to 16-24 weeks. World Bank energy development data shows jurisdictions with streamlined permitting processes achieve faster renewable energy adoption rates.
Critical tip: Hire contractors experienced in your specific jurisdiction – they navigate local quirks and maintain relationships with permit reviewers that accelerate approvals.
1. Optimal Tilt Angle Precision (3-7% gain):
Rooftop panels lock into your roof’s existing pitch – rarely ideal for your latitude. Ground mounts allow precise tilt angle selection:
- Northern climates: Latitude + 15° captures maximum winter sun
- Southern regions: Latitude – 5° optimizes year-round yield
- Off-grid systems: Steeper angles (latitude + 20°) prioritize winter production when solar availability drops
2. Perfect Azimuth Orientation (2-5% gain):
Roofs face fixed directions determined by home architecture. Ground arrays orient to true south (180° azimuth) or strategically southwest (up to 222°) for Time-of-Use rate optimization – capturing peak production when electricity prices surge in late afternoon.
3. Superior Cooling Performance (2-4% gain):
Airflow beneath ground-mounted panels maintains cooler operating temperatures. Solar panels lose 0.5% efficiency for every degree above 77°F. Rooftop installations trap heat against roof surfaces, raising panel temperatures 15-25°F higher than ground mounts. Result: Ground systems maintain peak efficiency during hot summer months when rooftop production drops.
4. Zero Shading Compromise (0-10% gain, site-dependent):
Ground arrays positioned in unobstructed areas, avoiding roof-based shading from chimneys, vents, dormers, trees, or neighboring structures. Sites with significant rooftop shading see the highest comparative gains – up to 10% improvement by eliminating shade losses entirely.
Add solar tracking for exponential gains:
- Single-axis trackers: +15-20% over optimized fixed ground mount
- Dual-axis trackers: +20-25% over optimized fixed ground mount
Real-world example: A 10kW rooftop system producing 12,000 kWh annually versus an equivalent ground mount generating 13,200-13,800 kWh – that’s 1,200-1,800 kWh additional production worth $180-$270 annually at $0.15/kWh rates. Over 25 years: $4,500-$6,750 additional value.
Required Quarterly Maintenance Tasks:
Panel Cleaning (1-2 hours)
- Ground mount advantage: Clean from ground level without ladders or roof access
- Method: Gentle spray with garden hose during cool morning/evening hours
- Frequency: Every 3 months in dusty climates; every 6 months in areas with regular rainfall
- Cost: DIY ($0) or professional service ($100-$200 per cleaning)
Vegetation Management (1-2 hours)
- Ground mount requirement: Mow grass and clear brush within 10-foot perimeter
- Critical importance: 6-inch grass growth creates micro-shading on bottom panel edges, reducing production 2-5%
- Frequency: Every 4-6 weeks during growing season
- Cost: DIY with standard lawn maintenance or $50-$100 per visit
- Rooftop advantage: No vegetation management needed
Visual Inspection (30 minutes)
- Check for loose mounting hardware or foundation movement
- Inspect wiring conduits for animal damage or water intrusion
- Verify inverter displays show normal operation
- Look for panel cracks, discoloration, or physical damage
- Both systems require this equally
Snow Removal (seasonal, 15-45 minutes)
- Ground mount advantage: Clear snow with soft brush from ground level
- Steeper tilt angles (35°+) allow natural snow shedding – minimal intervention needed
- Rooftop challenge: Snow removal dangerous or impossible without professional help
- Cost: DIY ($0) vs. professional rooftop snow removal ($200-$500)
Annual Professional Inspection ($150-$300)
- Electrical connection testing and torque verification
- Inverter performance diagnostics
- Ground resistance testing (critical for safety)
- Structural integrity assessment
- Required equally for both ground and rooftop systems
Foundation and Structural Monitoring (annual, 15 minutes)
- Ground mount specific: Check for foundation settling or movement
- Look for corrosion on exposed metal components
- Verify drainage around foundation piers remains clear
- No rooftop equivalent
Total Annual Maintenance Investment:
- Ground Mount: 6-10 hours DIY labor + $150-$300 professional inspection = $150-$500 total
- Rooftop Mount: 2-4 hours inspection + $150-$300 professional service = $300-$600 (higher professional cleaning costs due to roof access complexity)
Key advantage: Ground mount accessibility allows homeowners to handle 80% of maintenance tasks independently, reducing long-term service costs while maintaining peak system performance.