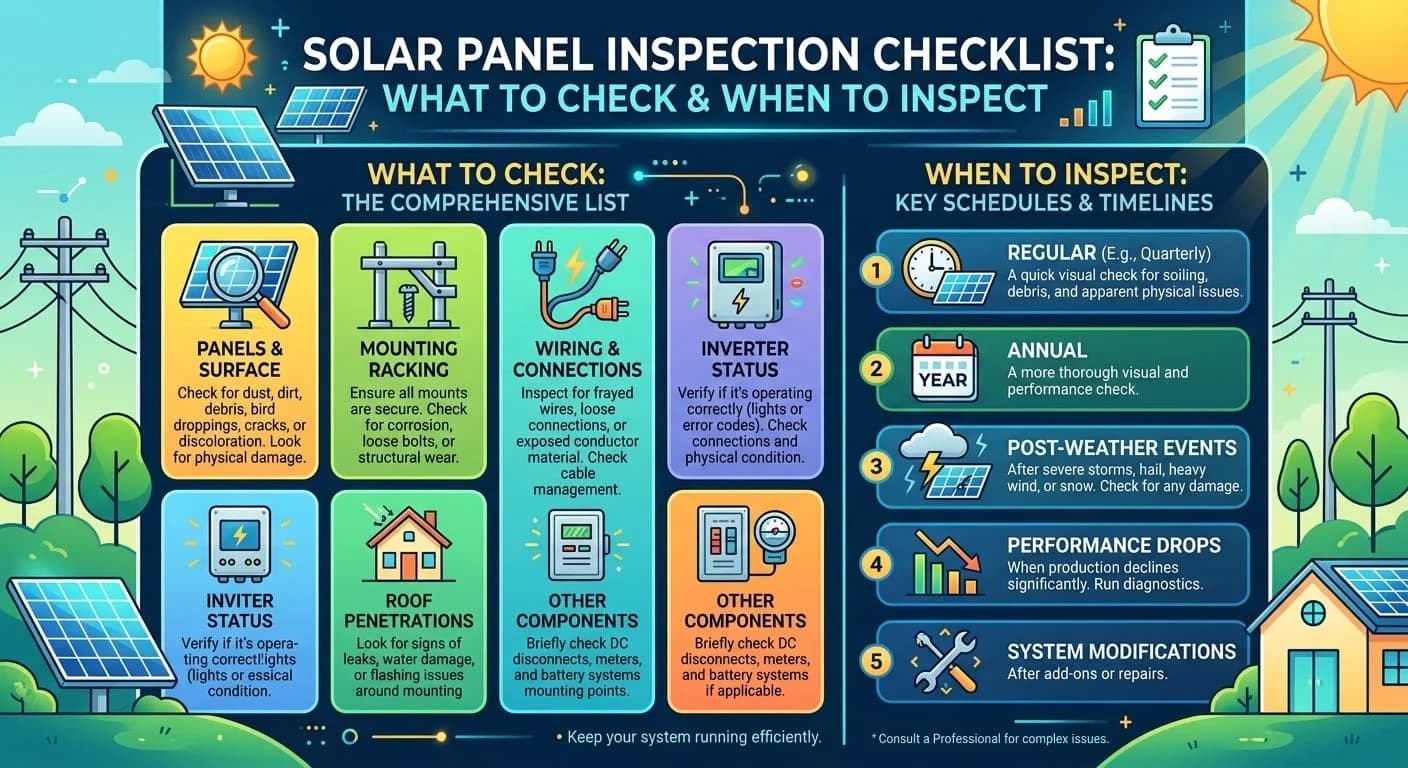
A solar panel inspection is a safe, visual review of an installed solar system’s panels, mounting, roof areas, wiring, inverter, production data, labels, and batteries, followed by a call to a qualified professional for anything electrical, structural, or roof-related.
Solar panels are designed to operate outdoors for decades, but that does not mean a solar system can be installed and forgotten. Regular inspections can help identify visible panel damage, roof problems, loose or damaged mounting components, wiring issues, inverter warnings, shading, and changes in system performance before they become larger problems.
Use this solar panel inspection checklist to review the condition of an installed solar PV system and identify areas that may need professional attention.
| Important: A solar panel inspection can mean different things depending on the situation. A routine inspection of an existing solar system is different from the final inspection required by a local authority after a new solar installation. This guide focuses primarily on checking the condition and operation of an existing installed system. If you are preparing for a required inspection after installation, see our guide to solar inspection after installation. |
Solar Panel Inspection Quick Reference
| Situation | What to Do | Who Should Do It |
|---|---|---|
| Routine check | Visual review of panels, shading, equipment, and monitoring on the schedule your installer or manufacturer recommends | Owner from a safe location; professional for repairs |
| After severe weather | Look for hail, wind, lightning, and debris damage, and document what you see | Owner for a ground-level look; qualified professional if damage is suspected |
| Production drop | Compare current output with historical data, then check monitoring and inverter messages | Owner first; installer or service provider if unexplained |
| New installation | Required AHJ inspection against the approved plans | Installer schedules; AHJ inspects |
| Buying or selling a property | Evaluate equipment condition, damage, and maintenance history | Qualified solar professional |
What Is a Solar Panel Inspection?
A solar panel inspection is a review of the physical condition, installation components, electrical equipment, and overall operation of a solar PV system. Depending on the purpose of the inspection, it may include checking:
- Solar panels and visible damage
- Shading and obstructions
- Mounting hardware and racking
- Roof areas around solar attachments
- Visible wiring and conduit
- Inverters and other electrical equipment
- System production and monitoring
- Disconnects and accessible equipment
- Safety labels and markings
- Battery storage equipment
- Signs of water, storm, or weather damage
A visual inspection does not replace electrical testing, structural evaluation, or professional troubleshooting when a problem is suspected.
When Should Solar Panels Be Inspected?
There is no single inspection schedule that applies to every solar installation. Follow the maintenance recommendations from your equipment manufacturer and installer, and consider an inspection when there is a specific reason to evaluate the system. Common situations include the following.
After a New Solar Installation
A newly installed system may need a required inspection by the local authority having jurisdiction (AHJ) before the project can move through the remaining approval process. That inspection is different from a routine condition inspection, and the system generally needs to be installed according to the approved plans and applicable requirements. Some jurisdictions use automated permitting platforms such as SolarAPP+, and requirements vary by location. After the inspection is approved, a grid-connected system still needs Permission to Operate from the utility, which our solar PTO guide explains in detail.
After Severe Weather
Consider having the system evaluated after:
- Hail
- High winds
- Lightning
- Heavy storms
- Fallen branches or trees
- Severe snow or ice
- Other events that could physically damage the equipment
PV modules are certification-tested for properties such as weather resistance and resistance to ignition, as UL Solutions explains, but severe hail, wind, and impact events can still cause damage. Some of it may not be obvious from the ground.
When Solar Production Drops
A noticeable reduction in energy production can have many causes, including weather, shading, soiling, equipment problems, communication issues, or electrical faults. Comparing current production with historical performance can help identify when further investigation may be necessary.
When You See Visible Damage
Have the system evaluated if you notice:
- Cracked or broken panels
- Damaged wiring
- Loose components
- Corrosion
- Roof damage
- Water intrusion
- Inverter error messages
- Damaged conduit
- Burn marks or other unusual signs
Before Buying or Selling a Property
A solar system can be an important part of a property’s electrical and structural systems. If a property changes ownership, a professional evaluation can help identify existing damage, equipment problems, or maintenance concerns.
Solar Permit Solutions
Skip the Permit Headaches
We design plan sets that pass inspection the first time. Code-compliant, PE-stamped, accepted by AHJs nationwide.
Solar Panel Inspection Checklist: 12 Items to Review
The following checklist covers the main areas to review during a solar panel inspection.
1. Check the Solar Panels for Visible Damage
Start with the modules themselves. From a safe location, look for:
- Cracked or broken glass
- Chips or visible physical damage
- Discoloration
- Delamination or bubbling
- Burn marks
- Damaged frames
- Broken or damaged components
- Heavy dirt or debris
- Signs of impact from hail or falling objects
Some electrical or cell-level problems cannot be identified through a basic visual inspection. A professional may need specialized testing if a panel is suspected to be electrically damaged.
Do not walk on solar panels. Walking on modules can damage the panels and may create additional safety risks.
2. Check for New Shading or Obstructions
Solar production can be affected when sunlight reaching the array is reduced. Look for changes such as tree growth, new structures, nearby construction, debris, vegetation, new rooftop equipment, or objects casting shadows on the array.
A shading issue does not necessarily mean the panels are damaged. A shading analysis during design estimates how much sunlight an array will lose to nearby obstructions, so new shading is worth comparing against the original design. If the system was previously performing normally and production has recently dropped, compare current production with historical data before assuming the panels themselves are defective.
3. Inspect the Solar Mounting System
The mounting system holds the panels in place and transfers loads to the roof or supporting structure. From a safe and accessible location, look for obvious signs of:
- Loose or displaced components
- Damaged rails or clamps
- Corrosion
- Bent components
- Missing hardware
- Movement or separation
- Visible damage to attachment points
Do not climb onto a roof or attempt to tighten structural hardware unless you are properly trained and equipped to do so. If a mounting component appears loose or damaged, have the system evaluated by a qualified professional.
4. Check the Roof Around Solar Attachments
Solar panels and racking are attached to a roof structure in different ways depending on the installation. Inspect accessible areas around the system for signs of:
- Water intrusion
- Damaged or deteriorated roofing
- Failed or damaged flashing
- Staining or moisture
- Visible gaps or damage around penetrations
A roof leak should not automatically be assumed to be caused by the solar installation. The source should be properly evaluated. If you notice water intrusion, have the affected area inspected before attempting repairs.
5. Inspect Visible Wiring and Conduit
Visible electrical components should be checked for obvious physical damage. Look for:
- Damaged insulation or exposed conductors
- Cracked, broken, loose, or displaced conduit
- Physical damage from animals or weather
- Signs of overheating
- Water intrusion
- Unsupported or damaged wiring
Where grounding connections are visible, look for loose or corroded hardware. Our solar grounding and bonding guide explains why these connections matter at inspection time.
Do not touch exposed conductors or attempt to repair damaged solar wiring yourself. Solar equipment can remain electrically energized when exposed to sunlight, even when some equipment has been shut down. Electrical problems should be evaluated by a qualified professional.
6. Check the Inverter
The inverter is one of the most important components to review when evaluating system operation. Depending on the equipment, check for error codes, warning messages, unexpected shutdowns, abnormal indicator lights, communication problems, unusual noises, signs of overheating, and significant changes in operating behavior.
A grid-tied system without battery backup is designed to stop exporting power when the grid goes down. Interconnection standards such as IEEE 1547 require this behavior, so a system that goes quiet during a blackout is usually working as intended.
If the inverter displays an error, record the message or code before contacting your installer, service provider, or equipment manufacturer. Avoid opening the inverter enclosure unless you are qualified to work on the equipment.
7. Review Solar System Production
A solar panel inspection should not focus only on physical appearance. Review the system’s production data when monitoring information is available, and compare current performance with previous months, previous years, similar periods, expected seasonal production, and any monitoring alerts.
Solar production naturally varies with weather, season, shading, and other conditions, so a decrease does not automatically mean the panels have failed. However, a persistent or unexplained change may justify further investigation.
8. Check the Solar Monitoring System
Many solar installations use monitoring platforms that report system production and equipment status. Check whether:
- The system is reporting normally
- Production data is current
- Inverters are communicating
- Batteries are communicating, if applicable
- Any equipment is showing an offline status
- Alerts or warnings have appeared
A monitoring problem does not necessarily mean the solar equipment itself has failed. A system may continue producing power even if its internet connection or monitoring platform is temporarily unavailable.
9. Check Accessible Disconnects and Equipment
Solar installations can include disconnects, electrical panels, rapid shutdown equipment, inverters, batteries, and other equipment. From a safe location, check for obvious signs of physical damage, water exposure, corrosion, obstructions, overheating, damaged covers, and unusual odors or sounds.
Electrical requirements follow the edition of the National Electrical Code that your local AHJ has adopted. At the main service panel, many systems connect through a backfed solar breaker sized under the 120% rule in NEC 705.12, which generally limits the combined rating of the main breaker and the solar breaker to 120% of the panel’s busbar rating. Do not add, swap, or relocate breakers in that panel without consulting your installer or a licensed electrician, since changes can affect compliance.
Do not remove covers or open electrical equipment as part of a basic homeowner inspection. If equipment appears damaged or overheated, contact a qualified professional.
10. Check Solar Safety Labels and Markings
Solar systems commonly use labels and markings to identify equipment and electrical hazards. During a visual inspection, check whether accessible labels appear present, legible, secure, and undamaged. Labels may identify PV disconnects, electrical disconnects, inverters, battery equipment, electrical panels, and other system components.
Label wording and format requirements change between NEC editions, and our solar PV labeling requirements guide breaks them down. Keep in mind that a routine inspection of an existing system is not the same as an AHJ inspection of a newly installed system. If you are preparing for a permit or final inspection, the required labeling should be checked against the approved plans and applicable requirements.
11. Inspect Battery Storage if Present
If the solar system includes battery storage, include the battery equipment in the inspection. Look for error indicators, warning messages, visible physical damage, unusual sounds, signs of overheating, water exposure, obstructions, and changes in normal operating behavior.
Energy storage installations are governed by NEC Article 706 and by fire-safety standards such as NFPA 855. Adding a battery to a PV-only system typically needs its own permit, as our solar battery permit guide explains. Some systems also use an energy management system to limit current on the main panel instead of upgrading it, as allowed under NEC 705.13. The 2023 NEC calls these energy management systems, while the 2020 and 2026 editions call them power control systems. Ask your installer whether your system relies on one, and treat any fault on it as a reason to call a professional.
Do not open the battery enclosure or attempt to service the internal components. If the battery displays a fault or warning, follow the manufacturer’s instructions and contact a qualified service provider when necessary.
12. Look for Water and Weather Damage
Weather can affect more than the solar panels themselves. Look for signs of hail damage, wind damage, fallen branches, lightning-related problems, water intrusion, corrosion, damaged conduit, damaged mounting components, roof damage, and animal-related damage. After a major storm, do not assume that a system is safe simply because the panels look normal from the ground.
Solar Panel Inspection Checklist
Use this simplified checklist when performing a visual review of an installed solar system.
| Inspection Item | OK | Needs Attention |
|---|---|---|
| Solar panels show no visible damage | ☐ | ☐ |
| No new shading or obstructions | ☐ | ☐ |
| Mounting components appear intact | ☐ | ☐ |
| No visible roof damage or leaks | ☐ | ☐ |
| Visible wiring and conduit appear intact | ☐ | ☐ |
| Inverter shows normal operation | ☐ | ☐ |
| System production appears normal | ☐ | ☐ |
| Monitoring system is communicating | ☐ | ☐ |
| Accessible electrical equipment shows no obvious damage | ☐ | ☐ |
| Safety labels are present and legible | ☐ | ☐ |
| Battery system appears normal, if applicable | ☐ | ☐ |
| No obvious storm or weather damage | ☐ | ☐ |
If any item requires attention, document what you observed and determine whether a qualified professional should evaluate it.
What Should You Not Do During a Solar Panel Inspection?
A visual inspection is useful, but it has limits. Do not:
- Climb onto the roof without proper training and fall protection
- Walk on solar panels
- Open energized electrical equipment or remove inverter covers
- Open battery enclosures
- Touch exposed conductors
- Disconnect solar equipment
- Attempt electrical repairs, including repairs to damaged wiring
- Tighten structural components without understanding the mounting system
- Restart damaged equipment after a severe electrical or weather event without appropriate evaluation
Roof work is also regulated for professionals. OSHA publishes fall protection guidance for residential roofing work, which is one more reason to leave roof access to trained and equipped crews. If you see exposed wiring, significant physical damage, water intrusion, burning, or other potentially hazardous conditions, stop the inspection and contact a qualified professional.
Common Problems Found During Solar Panel Inspections
A solar panel inspection may identify a variety of problems. The most common categories are below.
Physical Panel Damage
Cracked glass, damaged frames, discoloration, or impact damage may require further evaluation. For a deeper look at microcracks, hot spots, delamination, and snail trails, see our guide to common solar panel defects.
Dirt and Debris
Accumulated dirt, leaves, bird droppings, and other debris can reduce the amount of sunlight reaching the modules.
New Shading
Tree growth or nearby construction can change the amount of sunlight reaching the array.
Mounting Problems
Loose, damaged, corroded, or displaced mounting components may require professional evaluation.
Roof Problems
Leaks, damaged roofing, or deterioration around solar attachments may require attention from a qualified roofing or solar professional.
Electrical Problems
Damaged wiring, conduit, disconnects, or other electrical equipment can create safety concerns and should be evaluated professionally.
Inverter and Production Problems
Error codes, unexpected shutdowns, or communication problems may indicate an equipment or system issue. A significant and unexplained reduction in production can indicate a problem that requires additional troubleshooting.
Problems found at the time of a new installation are a different matter. See why solar inspections fail for the most common installation mistakes that cause an AHJ inspection to fail.
What If You Find a Problem During a Solar Panel Inspection?
The appropriate next step depends on the type of problem.
Minor Visual Issues
Document the condition and determine whether routine cleaning or maintenance is appropriate.
Inverter or Monitoring Warning
Record the error or warning and contact the installer, service provider, or manufacturer as appropriate.
Roof Leak
Have the affected roof area and solar attachment area evaluated to identify the source of the water intrusion.
Damaged Electrical Equipment
Do not touch or attempt to repair the equipment. Contact a qualified electrical or solar professional.
Storm Damage
Have the system professionally evaluated if there is significant damage or uncertainty about its condition.
Documentation can also be useful. Take photographs from a safe location and record relevant error messages, production changes, and the date the problem was observed. Keep your permit, approved plans, equipment datasheets, and inspection records together as well. Our guide to solar inspection documentation explains what those records include and why they matter.
Solar Panel Inspection vs. Solar Installation Inspection
The terms can sound similar, but they refer to different types of inspections.
| Solar Panel Inspection | Solar Installation Inspection |
|---|---|
| Usually evaluates an existing system | Usually evaluates a newly installed system |
| Focuses on condition and operation | Focuses on installation and compliance |
| May be performed for maintenance or troubleshooting | Often required as part of the permitting process |
| Can identify damage or performance concerns | Determines whether the installation meets applicable requirements |
| May include production and monitoring review | May compare the installed system with approved plans |
| Can be performed after severe weather | Typically occurs after installation is completed |
A required final inspection is generally part of the local permitting and approval process, and the exact requirements and sequence vary by jurisdiction. The U.S. Department of Energy describes permitting and inspection as the steps that must happen before an array can produce electricity on the grid: the local government inspects the new array, and then the utility connects it. Research from the National Laboratory of the Rockies (formerly NREL) on permitting, inspection, and interconnection timelines notes that review and approval across thousands of jurisdictions and utilities can sometimes add weeks or months. Many AHJs adapt inspection checklists from models such as the IREC Model Inspection Checklist for Rooftop PV, so confirm what your jurisdiction uses.
What Happens After a New Solar Installation?
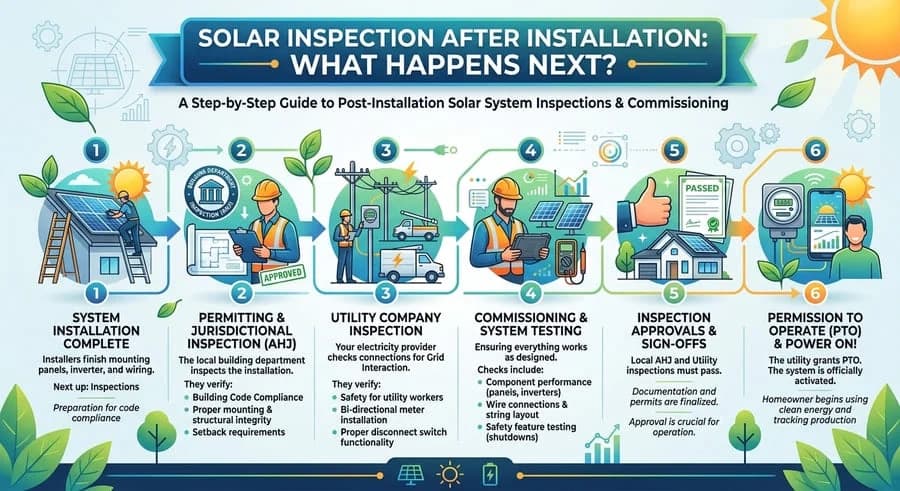
For a new installation, the local AHJ may require an inspection to verify that the installed system complies with the applicable requirements and approved plans. Depending on the jurisdiction and project, the process may involve:
- Completing the solar installation
- Scheduling the required inspection
- Having the AHJ inspect the installation
- Correcting any issues identified
- Completing a reinspection if required
- Moving forward with the utility and interconnection process
- Receiving permission to operate when all applicable requirements are satisfied
The exact process varies by location and utility. If the inspector issues corrections that require plan revisions, our guide on how to respond to solar permit corrections walks through the process. For the full walkthrough of this stage, read our complete guide to solar inspection after installation.
How Often Should Solar Panels Be Inspected?
There is no universal inspection interval that applies to every solar system. The appropriate schedule can depend on:
- Manufacturer and installer recommendations
- System age
- Local weather conditions
- Roof conditions
- Environmental exposure
- Maintenance history
- System performance
- Previous equipment problems
NREL’s best practices guide for PV and storage operations and maintenance emphasizes planned, preventive maintenance over reacting to failures. An inspection may also be appropriate after a significant storm, visible damage, unusual system behavior, or an unexplained decrease in production. For routine maintenance, follow the recommendations provided with your specific equipment and installation.
Keep Your Solar System Safe and Productive
A routine solar panel inspection is a simple way to catch visible damage, shading, roof concerns, and performance changes early. Stay on the ground, document what you see, and leave electrical, structural, and roof work to qualified professionals. If you identify an electrical, structural, roofing, or equipment problem, do not attempt to repair it yourself unless you are qualified to do so.
Need Help With a Solar Inspection After Installation?
If your solar system has already been installed and you are preparing for a required AHJ inspection, the process is different from a routine maintenance inspection. Solar Permit Solutions provides PE-stamped, permit-ready plan sets for residential solar design, commercial solar design, and off-grid solar design projects across all 50 states, along with plan revisions and permitting support. Submit your project to get started.
Frequently Asked Questions
How do I inspect my solar panels?
Start with a safe visual inspection from the ground or another accessible area. Look for visible panel damage, shading, roof problems, damaged wiring or conduit, mounting issues, inverter warnings, and changes in system production.
Do not climb onto the roof or open electrical equipment unless you are properly trained and equipped.
What should I look for when inspecting solar panels?
Check for visible panel damage, new shading, damaged mounting components, roof problems, damaged wiring or conduit, inverter warnings, monitoring issues, unusual production changes, and signs of weather damage.
How often should solar panels be inspected?
There is no single schedule that applies to every installation. Follow manufacturer and installer recommendations, and consider an inspection after severe weather, visible damage, unusual system behavior, or an unexplained production decrease.
Should I inspect my solar panels after a storm?
Yes. A professional evaluation may be appropriate after significant hail, wind, lightning, falling branches, or other severe weather. Some damage may not be obvious from the ground.
Can I inspect solar panels myself?
You can perform a basic visual inspection from a safe location, but electrical, structural, roof, and equipment problems should be evaluated by qualified professionals.
Do not climb onto the roof, touch exposed wiring, open electrical equipment, or attempt repairs as part of a basic inspection.
How do I know if my solar panels are damaged?
Visible cracks, broken glass, discoloration, physical impact, damaged frames, or other unusual conditions may indicate damage. A decrease in production can also justify further investigation, although reduced production can have many causes.
What does a professional solar inspection include?
Depending on the purpose of the inspection, a professional may evaluate the modules, mounting system, roof attachments, wiring, electrical equipment, inverter, battery system, system production, and other components.
The scope depends on whether the inspection is for maintenance, troubleshooting, damage assessment, or a required permit inspection.
What is the difference between a solar panel inspection and a final solar inspection?
A solar panel inspection may refer to checking the condition and operation of an existing system. A final solar inspection is generally part of the permitting process for a newly installed system and focuses on applicable installation and code requirements.
Do solar panels need to be inspected after installation?
A newly installed solar system may require an inspection by the local AHJ before the project can proceed through the remaining approval or utility process. Requirements vary by jurisdiction.
What happens if a solar installation fails inspection?
If an AHJ identifies problems during a required final inspection, the installer may need to correct the issues and schedule a reinspection. The exact process depends on the local jurisdiction.
Skip the Permit Headaches
We design plan sets that pass inspection the first time. Code-compliant, PE-stamped, accepted by AHJs nationwide.
SPS Editorial Team
Solar Permit Solutions
Solar Permit Solutions provides professional solar permit design services for residential, commercial, and off-grid installations across all 50 states. Our team ensures permit-ready plan sets delivered fast.
Related Articles
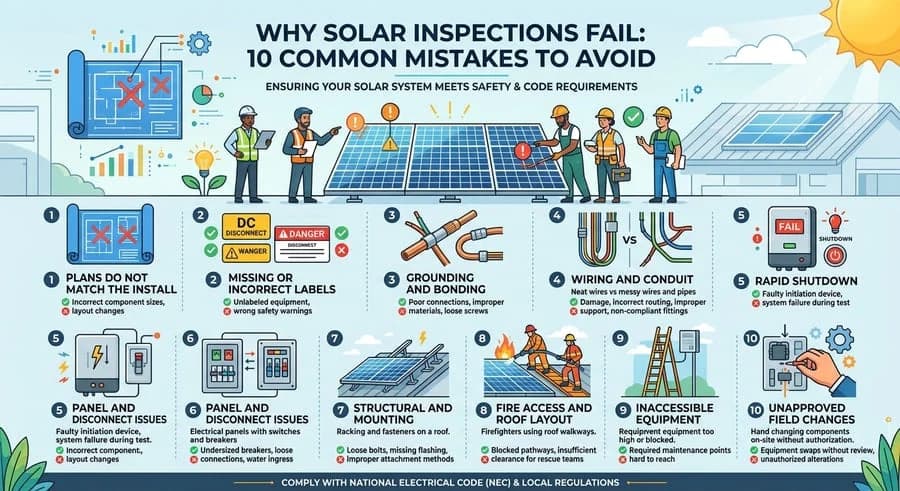
Why Solar Inspections Fail: 10 Common Mistakes to Avoid
Discover the 9 critical reasons solar inspections fail and how to avoid costly m...
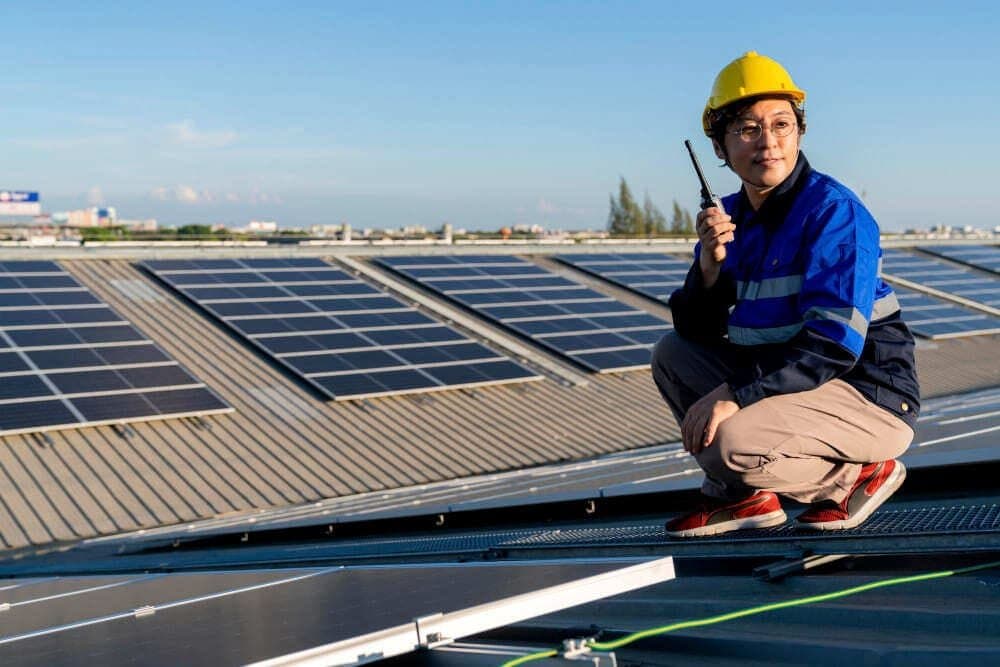
Solar Grounding And Bonding: How To Pass Inspection Every Time
Learn how to pass solar grounding and bonding inspections every time. Avoid comm...
Solar Inspection After Installation: What Happens Next?
Learn how to pass your solar inspection by following essential tips for obtainin...