Solar panel testing is the process of measuring voltage, current, and power output using a digital multimeter to verify panels function correctly and produce expected electricity. To test solar panels, set your multimeter to DC voltage mode and measure open circuit voltage (VOC) at the positive and negative terminals, then switch to DC amperage mode to check short circuit current (ISC). Panels producing readings within 10% of manufacturer-rated specifications under direct sunlight indicate healthy operation.
Testing becomes necessary when electricity bills increase unexpectedly, the inverter displays error codes, visible damage appears on panel surfaces, or batteries fail to reach full charge. Solar panels degrade approximately 0.5% to 1% annually, according to National Renewable Energy Laboratory studies, making baseline testing essential for systems older than ten years.
Most residential solar systems benefit from quarterly visual inspections and biannual multimeter output verification. Professional evaluation using thermal imaging and I-V curve analysis is recommended annually for systems exceeding 5 kW capacity or installations beyond ten years old. Discovering that solar panels are not producing power can be frustrating, especially after investing thousands of dollars in a renewable energy system. The good news is that most solar panel problems have straightforward solutions that homeowners can identify before calling a technician. According to the International Energy Agency’s Renewables 2024 report, solar installations continue growing rapidly worldwide, making troubleshooting knowledge increasingly valuable for homeowners.
This guide covers step-by-step multimeter testing procedures, safety precautions for working with energized panels, warning signs indicating testing urgency, recommended testing schedules, and criteria for choosing between DIY diagnostics and professional evaluation services. For those still planning their installation, understanding the solar permitting process helps avoid many common problems from the start.
Quick Diagnostic Checklist Before Starting
Before diving into detailed troubleshooting, performing a quick 10-minute assessment can often identify the problem immediately. This rapid diagnostic approach saves time and helps determine whether the issue requires professional intervention or a simple fix.
- Check the inverter display: Look for error codes, warning lights, or a blank screen. The inverter serves as the brain of the solar system and typically provides the first indication of problems.
- Verify breakers have not tripped: Inspect both the AC disconnect near the inverter and the main electrical panel. A tripped breaker is one of the simplest fixes but is often overlooked.
- Look for obvious shading or debris: Walk around the property and observe the panels from ground level. New obstructions like tree growth or accumulated debris may be blocking sunlight.
- Check the monitoring app: Review production data for sudden drops or gradual decline. Comparing current output to historical performance reveals patterns that indicate specific problems.
- Inspect visible wiring for damage: Look for chewed cables, disconnected conduit, or weather damage without touching any components.

Essential Safety Precautions For Solar Troubleshooting
Solar panels generate electricity whenever exposed to light, making safety absolutely critical during any troubleshooting activity. Even on cloudy days, panels produce enough voltage to cause serious injury or death. Following proper safety protocols protects both the person performing the inspection and the equipment itself.
Required Personal Protective Equipment (PPE): Wear insulated gloves rated for electrical work, safety glasses or goggles, nonslip rubber-soled footwear, and long sleeves. A hard hat is recommended when working near rooftop equipment.
System Shutdown Procedure: Always shut down the solar system completely before performing any inspection beyond visual observation. This typically involves turning off the AC disconnect, DC disconnect, and the main breaker feeding the inverter. Consult the system manual for the specific shutdown sequence.
DC Voltage Dangers: Most homeowners underestimate DC voltage risks. A typical residential solar array produces 300 to 600 volts DC, which is significantly more dangerous than household AC current. DC electricity causes sustained muscle contractions that prevent victims from releasing their grip on energized components. Understanding solar panel safety codes helps ensure proper precautions during any system work.
NEC 690 Rapid Shutdown Requirements: Systems installed after 2017 should have rapid shutdown capability that reduces rooftop voltage within seconds of activation. Understanding solar rapid shutdown requirements helps during troubleshooting and ensures your system meets current safety standards.
When DIY Becomes Dangerous: Never attempt repairs involving direct contact with electrical components, work on the roof without proper fall protection, or troubleshoot during wet conditions. If uncomfortable with any aspect of the inspection, stop immediately and contact a licensed professional.
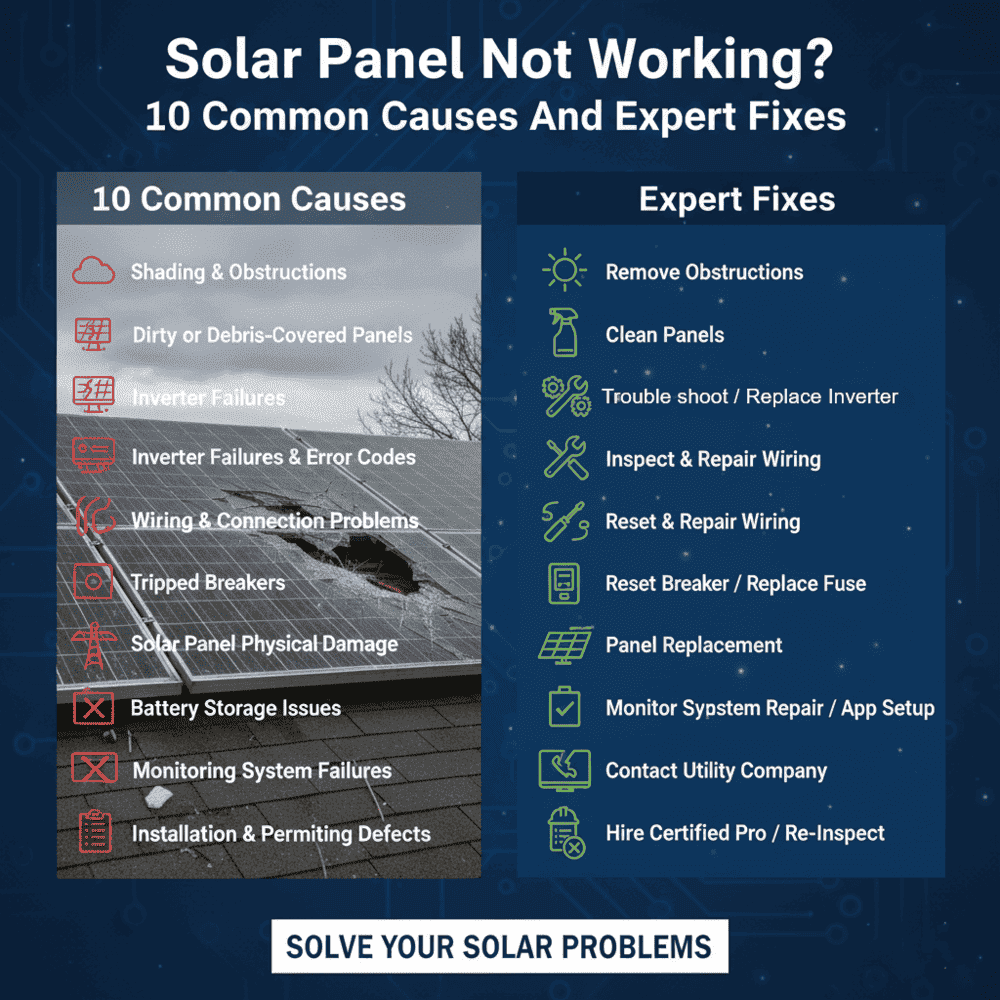
10 Common Reasons Solar Panels Are Not Working
1. Shading And Obstructions
Shading represents the most common cause of solar panel underperformance, and even partial shading creates disproportionate power losses. Understanding how shading affects solar systems explains why a small shadow can devastate overall production. Research from NREL’s solar energy research division confirms that shading impacts remain one of the most significant performance factors for residential installations.
Solar panels wire cells in series, requiring electricity to flow through each cell sequentially. When shade blocks even one cell, it restricts current across the entire string like a clogged pipe. Bypass diodes help reroute power around shaded sections, but losses remain substantial. Covering just 10% of a panel surface can slash output by 50% or more.
Shading patterns shift throughout the year as the sun’s path changes seasonally. Systems producing optimally during summer months may suffer significant shading in winter when the sun tracks lower across the horizon. Trees without leaves in winter can become major obstructions once spring foliage fills in.
New construction on neighboring properties introduces shading that did not exist during original system design. Buildings, additions, or structures on adjacent lots may cast shadows at certain times of day. Tree growth also creates evolving shade problems since branches trimmed during installation regrow continuously. Fast growing species can establish new shading issues within a single season.
Fix: Trim vegetation creating shadows, ensuring cuts are made properly to prevent damage to trees. For persistent shading from structures, consider relocating affected panels or installing microinverters or power optimizers that allow each panel to operate independently. These module-level power electronics minimize the impact of partial shading by isolating affected panels from the rest of the array.
2. Dirty or Debris-Covered Panels
Accumulated dirt, dust, pollen, bird droppings, and debris create a film that blocks sunlight from reaching solar cells. While rain cleans panels in many climates, certain conditions require manual intervention to maintain optimal performance.
Common Contaminants: Dust and dirt accumulate gradually, especially in arid climates or areas near construction sites. Pollen creates a yellow film during spring months. Bird droppings cause localized hot spots that reduce output and can damage cells over time. Fallen leaves and pine needles collect along frame edges and between rows of panels.
Snow Coverage: In cold climates, snow accumulation completely blocks production until it melts or slides off. Light dustings often clear naturally, but heavy wet snow may require removal. Never use sharp tools or hot water to remove snow, as thermal shock can crack the glass.
Expected Output Loss: Studies show dirty panels can lose 15% to 25% of their output depending on contamination severity. In dusty environments without regular cleaning, losses can exceed 30%. The economic impact makes regular cleaning worthwhile for most installations.
Fix: Clean panels with a soft brush or sponge and plain water. Avoid abrasive materials that scratch the glass surface. For stubborn deposits, use a mild soap solution. Clean during cool morning hours to prevent thermal stress from cold water on hot glass.
3. Inverter Failures And Error Codes
The inverter converts DC electricity from solar panels into AC power for home use, making it the most critical active component in the system. Inverter problems are responsible for the majority of solar system service calls, but many issues have simple solutions.
Common Inverter Error Codes: Each inverter manufacturer uses different error code systems, but common issues include ground faults (indicating insulation breakdown in wiring), arc faults (detecting dangerous electrical arcing), grid voltage errors (utility power outside acceptable range), and over-temperature warnings (inverter overheating). Consulting the inverter manual or manufacturer website provides specific code definitions.
Ground Faults: Ground fault errors indicate current is flowing where it should not, typically through damaged wire insulation to ground. This safety mechanism shuts down the system to prevent fires or electrocution. Ground faults require professional diagnosis to locate the insulation failure.
Arc Faults: Arc fault detection systems identify dangerous electrical arcing that can start fires. Loose connections, damaged wires, or corroded terminals commonly cause arcing. While arc fault errors sometimes result from false detection, they should always be investigated promptly.
Grid Voltage and Frequency Issues: Inverters monitor utility grid voltage and frequency to ensure safe operation. If grid power falls outside acceptable parameters, the inverter shuts down to prevent backfeeding power during outages. These errors often resolve automatically when grid conditions stabilize. Understanding how solar panels connect to the grid helps diagnose these interconnection problems.
Overheating From Poor Ventilation: Inverters generate heat during operation and require adequate airflow for cooling. Units installed in enclosed spaces, direct sunlight, or areas with restricted ventilation may overheat and reduce output or shut down entirely during hot weather.
Fix: For minor errors, try resetting the inverter by turning it off, waiting 30 seconds, and turning it back on. Clear any debris blocking ventilation and ensure adequate airflow around the unit. Persistent errors or fault codes require professional diagnosis. Ground and arc faults should never be reset repeatedly without addressing the underlying cause.
4. Wiring And Connection Problems
Electrical connections degrade over time due to weather exposure, thermal cycling, and environmental factors. Wiring problems can cause intermittent issues that make diagnosis challenging, as the system may work normally most of the time.
Loose MC4 Connectors: MC4 connectors link solar panels together in strings. These connectors can work loose over time due to thermal expansion and contraction or improper initial installation. A loose connection creates resistance that generates heat, potentially causing further damage and reduced output.
Rodent Damage: Squirrels, rats, and other rodents find solar panel wiring attractive for chewing. Rodent damage exposes copper conductors, creating shock hazards and potential short circuits. Evidence of rodent activity includes visible teeth marks, nesting materials, and droppings near equipment.
Corroded Junction Boxes: Each solar panel has a junction box on its back containing wiring connections and bypass diodes. Water intrusion causes corrosion that increases resistance and may eventually create open circuits. Discolored or swollen junction boxes indicate moisture problems. Reviewing a solar single line diagram helps understand how components connect throughout the system.
Weather-Damaged Conduit: Electrical conduit protecting wiring can crack or separate due to UV exposure, impact damage, or improper installation. Damaged conduit allows water entry that accelerates wire deterioration. Proper solar conductor sizing per NEC standards ensures wiring meets code requirements.
Fix: Visual inspection can identify obvious damage, but testing connections requires proper equipment and expertise. Rodent guards installed around panel edges prevent wildlife access. Damaged wiring must be replaced by a qualified electrician. Never attempt to repair high-voltage DC wiring without proper training and equipment.
5. Tripped Breakers Or Blown Fuses
Overcurrent protection devices, including breakers and fuses, shut down circuits when current exceeds safe levels. While these devices prevent fires and equipment damage, their activation indicates an underlying issue that should be investigated.
AC Disconnect Tripped: The AC disconnect located near the inverter may trip due to grid disturbances, inverter faults, or wiring issues. A single trip may be a random event, but repeated tripping indicates a problem requiring investigation.
DC Disconnect Issues: The DC disconnect between panels and inverter may have tripped or developed a fault. Some systems use fuses rather than breakers on the DC side, which must be replaced rather than reset when blown. Understanding NEC fuse servicing requirements ensures safe handling of these components.
Main Panel Breaker Problems: The breaker in the main electrical panel feeding the solar system may trip independently of the dedicated solar disconnects. This often indicates issues with the utility connection or internal house wiring. Different electrical panel types for solar interconnection have varying requirements for proper integration.
Combiner Box Fuse Failures: Larger systems use combiner boxes to merge multiple panel strings before the inverter. Each string typically has its own fuse, and a single blown fuse reduces output proportionally while leaving other strings operational.
Fix: Reset tripped breakers once after ensuring no obvious damage exists. If the breaker trips again immediately or shortly after reset, do not continue resetting. Replace blown fuses with exact replacements having the same amperage and voltage ratings. Repeated breaker trips or fuse failures require professional diagnosis to identify the underlying cause.
6. Solar Panel Physical Damage
Solar panels are remarkably durable but not indestructible. Physical damage reduces power output and can create safety hazards. Some damage is obvious, while other types require specialized equipment to detect.
Microcracks: Tiny cracks in solar cells often remain invisible to the naked eye but progressively worsen over time. Microcracks result from manufacturing defects, shipping damage, improper handling during installation, or thermal stress. These cracks interrupt current flow and create hot spots that accelerate degradation.
Hail Damage: Severe hailstorms can crack panel glass or damage underlying cells even when glass remains intact. After significant hail events, inspect panels for visible damage and monitor production for unexpected drops. Most quality panels are tested to withstand one-inch hail at typical velocities, but larger stones or unusually severe storms can cause damage.
Hot Spots and Cell Degradation: Damaged or shaded cells can become hot spots that generate heat instead of electricity. These hot spots accelerate local degradation and may eventually cause visible burn marks on the panel surface. Thermal imaging cameras reveal hot spots invisible to normal inspection.
Delamination and Moisture Ingress: The protective layers bonding panel components together can separate over time, allowing moisture to enter. Moisture causes corrosion, reduces performance, and eventually leads to complete cell failure. Bubbling, discoloration, or visible moisture inside the panel indicates delamination.
Fix: Thermal imaging inspection identifies hot spots and damaged cells not visible to the eye. Minor damage may be covered under the manufacturer warranty, which typically guarantees performance for 25 years. Severely damaged panels require replacement. Document any storm damage promptly for insurance claims. When panels reach the end of life, the EPA provides guidance on solar panel disposal regulations to ensure proper handling.
7. Battery Storage Issues (For Systems With Batteries)
Solar battery systems add complexity that creates additional potential failure points. Battery problems may masquerade as panel or inverter issues, making accurate diagnosis important for effective repairs.
Battery Not Charging: When batteries fail to charge despite adequate solar production, the issue may involve the charge controller, battery management system, or the batteries themselves. Check that the system is configured to charge batteries rather than export to the grid, as incorrect settings are a common cause.
Rapid Discharge Problems: Batteries that discharge much faster than expected may have degraded capacity, parasitic loads draining power, or incorrect depth of discharge settings. Compare actual capacity to rated specifications to determine if degradation has occurred.
BMS (Battery Management System) Faults: The battery management system monitors cell voltages, temperatures, and charge states to protect the battery. BMS faults may prevent charging or discharging even when batteries are healthy. Error codes from the BMS provide specific diagnostic information.
Temperature-Related Performance Drops: Lithium batteries perform poorly in extreme temperatures. Cold weather reduces available capacity, while excessive heat accelerates degradation and may trigger protective shutdowns. Batteries installed in unconditioned spaces experience greater temperature fluctuations.
Fix: Verify system settings match intended operation. Check battery temperature and ensure installation location provides adequate climate control. Monitor state of charge and cycle counts to assess battery health. BMS errors typically require manufacturer support to diagnose. Most battery issues should be addressed by qualified technicians due to the energy stored in these systems.
8. Monitoring System Failures
Solar monitoring systems track production data and alert owners to problems. When monitoring fails, it may appear that the solar system has stopped working even though panels continue producing power normally.
WiFi Connectivity Issues: Most monitoring systems transmit data over WiFi, making them dependent on reliable internet connectivity. Router changes, password updates, or network congestion can disrupt communication. The monitoring gateway may need reconfiguration after any network changes.
Gateway And Communication Device Problems: The monitoring gateway collects data from the inverter and transmits it to cloud servers. These devices can fail, lose programming, or become corrupted. Power cycling the gateway often resolves communication issues.
Software Glitches Showing False Readings: Monitoring software occasionally displays incorrect data due to bugs, synchronization issues, or server problems. Compare app readings to the inverter display, which shows real-time production independently of the monitoring system.
Fix: Power cycle the monitoring gateway by unplugging it for 30 seconds. Verify WiFi connectivity and update credentials if the network password has changed. Check that the monitoring app is updated to the latest version. Contact the monitoring service provider if issues persist after basic troubleshooting. Resources like EnergySage offer helpful guides for understanding monitoring system features and troubleshooting common issues.
9. Grid Connection Problems
Grid-tied solar systems must synchronize with utility power to operate. Problems with the grid connection can prevent the system from exporting power or cause unexpected shutdowns.
Utility Meter Issues: The utility meter measures power flowing to and from the grid. Meter malfunctions may record incorrect values, fail to credit exported power, or send fault signals that affect system operation. Contact the utility company if meter readings seem inconsistent with actual production.
Net Metering Not Crediting Properly: Net metering policies vary by utility and may change over time. Verify that the account is enrolled in the correct rate program and that exported power receives appropriate credit. Billing errors can accumulate for months before becoming apparent.
Anti-Islanding Protection Activating Incorrectly: Inverters include anti-islanding protection that shuts down the system when grid power fails, preventing dangerous backfeed to utility workers. Sensitive settings or unstable grid power can cause false trips. Utilities may need to adjust local voltage or frequency regulation. Understanding solar supply side connections helps navigate complex interconnection scenarios.
Grid Outages Affecting Production Reporting: Brief grid disturbances may cause the system to shut down and restart without obvious indication. Production monitoring may show gaps or reduced output during these events even though no actual problem exists with the solar equipment.
Fix: Contact the utility company for meter testing or net metering enrollment verification. Report frequent anti-islanding trips to both the installer and utility, as grid voltage regulation may need adjustment. Document outages and compare to production gaps to identify grid-related issues.
10. Installation And Permitting Defects
Installation errors and code violations can cause persistent problems that surface months or years after the system begins operating. Proper permitting and inspection processes exist specifically to catch these issues before they cause problems. The REN21 Global Status Report highlights that installation quality remains a key factor in long-term system performance worldwide.
Improper Panel Orientation or Tilt Angle: Panels installed at the wrong angle or facing the wrong direction produce less power than properly oriented arrays. While not technically a malfunction, orientation errors represent permanent performance losses that should have been addressed during design and installation.
Undersized Wiring From Original Installation: Wire gauge must match system current to prevent overheating and voltage drop. Undersized wiring causes energy losses, creates fire hazards, and violates electrical codes. This error typically results from cost-cutting during installation.
Code Violations Causing System Shutdowns: Building inspectors or utility interconnection reviews may identify code violations requiring correction before the system can operate. Common violations include improper grounding, missing disconnects, inadequate labeling, and structural attachment issues. Learning how to pass your solar inspection helps avoid these common pitfalls.
Failed Inspections Requiring Corrections: Systems that fail initial inspection cannot legally operate until corrections are made and reinspection passes. Some installers leave systems in this limbo state, especially if they are experiencing business difficulties or dispute the inspection findings. Understanding what happens if you install solar without a permit underscores the importance of proper compliance.
Fix: Request a professional system audit from an independent solar contractor not affiliated with the original installer. Verify permit status with the local building department and ensure the final inspection has passed. Address code violations promptly, as they may affect insurance coverage and property sale. Following solar permitting best practices helps ensure smooth approvals.
Solar Permit Solutions
Need Solar Permit Plans?
Professional, permit-ready solar plan sets delivered fast. Residential and commercial projects across all 50 states.
DIY Fixes Vs When To Call A Professional
Knowing when to attempt repairs independently versus calling a professional prevents both unnecessary service calls and dangerous situations. The following guide helps determine the appropriate response to common issues.